Share this page


Data files
This topic describes the advantages of using data files and how to use them.
Use data files
You can upload data files and assign them to scripts so that the scripts can use their contents instead of having to input the data directly into the scripts. This is especially useful when multiple scripts use the same data (for example, paths, URLs or credentials). When the data changes, you only need to update and reload the data files, instead of having to manually update multiple scripts.
Data files associated with a script are deployed on load generator machines at runtime and extracted into the script's folder.
The folder structure inside the data file is maintained, but existing files in the script folder are overwritten.
Data files are not exclusively for data or parameter files. You can also use them to share common items, such as header files, code, and TruClient function libraries.
Assume you have a common login implementation defined in the login.h header file which is used by multiple scripts. You can create a .zip file to include the login.h file and its dependencies, and upload it as a data file to OpenText Core Performance Engineering. Then, associate it with all scripts which need the implementation. Should you choose to include a shared transaction in your data files, all the scripts that need to use this transaction must include a reference to it.
If you want to update the common login implementation, you create a new .zip file to include the updated implementation, then reload the data file in Assets > Data files.
All scripts associated with the data file automatically use the new implementation.

Prepare data files
The following guidelines apply to data files:
-
Data files must be uploaded as a .zip file.
-
The size of a data file, both compressed and decompressed, is limited (see Data file limitations). To optimize the test initialization process, we recommend that you avoid using large files.
-
For trial versions of OpenText Core Performance Engineering, the total of all .zip files cannot exceed 200 MB.
-
The maximum number of data files that can be uploaded per tenant is 100 for trial versions and 5,000 for non-trial versions.
-
By default, the following file types are supported: c, cfg, csv, dat, doc, docx, h, htm, html, java, jar, jpg, js, json, pdf, png, ppt, pptx, txt, xml, xls, xlsx, yml, yaml, zip.
Organize data files in a Git repository
You can connect to an existing Git script repository and add data files to your OpenText Core Performance Engineering assets. For details, see Git integration.
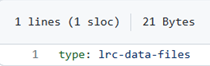
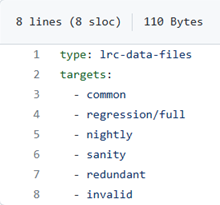
Each data file in a Git repository is a folder. To identify these data file folders, add a configuration file called data.yml in the repository. In the file, include a type member with the value lrc-data-files. In addition, you can include the name and relative path of directories that contain data file folders. The Git agent searches the directory containing the .yml file, as well as any other directory referenced in the file, and identifies every folder in these directories as a data file.
Examples
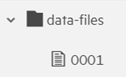
This data.yml file only includes the lrc-data-files type member and the directory that contains the data.yml file also contains a data file folder.
| data.yml file content | Structure in Git repository | Structure in OpenText Core Performance Engineering |
|---|---|---|
|

|
|
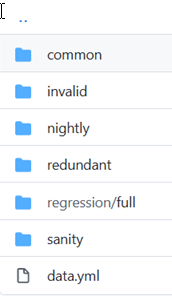
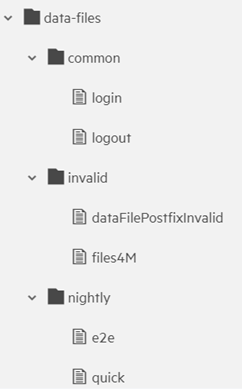
The following data.yml file includes the lrc-data-files type member as well as the names and relative paths of other directories that contain data file folders.
| data.yml file content | Structure in Git repository | Structure in OpenText Core Performance Engineering |
|---|---|---|
|
|
|
Upload and manage data files
To upload and manage data files, select Assets > Data Files.
Data files that have been uploaded are displayed in a list. For each data file in the list, the number of scripts to which the data file has been assigned is also displayed. For a selected data file, additional information is shown, including the files that comprise the .zip file and the scripts to which the data file has been assigned. In addition, for Git data files, information about the Git agent and repository is displayed and you can also click the Commit history link to view the last ten commits.
| Action | Task |
|---|---|
| Upload |
|
| Upload from Git |
Note: This action is only available if you are connected to a Git repository. For details, see Git integration. |
| Reload |
|
| Reload from Git |
Note: This action is only available if you are connected to a Git repository. For details, see Git integration. |
| Sync |
Note: This action is only available for data files in a Git repository. |
| Download |
Select the data file in the list and click the Download button The file is saved in the default Downloads directory in the local file system. |
| Delete |
Select the data file in the list and click the Delete button Deleting a data file removes it from any assigned scripts and also from the current project. |
 to sync the data files with the Git repository.
Assign data files to scripts
You assign one or more data files to a script through Assets > Scripts or the Load tests > Load profile pane.
For details, see Assign data files.
 See also: