Change Requests Overview
To use the change request tracking system effectively, you need to understand the model on which it is based.
About Change Requests
The change request component allows you to:
- Attach change requests to any folder. In the application, change requests can be attached to any project folder or shared among folders or other views in the same server configuration. You can also link a change request to any other item, such as a file. In many other defect tracking systems, a change request can be associated only with a project, even though it requires modification of a particular file.
- Save time when updating change requests. When you check in a file or group of files, you can indicate the change requests that are fixed by the files being checked in. This feature saves the time required to change the status of each change request separately.
- Make only appropriate status changes. When you create a change request, the status options are
New,Open,Deferredor a resolution. The resolutions areCannot Reproduce,As Designed,Fixed,Documented, andIs Duplicate. After resolution, a change request can only be verified or reopened. After verification, a change request can only be closed or reopened. - Benefit from automatic changes based on the status of the change request. The application automatically changes the person responsible to coincide with the current status of the change request. When a change request is resolved, the responsibility for the change request automatically reverts to the person who entered the change request, who is usually the best person to verify its resolution. When a change request is reopened after being resolved, the responsibility is automatically set to the user who resolved it. If desired, you can override these automatic changes and make another person responsible.
- Base change requests on the build in which the change request is resolved. When a change request receives a Fixed or Documented status, the value of its Addressed In Build field becomes Next Build. When that build label is created, the application replaces Next Build with the name of the build label, letting testers know the build to use when verifying change requests.
Note: This help system explains how to use the standard property dialog to create and edit change requests. Depending on how your team has set up the application, you may see a different dialog called an alternate property editor (APE). Even if you use the standard property dialog for change requests, your company or team leader may implement change request guidelines that differ from those discussed in this help system.
Change Request Tracking System Model
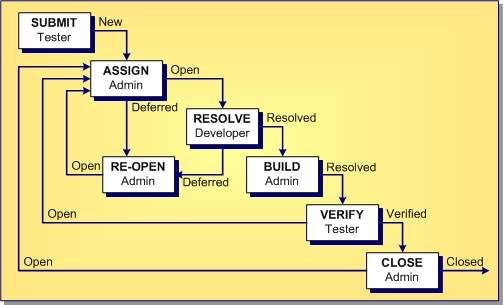
The following diagram and procedure show the change request tracking process. The boxes represent the steps taken from the time that the change request is submitted until the time it is closed. Each box indicates an action and the team member most likely to be responsible for performing this action. The arrows show the status of the change request at the time of each step.

The change request tracking system consists of the following steps:
| Step 1 |
A team member creates a new change request that does either of the following:
This change request has a status of
|
| Step 2 |
Another person, such as an administrator or team leader, decides whether to fix the problem or add the suggested enhancement to the product. This person can:
Change requests with an
|
| Step 3 |
The person assigned to resolving the change request changes the status of the change request to
|
| Step 4 |
Next, a team member (usually a tester or quality assurance engineer) verifies the change request. For example, a test case may be developed to determine if the problem is really fixed, documented or not reproducible and changes the status to one of the following verified statuses:
|
| Step 5 |
Finally, another team member changes the status to
|
In most of the above steps, the change request can be reopened and reprocessed.
Built-in Workflow for Change Requests
StarTeam has a built-in workflow for change requests that automatically sets many of the values associated with change requests. This built-in workflow determines these settings based on the setting of the Status field for the change request.
You cannot add additional settings to the
Status field. However, you can rename them to better suit preferences set by your organization. For example, your organization may prefer to change the name of the value
New to
New Change Request.
When you alter the status of a change request, the built-in workflow automatically selects the appropriate properties associated with the change in status.
After selecting
New,
Open, or
In Progress, six new statuses display in the
Status list. These statuses, which are associated with the status you selected, are:
DeferredCannot ReproduceAs DesignedFixedDocumentedIs Duplicate
Lifecycle for Change Requests

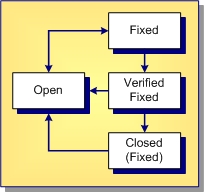
The above diagram shows the lifecycle for a change request with an initial status of
Open. The status was then set to
Fixed. After this setting, the built-in workflow added an additional status field of
Verified Fixed. Finally, the change request was closed, meaning its status was set to
Closed (Fixed).
The diagram also shows that a change request can be reopened at any stage in its lifecycle because the arrows leading from each of the three fixed statuses can lead back to the Open status at any time.
Summary of the Change Request Automatic Workflow
The following summarizes the steps used in processing change requests as explained in this topic. It includes the automatic workflow changes the application makes to change requests based on their statuses.
| Submit |
Anyone (usually a tester or quality assurance engineer) can submit a change request. Process: Select the Change Request tab. Then select New from the Change Request or context menu. A change request has the following default properties (which you can change if necessary). Status:
Severity:
Priority:
Type:
Platform:
Last Build Tested:
Entered by:
Many other fields are initially blank. Some team leaders prefer to have all change requests submitted at the root folder. They use drag-and-drop to move the change requests to the appropriate child folders. |
| Assign* |
Process: The team leader finds all new change requests and does one of the following:
|
| Resolve |
Process: Users find the
|
| Build |
Who builds the project? The project view may have a formal or informal build process. However, at some point, all the files, and so on currently in the view receive that build label. It is usually applied to the source code files, and so on that were compiled (and may need to be changed) rather than to the executable files that result from the build. Effect on change requests: For any resolved change request that has
Note: If a new build label is based on a past configuration (rather than the current configuration), it has no effect on the
|
| Verify* |
The person who submitted the change request (usually a tester or quality assurance engineer) verifies a resolution. Process: Install the build in which the resolution is to be verified and determine whether the change request has been resolved correctly. Do one of the following:
|
| Close* |
Usually the team leader closes the change request. Process: The team leader does one of the following:
|
*Changes in status can result in automatic changes to other properties.


