Conditionally Linking Steps
A link can indicate that a transition from one step (or enumerated value) to another is valid only when an item property other than the workflow control property has specific values. For example, suppose you have two steps named “1. New” and “2h. Suggestion Review”. Suppose that the user can select “2h. Suggestion Review” as the next value for an item’s workflow control property only when the Type property has the value “Suggestion”. To show this in the workflow, you connect the two steps with a conditional link. A conditional link is a dotted arrow pointing to the step that is available only when the condition is true.
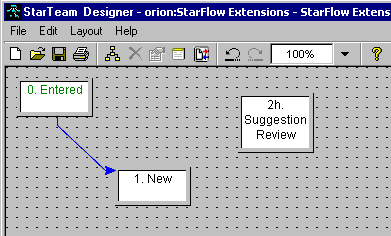
The following figure shows the workspace with the “0. Entered”, “1. New”, and “2h. Suggestion Review” steps, but no link has yet been created between the “1. New” and “2h. Suggestion Review” steps.

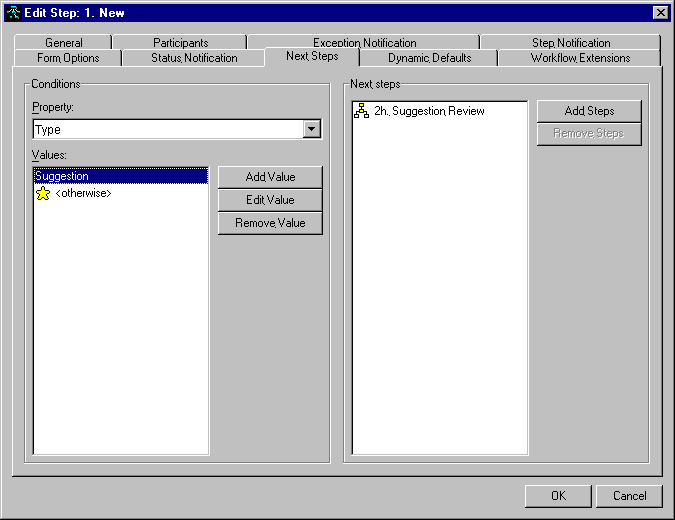
The next figure shows how this conditional transition would be displayed in the Next Step tab of the Edit Step dialog box. You must use this dialog to create conditional links. They cannot be created manually within the workspace.

When you specify a condition, you select a property and one or more values. For each value, you select one or more steps that are appropriate transitions for an item whose property is set to that value—an item that meets that condition. In this example, the conditional property is Type. When the value of that property is Suggestion, the user can select “2h. Suggestion Review” as the next value of the workflow control property.
If the steps and links have not already been drawn manually, Workflow Designer creates a step for each step listed in the Next Steps list. It also creates links from the selected steps to those steps. The steps and links are drawn automatically and layered in the upper left corner of the workspace. Use Automatic Layout to reposition the steps or drag each step to an appropriate location using the mouse.
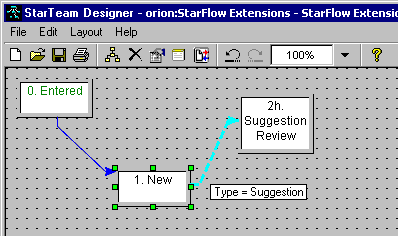
Hovering over the link displays these values. They can also be displayed as text in the workspace. As you open existing workflows, this text is on by default.
The next figure shows these steps and links after the mouse has hovered over the new conditional link long enough to display the conditional information.

If the steps were already drawn manually, but not the links, Workflow Designer draws the links. In each case, the link starts from the first step’s left edge and ends at the second step’s right edge, regardless of the locations of these steps in the workspace.
If the links were already drawn, there already are steps listed as possible transitions for <otherwise>. If you add a condition, they remain in place but they become conditional links as well as <otherwise> links. Only one link is ever drawn between two steps, although the link may have more than one value (including <otherwise>) for the conditional property.
If all the possible values for the conditional property appear in the Next Steps tab, the <otherwise> condition may be left blank. We do not recommend this because if an additional value is added to the conditional property, an item with that new value as its setting becomes stranded. It has no next step to go to.
To conditionally link steps:
- In the workspace, double-click an existing step. The Edit Step dialog box opens.
- Click the Next Steps tab.
- From the Properties list, select the property on which to base the condition (for example, the Type property).
- Click Add Value. The Select a Value dialog box opens.
-
Do one of the following:
-
Select a value for the condition (for example,
Suggestion), then click OK. The value appears in the Values list and is s -
Select a property from the Value of Property list so that the condition becomes dependent upon the value of that property.
For example, suppose the property in the Properties list is Entered By. You can select another property of the same type such as Locked By from the Value of Property list. Your condition is equivalent to "When the value of these two properties is the same.”
-
Select a value for the condition (for example,
- Click OK.
- Click Add Steps. The Select Next Steps dialog box opens.
- Select one or more next steps and click OK.
- (Optional.) Repeat steps 4 through 8 of this procedure to select additional values of the specified conditional property and the steps available for transition when the conditional property has those values.
- Select <otherwise> to specify the workflow steps to which the item is linked (and, therefore, the values of the workflow control property to which the user can transition) when no conditions exist or no conditions are met. Repeat steps 7 and 8 of this procedure to select those workflow steps.
- (Optional) Use the Edit Value, Remove Value, and Remove Steps buttons to make corrections as needed.
- When you click OK to close the Edit Step dialog box, any steps that were specified as next steps and were not yet drawn appear in the upper left corner of the window. Note that the link appearance is different when the link is conditional.
When Editing an Item:
Suppose that you are editing an item at “1. New” step and the item’s Severity is High. Further suppose that, in the workflow, the step “1. New” has a conditional link to the step “2a. Open” and another conditional link to the step “2b. Emergency”. The condition attached to the link between “1. New” and “2b. Emergency” is equivalent to “When Severity is High”. The condition attached to the link between “1. New” and “2a. Open” is equivalent to “When Severity is Low”. Then the only value you can choose for the workflow control property at this step is “2b. Emergency”.
If you change the value of Severity to Low, the APE changes the value (step) that can be selected from the workflow control property’s list to “2a. Open”.


