Configure the Oracle AQ agent
Supported for: Windows only
This task describes how to configure the Service Virtualization Oracle AQ agent.
Tip: The ODP (Oracle Data Provider) for .NET 11g is part of ODAC 11.2, and can be downloaded from the Oracle download site.
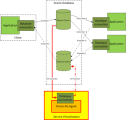
The Service Virtualization Oracle AQ Agent serves to virtualize communication between applications that are using Oracle Advanced Queuing. It supports buffered and persistent multi-user queues with UDT and XML payloads.
The Service Virtualization Oracle AQ Agent requires:
- one AQ subscribing agent in the Oracle database assigned to virtualization for listening on the request queue
- optionally, a second AQ agent in the Oracle database for listening on the response queue when the virtual service is in Learning and Standby mode, and for publishing responses when the virtual service is in Simulation mode.
Requests and responses are correlated using a correlation identifier of the AQ message. You can combine UDT requests with XML responses and vice-versa. For more information on Oracle Advanced Queuing and correlation identifiers, see the Oracle documentation.
To configure the Oracle agent:
-
Prerequisites
-
To enable Service Virtualization to access the Oracle database, you must install Oracle Data Provider for .NET 11g on the Service Virtualization machine running the Service Virtualization Oracle AQ agent. The Oracle AQ agent requires Oracle Data Provider for .NET 11g to access the Oracle database. Oracle Data Provider for .NET 11g is a part of ODAC 11.2, which can be downloaded from the Oracle download site.
Note: The Oracle AQ agent was tested with ODAC 11.2 only and may not work with other versions.
- You must create a subscribing agent in the Oracle database dedicated to virtualizing messages coming to the request queue (SV Subscriber in the image above) and optionally a second one dedicated to virtualizing messages coming to the response queue (SV Publisher in the image above).
-
-
Configure the agent settings
From the main menu, select Tools > Options. On the Agents Page, select OracleAQ. For user interface details, see the Oracle AQ agent settings.


