
Share this page


Configure the WebSphere MQ Non-Intrusive agent
This task describes how to configure the Service Virtualization IBM WebSphere MQ Non-Intrusive agent, configure your WebSphere MQ Server, and virtualize MQ communication.
Overview
The Service Virtualization WebSphere MQ Non-Intrusive agent enables you to virtualize WebSphere MQ communication without the need for any reconfiguration of your applications under test. You need only to deploy several libraries to the MQ server and reconfigure a queue manager. No virtual queues are required.
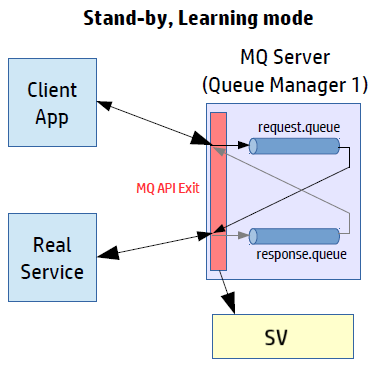
In Standby and Learning modes, messages come untouched through the MQ server, but Service Virtualization is receiving message copies.
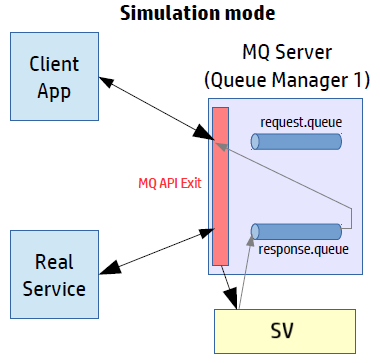
In Simulation mode, messages are processed by Service Virtualization while the real service is still running, but the real service does not receive any communication.

Supported WebSphere MQ platforms
-
Solaris 5.10 x86_64, MQ Server v7.0.1.x
-
Solaris 5.10, SPARC V9, MQ 8.0.0.0
-
Windows 2008 R2 x86_64, MQ Server v7.0.1.x
-
HP UX 11.31 Intel Itanium IA64, MQ Server v7.0.1.x
Note:
- For the most up to date information on supported versions, refer to the Support Matrix.
-
SV MQ API Exits are compiled against specific versions of operating systems and MQ servers. Testing was conducted on the same configurations as those on which they were compiled. Newer versions of the supported operating systems and MQ servers may or may not function properly.
The mq-version.txt file contains the version of MQ that was used for compilation of the libraries. The file is located in the libraries folder within the Service Virtualization installation folder. For additional details, see Configure the WebSphere MQ server.
Configure the Service Virtualization agent
-
Configure the Service Virtualization agent settings
From the main menu, select Tools > Options. On the Agents Page, select WebSphere MQ Non-Intrusive. For user interface details, see the WebSphere MQ Non-Intrusive agent settings.
-
Optional: Perform additional global configuration
You can configure additional settings using the Service Virtualization configuration files.
-
Open the appropriate file:
-
Standalone Server configuration file on Windows:
%[INSTALLLOCATION]%\Server\bin\HP.SV.StandaloneServer.exe.config
-
Designer configuration file on Windows:
%[INSTALLLOCATION]%\Designer\bin\VirtualServiceDesigner.exe.config
-
-
You can define the following element in the appSettings section of the configuration files. This configuration element sets up global behavior for processing WebSphere MQ messages.
-
<add key="MQAgent.DefaultCharacterSet" value="0"/>
Configures the default character set for simulated XML responses. Use this configuration if the character set is not recorded as message metadata. If the value is set to 0 the character set is not set.
-
-
Agent limitations
-
The WebSphere MQ Non-Intrusive Agent instance can only use queues from a single Queue manager.
-
The WebSphere MQ Non-Intrusive Agent instance can only use a single TCP channel to connect to the Queue manager.
-
CCSID configuration in the WebSphere MQ Non-Intrusive Agent instance requires an application restart.
-
CCSID configuration is global for whole the application. There cannot be two agents with different CCSIDs.
Configure the WebSphere MQ server
Note: You must have MQ administration rights to perform this configuration on the MQ server.
-
Extract the Service Virtualization MQ API Exit libraries.
After you install Service Virtualization, the libraries are in the following locations:
Designer C:\Program Files\Micro Focus\Service Virtualization Designer\Tools\WebSphere MQ Extensions\HP.SV.WebSphere_MQ_API_Exits.zip Server C:\Program Files\Micro Focus\Service Virtualization Server\Tools\WebSphere MQ Extensions\HP.SV.WebSphere_MQ_API_Exits.zip -
Unzip the file and copy the appropriate Micro Focus SV MQ API Exit libraries to the following destination folders on your MQ server.
Solaris - From
<extracted root>/<solaris version>/32bitto/var/mqm/exits - From
<extracted root>/<solaris version>/64bitto/var/mqm/exits64
Windows -
From
<extracted root>\<windows version>\32bittoC:\Program Files (x86)\IBM\WebSphere MQ\exits -
From
<extracted root>\<windows version>\64bittoC:\Program Files (x86)\IBM\WebSphere MQ\exits64
HP UX -
From
<extracted root>/<hpux version>/32bitto/var/mqm/exits -
From
<extracted root>/<hpux version>/bitto/var/mqm/exits64
IBM AIX - From
<extracted root>/<AIX version>/32bitto/var/mqm/exits - From
<extracted root>/<AIX version>/64bitto/var/mqm/exits64
- From
-
Enable the TCP/IP port.
Enable your firewalls to connect from the MQ Server to the Service Virtualization Server on a port that you specify. This port must be the same port you use in the Service Virtualization WebSphere MQ Non-Intrusive Agent settings, in the Non-Intrusive Server Port field, as defined in step 2 above.
Note: If the Service Virtualization WebSphere MQ Non-Intrusive Agent is not running and Service Virtualization Server is protected by Windows Firewall, you might experience slow performance. This is caused by the fact that the SV MQ API Exit library can not communicate with the Service Virtualization Server. This can be resolved by disabling Stealth Mode in Windows Firewall. For details, refer to Microsoft documentation.
-
On the MQ Server, update the queue manager configuration.
Append the following lines to your queue manager configuration file. By default, the file is located on the MQ Server in
<WebSphere MQ root>/qmgrs/<your QM>/qm.ini.Note: The Data parameter is limited to a maximum of 32 characters.
Solaris, HP UX, AIX:
ApiExitLocal:
Module=sv_mq_api_exit
Function=Init
Name=SV
Sequence=100
Data=<Service Virtualization hostname or IP>:<Service Virtualization TCP/IP port>
Windows:
ApiExitLocal:
Module=SvMqApiExits.dll
Function=Init
Name=SV
Sequence=100
Data=<Service Virtualization hostname or IP>:<Service Virtualization TCP/IP port>
Where:
-
<hostname or IP address> = Hostname, DNS, or IP address of the Service Virtualization machine, such as example.com or 192.168.0.2.
Note: Raw IPv6 addresses are not supported. As a workaround, you can map the IP address to a hostname in the machine's hosts file , and then use the hostname in the qm.ini file.
- <TCP port> (mandatory) = The TCP port of the Service Virtualization agent, such as 5500 or 5000.
For additional configuration parameters, see Additional queue manager configuration options.
-
- Stop and then restart your queue manager. On a Windows system, you may need to also stop and restart the IBM MQ system service.
Additional queue manager configuration options
You can define additional configuration parameters in the queue manager configuration file for debugging and timeout settings.
In qm.ini, configure the Data section of MQ API Exit definition in the following format (up to 32 characters):
<hostname or IP address>:<TCP port><timeout><log level>
Where:
- <timeout> (optional) = The TCP connection timeout value, according to the table below.
-
<loglevel> (optional) = The log level of the API exit, according to the table below.
- Note:
- The logs can consume large quantities of your disk space. This feature should be enabled for debugging only, and should be turned off by default.
-
When logging is enabled, log files with the pattern sv_mqexit_*.log are created. Those files are placed in the following folders on the MQ server machine:
- Windows: The default temp folder C:\temp.
- UNIX: The default temp folder /tmp.
You must assign write permissions for MUSR_ADMIN and other MQ-related user accounts in order to successfully generate log files and prevent the exit from crashing.
| Letter | Timeout (ms) |
|---|---|
| A | 1 |
| B | 5 |
| C | 10 |
| D | 25 |
| E | 50 |
| F | 100 |
| G | 150 |
| H | 200 |
| I | 250 (default) |
| J | 300 |
| K | 400 |
| L | 500 |
| M | 600 |
| N | 700 |
| O | 800 |
| P | 900 |
| Q | 1000 |
| R | 1250 |
| S | 1500 |
| T | 1750 |
| U | 2000 |
| V | 3000 |
| W | 4000 |
| Letter | Log level |
|---|---|
| o | OFF |
| e | ERROR |
| w | WARNING |
| i | INFO |
| d | DEBUG |
| t | TRACE |
Example: sv.domain.com:5501Ki
where:
- hostname = sv.domain.com
- TCP port number = 5501
- connection timeout = 400 ms
- log level = INFO
Create a new virtual service
Create a new virtual service, and select the appropriate WebSphere MQ Non-Intrusive option for your messaging protocol. For user interface details, see Create New Virtual Service Wizard.
You can now virtualize any request/response queue pair from the queue manager.


