Share this page


This lesson describes how to create an run a Web Application service API test, using custom activities imported into UFT One from a Web Application Description Language (WADL) file.
WADL files can store service descriptions, defining the service metadata and operations or methods. UFT One can read the WADL and create the service's methods and activities for you in the Toolbox pane.
Use custom imported services whenever standard activities do not match the processes that your app performs.
Add a Web application service test to your MyFlight Application solution to test the Web (API) later of the MyFlights app.
Do the following:
-
Start with UFT One and the MyFlight Application solution open.
For more details, see Plan your test and create a solution.
- Select the Add dropdown
 in the toolbar, and then select Add New Test.
 -
In the Add New Test dialog:
- Select API Test.
- In the Name field, enter MyFlightWADL.
- In the Location field, ensure that the test is saved in the C:\%HOMEPATH%\Unified Functional Testing directory.
Click Add to add the test to your solution.
- Continue with Import the MyFlight Web Application service model.

Import the MyFlight WADL service description and its methods into UFT One.
Do the following:
-
Start the Flight API app. For details, see Flights API layer.
Note: Keep the Micro Focus Service APIs dialog open while performing this lesson to ensure that the Flights API service is running while UFT One runs the test.
- In the Micro Focus Service APIs dialog, click Copy WADL Path to copy the service path to the clipboard.
-
In UFT One, select the Add REST Service
 toolbar drop-down, and select Import WADL from URL.
 -
In the Import WADL from URL dialog, paste the URL to the WADL path you'd copied from the Micro Focus Service APIs dialog.
-
Click OK to import the service into UFT One.
The methods are now displayed in the Toolbox pane.

- Continue with Edit the Web Application service methods in your test.
This exercise describes how to add additional properties to the service description imported from the WADL file, which will be used as the prototypes whenever you add a method to your test.
The original data imported from the WADL file is read-only, and cannot be modified after being imported.
Do the following:
-
Copy the following lines of code to a text editor, and save the file as response.xml.
<ArrayOfFlight xmlns="HP.SOAQ.SampleApp" xmlns:i="http://www.w3.org/2001/XMLSchema-instance"> <Flight> <Airlines>AA</Airlines> <ArrivalCity>Denver</ArrivalCity> <ArrivalTime>01:23 PM</ArrivalTime> <DepartureCity>London</DepartureCity> <DepartureTime>06:12 AM</DepartureTime> <FlightNumber>20279</FlightNumber> <Price>112.2</Price> </Flight> </ArrayOfFlight> -
In the Toolbox pane, right-click the Flight Service node, and select Edit Service.
-
In the Edit REST Service dialog, select the Flight Service > Flights_REST > Flights > GetFlights node on the left.
-
Select the HTTP
 tab on the right, and define the Response Body as XML.
 -
In the Response Body section, click
 , and browse to and select the response.xml file you created in step 1.
The imported properties are shown in a grid.
-
Click
 to show the properties you copied in a grid view. These are some of the properties you'll use in this test.
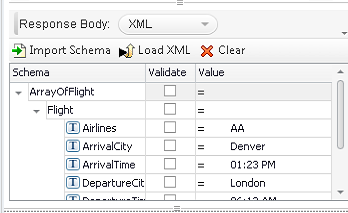
-
In the Edit REST Service dialog, select the Flight Service > Flights_REST > FlightOrders > ReserveOrder node.
-
Select the HTTP
tab on the right, and define the Request Body as XML. -
With the
 view selected, copy the following code into the XML edit box:
<?xml version="1.0" encoding="utf-8"?>
<FlightOrderDetails xmlns="HP.SOAQ.SampleApp">
<Class>Business</Class>
<CustomerName>John Doe</CustomerName>
<DepartureDate>2019-12-12</DepartureDate>
<FlightNumber>1304</FlightNumber>
<NumberOfTickets>21</NumberOfTickets>
</FlightOrderDetails>
-
Click
to show the properties you copied in a grid view. These are the rest of the properties you'll use in this test.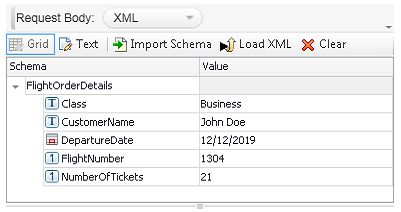
- Click OK, and save your test to save the changes to the service model you imported from the WADL file.
- Continue with Build a MyFlight Web Application service test.
This exercise describes how to build a Web Application service test using the MyFlight service methods you imported and modified in your test. When you're done, your test will include steps to get flights and create a flight order.
An API service test flow should match the steps in the application flow as closely as possible. You should already be familiar with the steps in the app from the test you created for the GUI layer. For more details, see Create and run GUI tests.
Create your test structure
-
In the Toolbox pane, expand the Local Activities > REST Services > Flight Server > Flights_REST > Flights node.
-
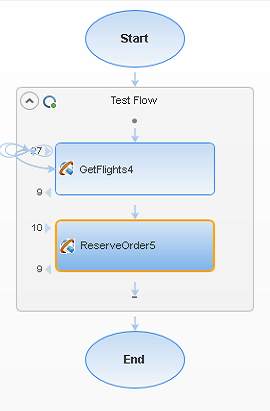
Drag the GetFlights method to the canvas to create the first step.
-
In the Toolbox pane, expand the FlightOrders node, and drag a ReserveOrder method to the canvas to add the second step.
- Continue with Link the FlightNumber value to the GetFlights output.
Link the FlightNumber value to the GetFlights output
Do the following:
- In the canvas, select the ReserveOrder step to display the Properties pane on the right.
-
In the Properties pane, select the HTTP tab
. -
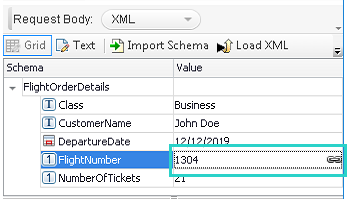
Hover over or click in the FlightNumber Value cell, and click the Link to a data source button
 .
.
-
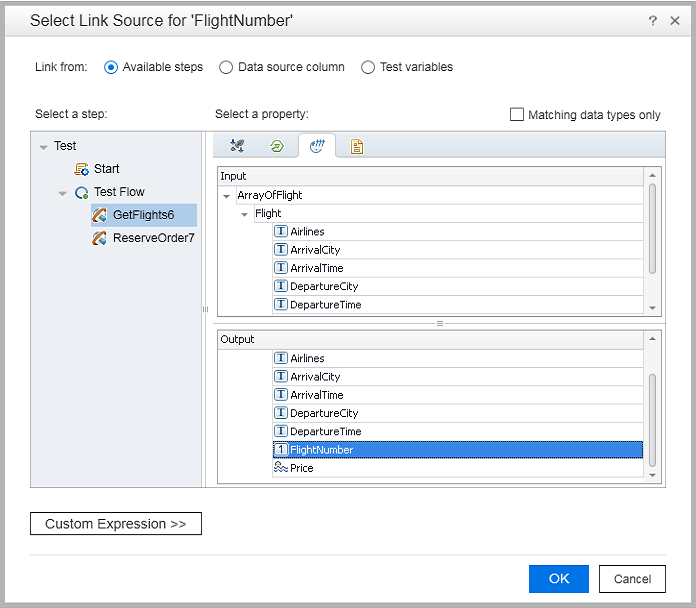
In the Select Link Source for 'FlightNumber' dialog, do the following:
- At the top, select Available steps.
- On the left, select the GetFlights step.
- On the right, select the FlightNumber property.

-
Click OK for UFT One to update the FlightNumber value as parameterized from the GetFlights step output.

- Continue with Add a data source to use in your test.
Add a data source to use in your test
Do the following:
- Display the Data pane if it's not already shown (View > Data).
-
In the Data pane, click New Data source
 , and select Excel.
 -
In the New Data Source dialog:
- In the Name field, enter WADL_Flights.
- Browse to and select the Excel file stored in the <UFT One installation folder>\samples\Flights Application directory.
- Select Link to the Excel file in its original location.
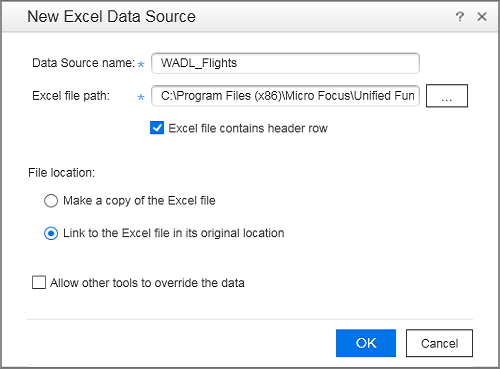
Click OK to add the Excel data to your test.
- Continue with Link the test steps to the data sources.
Link the test steps to the data sources
Do the following:
-
In the canvas, select the GetFlights step to display the Properties pane on the right.
-
In the Input/Checkpoints
 tab of the Properties pane, hover over or click the DepartureCity Value cell, and click the Link to data source button .
 -
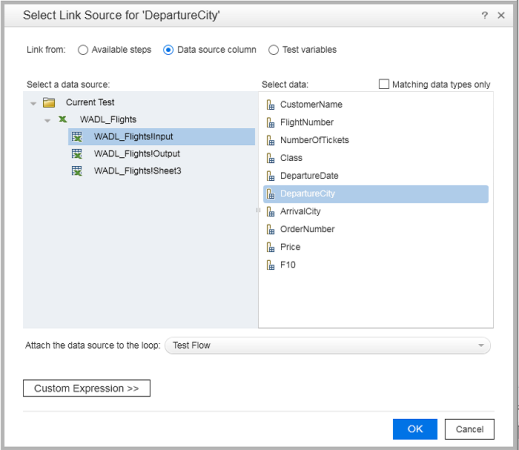
In the Select Link Source dialog, do the following:
- At the top, select Data source column.
- On the left, select WADL_Flights!Input.
- On the right, select DepartureCity.
-
Click OK to link the DepartureCity property value to the DepartureCity column in the data table.
-
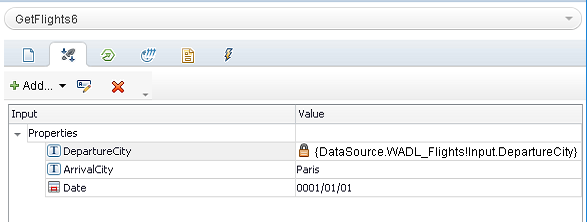
Repeat the previous steps for the ArrivalCity and Date values.
For the Date value, select DepartureDate.

-
Back in the canvas select the ReserveOrder step to display the Properties pane on the right.
-
In the HTTP tab
, repeat these steps again to parameterize the following values:- Class
- CustomerName
- DepartureDate
- NumberofTickets
When you're done, the Properties pane should look like this:

-
Save your test, and continue with Set data source navigation settings.

Set data source navigation settings
Configure how UFT One handles your data during a test run. Do the following:
-
In the canvas, select the Test Flow box to display the Properties pane for the test flow.
-
In the Properties pane, select the Data Sources tab
 .
. -
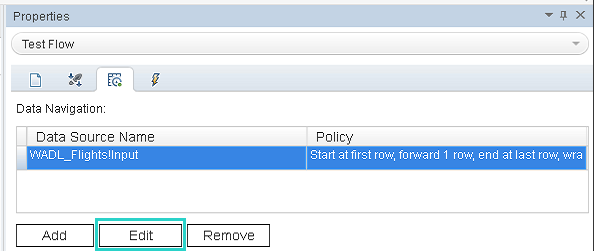
Select the WADL_Flights!Input entry in the table and click Edit.
-
In the Data Navigation dialog, specify the data navigation details as follows:
Start at: First row Move by: 3 rows Forward End at: Last row Upon reaching the last row: Wrap around -
Click OK, and save your test.
-
Continue with Run the MyFlight WADL service test.
Run the WADL Web application service test you created in the previous steps.
Do the following:
-
Ensure that the Flight API app is still running. For more details, see Flights API layer.
-
Define the number of test iterations. In the canvas, select the Test Flow box.
-
In the Input tab
on the Properties pane:- Select the 'For' Loop option.
- In the Number of Iterations field, enter 8.
-
Click the Run toolbar button
 .
.Ensure that the MyFlightWADL test is selected, and then click Run to run your test.
-
When the test is complete and the run results are shown, navigate down in the Test Flow to the ReserveOrder node. The run results display a summary of the step.
-
In the captured data, note the Request and Response information.
Click on the links in the Request Body and Response Body cells to open the XML response and request information in a browser window.
RequestBody
<FlightOrderDetails xmlns="HP.SOAQ.SampleApp">
	<Class>Economy</Class>
	<CustomerName>Clark Frank</CustomerName>
	<DepartureDate>2115-06-01</DepartureDate>
	<FlightNumber>1089</FlightNumber>
	<NumberOfTickets>3</NumberOfTickets>
</FlightOrderDetails>
ResponseBody
<CreatedOrderParams xmlns="HP.SOAQ.SampleApp" xmlns:i="http://www.w3.org/2001/XMLSchema-instance">
	<OrderNumber>87</OrderNumber>
	<TotalPrice>1767.6</TotalPrice>
</CreatedOrderParams>
- Continue with one of the other exercises in the tutorial.
 Next steps: