Share this page


When working with tests, UFT One records a SetCellData statement, by default, when you modify the value of a cell in a table or grid. If you want to modify the values of several cells in a single table or grid, and then parameterize your test so that different values are entered into the cells each time your test action runs, parameterize each statement individually or by enable the Auto-parameterize table and grid controls option.
When this option is selected, UFT One automatically captures all values you set for a particular table or grid during a recording session and stores them in a special data sheet in the Data pane. UFT One inserts a single SAPGuiTable.Input, SAPGuiGrid.Input, or SAPGuiAPOGrid.Input statement into your test, which refers to this new data sheet. Before running the test, you can easily modify the values or add additional sets of data to the data sheet for each action iteration.
Note: You also use this option to enable creation of table parameters when learning flows using the Packaged Apps Kit for Business Process Testing.
How UFT One records in Auto-parameterize mode
When you record with the Auto-parameterize table and grid controls option and you perform an operation that sends data to the SAP server after setting table or grid cell values, UFT One:
-
Creates a new data sheet to represent the table or grid. Each data sheet is a sub-sheet of the action in which the table or grid operations were recorded. The data sheet name is always the action name followed by a period (.) and the internal name of the table or grid. For example: Action1.FLIGHT_TABLE
Note: Sheet names are limited to 31 characters. Therefore, if the action + table name combination is too long, the name is shortened automatically while maintaining uniqueness.
-
Adds a column to the data sheet for each table or grid column in which you record. The name of the column in the data sheet is generally the same as the name of the column in your application.
If a column in the application does not have a header, or more than one column header has the same name, UFT One inserts a column with a name in the format: _ _<index>, where <index> represents the column number according to its location when you record the Input step.
-
Inserts the values you use when recording into the appropriate cells in the data sheet. Each row in which you entered data is represented by a row in the data sheet. Place-holder (empty) rows are added for rows above the rows in which you recorded. For example, if you set data in rows 3, 5, and 8, seven rows are added to the data sheet. The cells in rows 2, 4, 6, and 7 do not contain any data.
-
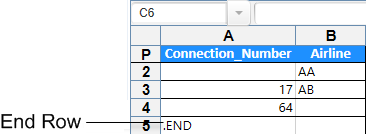
Inserts an additional end row where the value of the first cell in the row is .END.
-
Inserts an Input <DataSheetName> statement (followed by a SelectCell statement) into your test.

The Input statement instructs UFT One to enter values from the data sheet into the table or grid corresponding to the data sheet name, similar to an automatically parameterized statement referring to a special sheet in the Data pane.
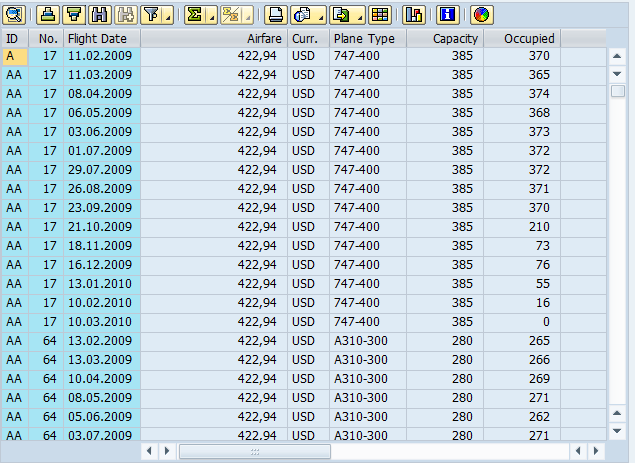
Example: Suppose you update values in a table control containing airline flight information. You update some airline codes, add state and country names to some of the departure and destination cities, update one of the destination airport codes, and update some of the departure times. The edited table in your application may look something like this:
UFT One inserts the following Input statement in your test to represent the data input:
SAPGuiSession("Session").SAPGuiWindow("SAP R/3").SAPGuiTable("SPFLI").Input "Action1.SPFLI"
If you record on a table or grid that scrolls using the ENTER key rather than the PAGEDOWN key, you may need to manually add the ScrollMethod optional argument. For details, see Data in rows that require scrolling.
The corresponding data sheet in your Data pane looks like this:
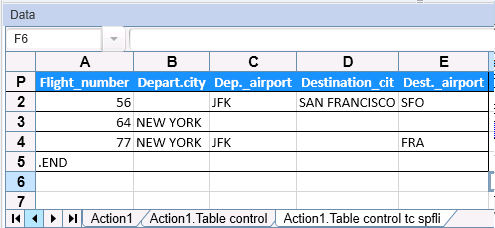
There are three rows in the data sheet, because data was modified in the first three rows of the table or grid in the application. Note that the data sheet does not contain columns for the Airfare and Plane Type columns, because no values were modified in those columns during the recording session.

Parameterized cell values in data sheets
UFT One inserts an Input statement and a new input data sheet each time information including modified table or grid cell data is sent to the server. If you set data in the cells of a particular table or grid both before and after sending information to the server, you will have more than one input data sheet (and more than one Input statement) representing the same table or grid. For best results:
-
Enter data only in the visible rows of the table or grid while recording, especially if scrolling results in sending information to the server. You can add additional rows to the recorded data set while editing your test.
-
Perform sorting, calculations, and other such operations either before beginning or after you finish entering data in a table or grid.
To supply different data values for each action iteration, you add new data sets. You add a new data set for a table or grid by entering the values in the appropriate rows and columns below the previous end row. To indicate the end of the new data set, copy and paste the end row from the first set of data to the row below the new set of data. You can include a different number of rows in each data set.
Note: The Input statement can run successfully only if it can find the end row. Therefore, the first cell of the end row must contain only the text .END. You can enter text into other cells in that row, if needed. For example, you can enter a number in the second cell of the end row to indicate the iteration number corresponding to that set of data.
Because the input data sheets are added as a sub-sheet of the current action, the Input statement uses the data set corresponding to the current action iteration. For example, if you set the action to run on all iterations and your action sheet includes five rows of data, then your input data sheet should also include five data sets (and five .END rows).
To use multiple sets of data from an input data sheet, you must have at least one other Data pane parameter in your action that is set to use Current action sheet (local). Also, confirm that the action is set to run multiple iterations in the Run Tab (Action Call Properties Dialog Box).
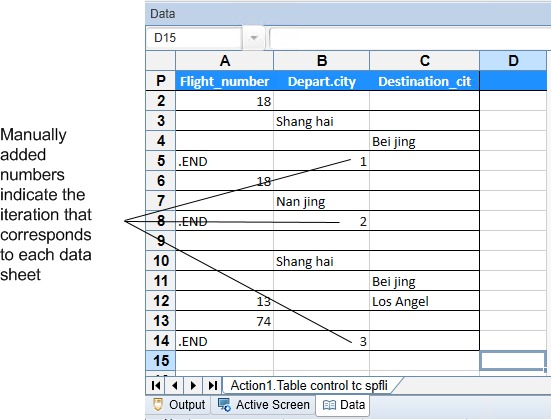
Example: The input data sheet below contains three sets of data. The first set contains data for the top three rows of the table or grid. The second set contains data for the top two rows of the table or grid. The third set contains data for rows 3-6. The blank first row (row 9 in the data sheet), indicates that no data should be entered or modified in the first row of the table or grid.
Note that a number was manually entered into the second cell of each END row to make it easier to identify the action iteration to which each data set corresponds.
Data in rows that require scrolling
If scrolling inside the table results in sending data to the server, we recommend adding data only to visible cells during the recording session. If you want to enter data into additional rows during the run session, you can add those rows to the data sheet manually while editing your test.
If you create an input data set for rows that are not visible on the table or grid in your application, then UFT One must scroll the table or grid during the run session to insert the data for those rows. If you create an input data set for a row that needs to be added to the table or grid, UFT One must send a command to add the row. By default, UFT One sends a PageDown command if the rows in the data sheet exceed those currently displayed in the application. If UFT One needs to use the ENTER key to add additional rows to the table or grid, then you need to manually add the optional ScrollMethod argument (with the value ENTER) to your Input statement before running your test.
For example:
SAPGuiSession("Session").SAPGuiWindow("Create Standard").SAPGuiTable("SAPMV45ATCRTL_V_ERF_").Input "Action1.All items", ENTER