Share this page


This exercise describes how to add parameters to the Standard test you created earlier, using a single data source, output values from earlier steps, as well as multiple data sources.
Parameterize a test step from a single data source
Add parameter values to the Standard API test using data manually entered into a data table.
Add a Concatenate Strings step to your test
Do the following:
-
Start with UFT One open, with the Standard test selected and displayed in the Document pane.
For more details, see Create and run an API test with standard activities.
-
Add the Concatenate Strings step to your test.
From the Toolbox pane, drag the String Manipulation > Concatenate Strings activity to the Test Flow in the canvas, above the Replace String activity.
- Continue with Add a data source and values.
Do the following:
-
Select View > Data to display the Data pane.
Then, click New Data Source
 > Local Table.
 - In the New Local Table Data Source dialog, enter the Data Source name as Concatenated Strings.
-
Click Add
 to add a row to the table.
 In the table, enter Prefix in the Name column, and leave the Data Type as String.
-
Click Add
again to add another row. Enter Suffix in the Name column, and again leave the Data Type defined as String.
-
Click OK to return to UFT One. The table is added to your test, and is displayed in the Data pane, as a sub-node of the Current Test data sources:

-
Select the Concatenated Strings node in the Data pane, and enter the following values on the right:
Make sure that you leave spaces after Hello, Welcome, and I am running.
Prefix Suffix Hello world. Welcome to UFT One. I am running API tests. - Continue with Connect the test steps to the data source.

Connect the test steps to the data source
Do the following:
-
In the canvas, select the Concatenate Strings step.
-
Define the step properties in the Input/Checkpoints tab
 on the right as follows, for both the Prefix and Suffix values:
- Hover over the Value cell, and click the Link to data source
 button.
 -
In the Select Link Source dialog, select the Data source column option. You'll the see the Concatenated Strings table listed in the data sources below.
Select the Concatenated Strings item, and then select the Prefix or Suffix data item on the right.

Click OK to update the value in the Properties pane.
When you're done, the Properties pane is updated with the links to the data table values you created earlier.

- Hover over the Value cell, and click the Link to data source
- Continue with Set the test iteration settings and data navigation policy.

Set the test iteration settings and data navigation policy
Define test settings for the entire test flow. Do the following:
-
In the canvas, select the Test Flow box.
-
In the Properties pane, on the Input
tab, do the following:- Select the 'For' Loop option.
- In the Number of Iterations field, enter 3 for the number of iterations. This configures UFT One to use all three lines of the data table when running the test.
-
In the Properties pane, on the Data Sources
 tab, select the Concatenated Strings data source, and then click Edit.
In the Data Navigation dialog, ensure that the values are selected as follows:
Start at First row Row 1 Move by 1 rows Forward End at Last row Upon reaching the last row Wrap around - Click OK to close the dialog.
- Save your test, and continue with Run your parameterized test and view results.
Run your parameterized test and view results
Do the following:
-
Click the Run
 toolbar button.
 -
Ensure that the Standard test is selected, and accept the other default values.
-
Click Run to start running the test.
UFT One runs the steps in sequence, using the values in the data table for the input of the Concatenante Strings activity.
While UFT One is running the test, you can see the values UFT One takes from the data table in the Output pane:
-
When the test run is complete, and the run results are displayed, click through the steps in the Test flow to view the three separate iteration nodes, for the three lines in the data table.
Click each step to view the Step details for that iteration on the right.

Parameterize a test step from an output value
Add parameter values to the Standard API test using output from earlier steps in your test.
Do the following:
-
Continue working with UFT One open, with the Standard test selected and displayed in the Document pane.
For more details, see Create and run an API test with standard activities.
-
In the canvas, select the Replace String step to display the Properties pane on the right.
-
On the Input/Checkpoints
Properties pane tab, hover or click the Source string row, and then click the Link to data source button . -
In the Select Link Source for 'Source String' dialog that appears, do the following;
- Select the Available steps option at the top.
- Select the Concatenate Strings step on the left.
- Select the Result row on the right.

-
Click OK to close the dialog, and note how the Source string value in the Properties pane is updated with a link to the output from the Concatenante Strings step.

-
In the canvas, select the Test Flow box and set your run iterations.
In the Properties pane, on the Input
tab, ensure that 'For' Loop is selected, and the number of iterations is set to 1. -
Click the Run toolbar button
, and then click Run to start the test run. -
When the test run is complete, view the run results for the Replace String step you parameterized.
In the Test flow, click the Replace String node and view the Captured Data on the right.
The source string value is Hello world, which is the same as the result of the previous Concatenate Strings step.

-
Save your test and continue with Parameterize a test with multiple data sources.


Parameterize a test with multiple data sources
Parameterize your test with custom expressions to pull step values from a variety of places, such as by entering them manually, data sources, or output values of previous steps.
This exercise describes how to create and use a custom expression for all three of these data sources.
Do the following:
-
Continue working with UFT One open, with the Standard test selected and displayed in the Document pane.
For more details, see Create and run an API test with standard activities.
-
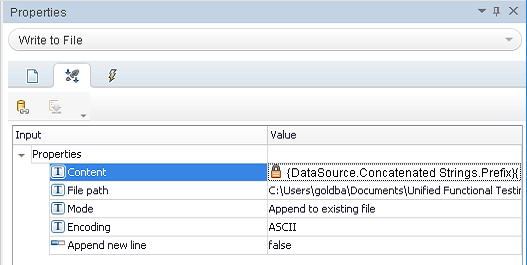
In the canvas, select the Write to File step to display the Properties pane on the right.
-
On the Input/Checkpoints
Properties pane tab, hover or click the Content row, and then click the Link to data source button . -
In the Select Link Source for 'Source String' dialog that appears, do the following;
- Select the Data source column option at the top.
- Select the Concatenate Strings step on the left.
- Select Prefix on the right.

-
Click Custom Expression on the bottom to expand the Expression area.
Then, do the following to create the first part of the expression:
-
Above the Expression area, click Add to add the selected Prefix parameter to the expression.
The expression value is updated as follows:
{DataSource.Concatenated Strings.Prefix} -
At the top of the dialog box, click Suffix, and then click the Add button again. UFT One adds the Suffix parameter to the expression.
{DataSource.Concatenated Strings.Prefix} {DataSource.Concatenated Strings.Suffix}
-
-
Enter the middle part of the expression manually, as a static text string.
In the Expression area, type a space at the end of the current value. Then, enter was replaced by, followed by another space.
{DataSource.Concatenated Strings.Prefix} {DataSource.Concatenated Strings.Suffix} was replaced by -
Add the final part of the custom expression by linking it to the output from a previous step.
Do the following:
- At the top of the dialog, select the Available steps option.
- Select the Replace String node on the left.
- Select the Result row on the right.
- Click Add.
The custom expression is updated to read as follows:
{DataSource.Concatenated Strings.Prefix} {DataSource.Concatenated Strings.Suffix} was replaced by {Step.OutputProperties.ReplaceStringActivity4.Result}
-
Click OK to close the dialog. Note how the Content value in the Properties pane is updated with this expression.
-
Click the Run toolbar button
, and then click Run to start the test run. -
When the test run is complete, view the run results for the Write to File step you parameterized.
In the Test flow, click the Write to File node and view the Captured Data on the right.
The content written to the file is the string defined by your custom expression.

-
Save your test and continue with other exercises in this tutorial.


 Next steps: