Share this page


Use Azure DevOps Server or Services to trigger tests from ALM Lab Management
This topic describes how to add Azure DevOps Server build steps to first prepare the ALM Lab environment, and then trigger UFT One functional tests from the ALM Lab Management module.
Note: This topic describes working with UFT One Azure DevOps extension version 5.*. To benefit from the latest functionality, we recommend updating existing tasks' versions to 5.*. When using this extension version, make sure that you installed the corresponding UFT.zip file from the ADM-TFS-Extension GitHub repository.
Prerequisite
Before you can run UFT One tests from ALM, you must first set up the integration with ALM.
Perform these steps once on the machine that the Azure DevOps Server will use to run the UFT One tests:
-
Install the ALM Connectivity tool.
-
Run ALM Client Registration.
For information on performing these steps, see the section on installing ALM tools and add-ins in the ALM Help Center.

Prepare the ALM Lab environment
Prepare the ALM Lab environment before running UFT One tests saved in ALM, as part of a test set or build verification suite from the Test Lab Module in ALM.
In Azure DevOps Server, do the following:
-
Create a pipeline. (Note: If you are using TFS, skip this step)
-
Create a build pipeline or a release pipeline, with the Empty job template.
Note: A build pipeline is the pipeline type created when you do not explicitly create a release pipeline.
-
Select the agent pool that includes the agent on which you want to run your tests.
-
In the pipeline variables, add a UFT_LAUNCHER variable. The variable's value should be the full path to the UFTWorking folder.
For more details, see the Microsoft Azure documentation.
-
-
Add a UFT One task or build step, in the correct place in the build order:
-
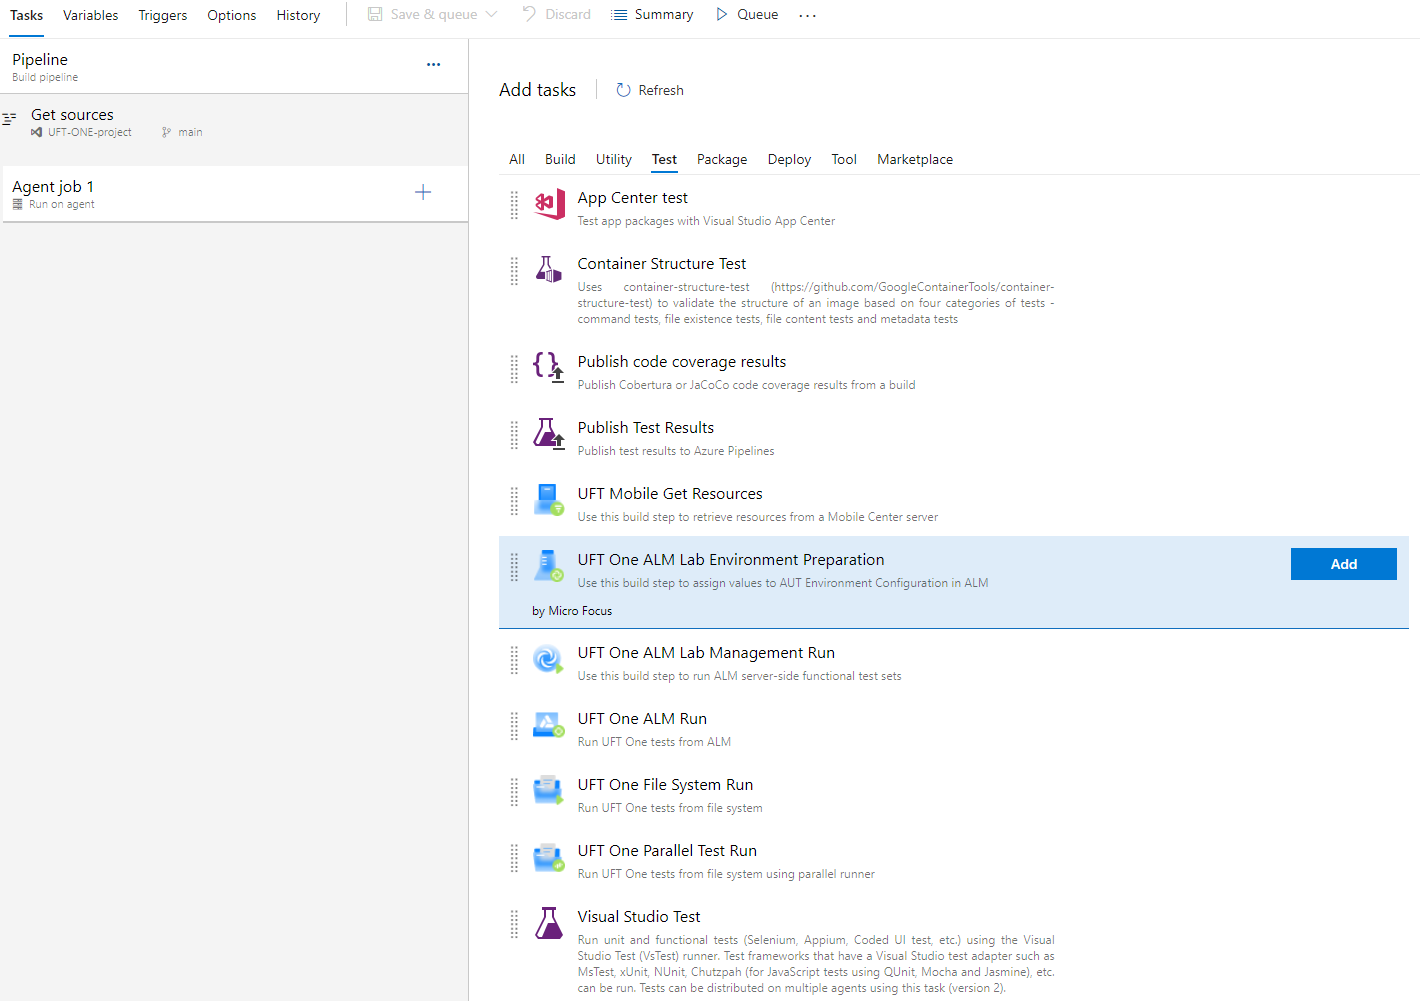
In the Task catalog, select the Test tab. A list of all available test tasks is displayed:

-
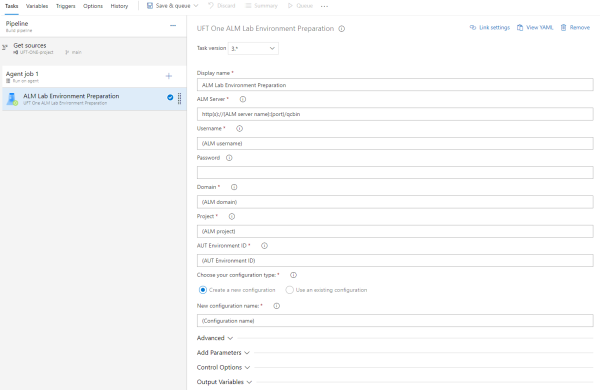
From the Test tab, select the UFT One ALM Lab Environment Preparation task and click Add. A new, empty task is added as part of your build plan:
-
-
Provide the following information for your task:
Display name (optional) By default, the Azure DevOps Server CI system uses a preset descriptor for the task.
Provide a more meaningful name for your step.
ALM server The ALM server from which to run the test.
The ALM server address must be in one of the following formats:
- http://<ALM server name>
- IP:port/qcbin
You may also need to connect to ALM using common registration mode. If this is the case, enter the URL using one of the following formats:
- http://<ALM server name>
- IP:port/qcbin/start_a.jsp?common=true
ALM Credentials Enter the username and password to use to access the ALM server. (SSO authentication is not supported)
Ensure that the ALM user you specify has the correct permissions to open and run the UFT One tests.
For details on permissions, see the ALM Help Center.
Domain The domain in the ALM server where the project containing the tests is stored. Project The project containing the tests.  To hide sensitive information in Azure
To hide information such as the ALM password or the SSO credentials, define Azure task variables for this information and lock them:
-
Create the variable:
In the task's Variables tab add a variable for each field whose value you want to hide.
Enter the value for the variable, select the lock option.
Tip: Optionally, select Settable at queue time too, to enable editing this value when queueing the build.
For example, create a
MyPasswordvariable and enter your ALM password as its value. -
Link your variable to the relevant field in the task:
In the Tasks tab, click Link settings.
In Setting to link, select the field to link to the variable, and in Value, enter $(<variable name>). Click Link to complete the process.
For example, select the Password field and enter
$(MyPassword).
-
Expand the Advanced settings and specify one of the following:
Create a new configuration named Enter a name for the configuration.
If you select this option, enter the values in the specified fields.
Use an existing configuration ID Enter the ID of your AUT Environment configuration in ALM. For details on the available options, click the question icon to the next of the option.
-
Expand the Parameters section and enter the AUT Environment parameters you want to update for the configuration.
You are limited to 10 parameters for this task. If the tests you want to run include more than 10 parameters, add another step.
Note: You must select each parameter individually (one-by-one), and specify the parameter details.
Not selecting or providing a parameter value for any parameter will cause the specified parameters to not be used.
-
Configure the CI system control options for the step, including:
Enabled Specify whether the step should be run as part of this build Continue on error Instructs the CI system to stop or continue the build if there is an error on this step.

This configuration will be used as a build step in the appropriate place.
Continue with Trigger UFT One tests from ALM Lab Management.
Trigger UFT One tests from ALM Lab Management
After preparing the ALM Lab environment, add another Azure DevOps Server build step to trigger your UFT One test run.
To trigger a test run from ALM Lab Management:
-
In Azure DevOps Server, do one of the following:
-
Open the pipeline you created earlier, which contains the step for UFT One ALM Lab Environment Preparation task.
-
If your lab environment is already set up and you don't need a preparation task:
Create a pipeline. (Note: If you are using TFS, skip this step)
-
Create a build pipeline or a release pipeline, with the Empty job template.
Note: A build pipeline is the pipeline type created when you do not explicitly create a release pipeline.
-
Select the agent pool that includes the agent on which you want to run your tests.
-
In the pipeline variables, add a UFT_LAUNCHER variable. The variable's value should be the full path to the UFTWorking folder.
For more details, see the Microsoft Azure documentation.
-
-
-
Add a UFT One task or build step, in the correct place in the build order:
-
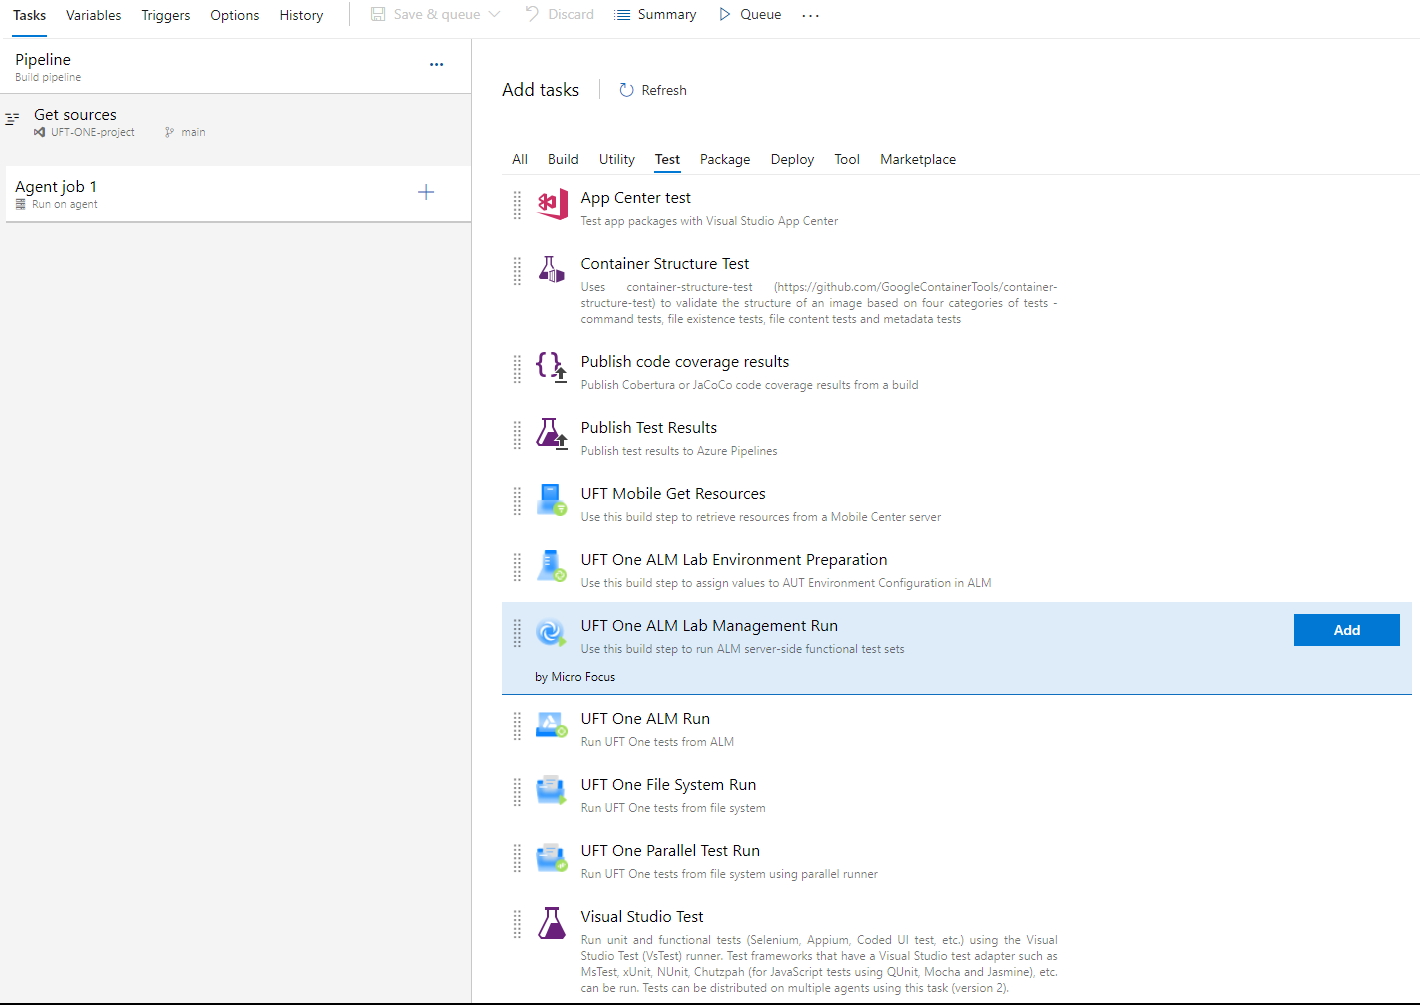
In the Task catalog, select the Test tab. A list of all available test tasks is displayed:

-
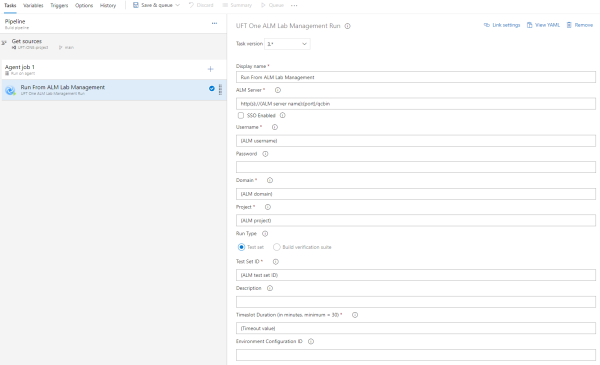
From the Test tab, select the UFT One ALM Lab Management Run task and click Add.
A new, empty task is added in red as part of your build plan:
-
-
Provide the following information for your task:
ALM Server The general information for the tests, including the ALM server information, and the Test Lab identification information.
You may also need to connect to ALM using common registration mode. If this is the case, enter the URL format as one of the following:
- http://<ALM server name>
- IP:port/qcbin/start_a.jsp?common=true
ALM credentials Depending on the authentication type required by your ALM server, credentials can be a username and password or an API key for SSO authentication.
-
Username and password:
User name: The ALM user name to use to access the server.
Password: The password for the ALM user specified above.
-
SSO authentication:
Select SSO enabled.
Enter the Client ID and API key secret obtained from your ALM site administrator.
Ensure that the ALM user or client specified in this task has the correct permissions to open and run the UFT One tests.
For details on permissions, see the ALM Help Center.
Domain The domain in the ALM server where the project containing the tests is stored. Project The project containing the tests. Run Type The run mode to use when running the tests: Test set or Build verification suite Test Set ID / Build Verification Suite ID The ID (from ALM) of the test set or build verification suite you want to run.
The test set must be of type Functional.
Timeslot Duration
(in minutes, minimum=30)
The amount of time needed on the host, or slave, to run the test set or build verification suite.
CDA provisioning information The details for CDA provisioning on the ALM server.
For details on an individual option, click the Information bubble next to the option.
For more details, see the ALM Help Center.
Timestamp pattern Define the value format of the timestamp field used for reporting in the Extensions tab.
The default value is yyyy-MM-dd HH:mm:ss.
-
(Optional) From the Test tab, add a Publish Test Results task or build step to publish test results to Azure Pipelines.
Note: This option is supported when working with the UFT One Azure DevOps extension version 2.0.3 or later.
Provide the following information for the step, to create a JUnit report based on UFT One's XML run result report:
Display name Specify a name for the step. Test result format JUnitTest results files **/*.xmlSearch folder Provide the path to the folder that contains the test result XML files.
Use the following format:
In a build pipeline: <Path to UFTWorking\res folder>\Report_$(Build.BuildNumber)
In a release pipeline: <Path to UFTWorking\res folder>\Report_$(Release.ReleaseID)
Test run title Specify a title for the report.
Use environment variables in the title as follows, to base the report name on the pipeline name and the build number:
In a build pipeline:
$(System.DefinitionName)_$(Build.BuildNumber)In a release pipeline:
$(System.DefinitionName)_$(Release.ReleaseID)This helps retrieve the report on Azure DevOps.
-
Configure the CI system control options for the step, including:
Enabled Specify whether the step should be run as part of this build Continue on error Instructs the CI system to stop or continue the build if there is an error on this step. Run this task Indicates to the CI system when to run this step. To publish the results after running the tests failed, select Even if a previous task has failed, unless the build was canceled. -
Set your pipeline to run:
Build pipeline: Save and queue the pipeline.
Release pipeline: Create a release and deploy the pipeline.
When the pipeline runs, the UFT One tests run as part of the task you added.
The tests run on the hosts configured in the ALM Lab Management setup. Both specific host allocations and Automatch configuration are supported.

View the test results
After the test run, you can view the run results in the following ways:
A visual report
In the Extensions tab of the run results, you can see a report including the following parts:
-
The UFT Report section shows the test run status.
-
The Run Summary shows the number of tests that ran and the percentage of each status.
Note: If you are working with a release pipeline, these results are available on the Stage level.
A JUnit test result report
If you added a Publish Test Results step, you can view the JUnit results on the Tests tab of the run results.

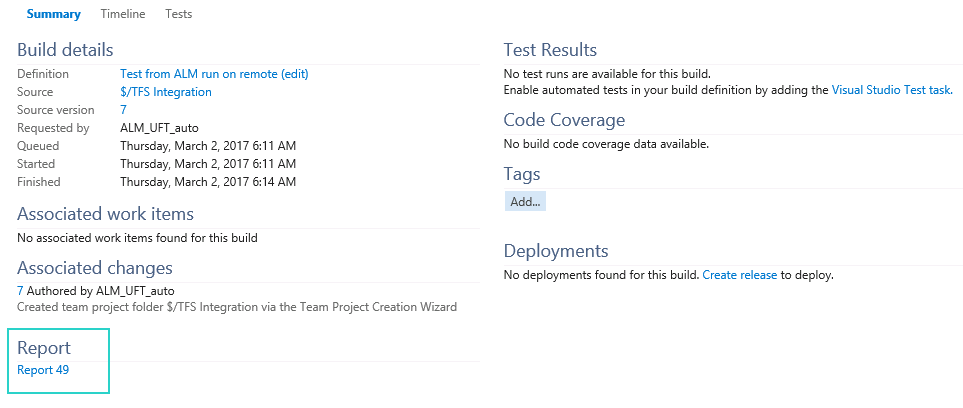
A link to the run results that are saved on ALM (if you run the tests from TFS)
UFT One automatically saves a link to the run results on ALM as an artifact with the build.
View this link on the Summary tab of the run results.
For example:
 See also: