Share this page


Relevant for: API testing only
This topic describes how to create a REST service model.
Prerequisite
Study the structure of the REST Service body and determine which resources and methods you need to define.

Create the service model hierarchy
In order for UFT One to create and use the service model, you must define the hierarchy of the service, including its resources and methods:
-
In the toolbar, click the Add REST Service drop-down button
 and select REST Service Editor.
 -
In the Add REST Service editor, give the service a name.
-
Add resources and methods as needed:
For new resources Click the Add Resource toolbar button
 and provide a meaningful name for the resource.
For new methods Click the Add Method toolbar button
 and provide a meaningful name for the method.
Set the General properties
-
Select the service, resource or method for which you want to set its properties.
-
In the right pane's Properties list, open the General
 tab.
tab. -
Enter values for the properties.
Set the URL property values
-
In the REST Service editor, select a REST service, resource, or method.
-
In the General tab, enter the URL property value:
-
If you are entering a URL property value for a REST service, enter the URL prefix in the URL property row, beginning with a http://
-
If you are entering a URL property value for a REST resource or method, enter the URL property value in the Relative URL property row.
Note: If you enter a URL property value for the service or resource of your REST service, the URL property values are passed to all resources or methods included in the service or resource. For details, see Pass REST service properties
-
Define the method's HTTP properties
-
Select a REST service method.
-
In the REST service editor's right pane, click the HTTP Input/Checkpoints tab
 .
. -
For each method, modify the HTTP method and HTTP version.
-
Use the plus sign
 in the RequestHeaders parent node to add name and value pairs for the request header array.
Define custom properties - optional
For methods that require input, such as PUT or POST, you can add custom input properties. For methods that provide an output such as GET, you add the required output properties. To create these properties:
-
In the right pane's Properties list, click the Custom Input/Checkpoints tab
 .
. -
Expand the plus button
 and select Add Input/Output Property.
 -
Provide a name, data type, and description (optional) for each property.
-
Enter the property values in the Value column.
Enter the request body directly - optional
This section describes how to enter the request body directly.
-
Return to the design document for the REST service and copy the Request body onto the clipboard.
-
In the right pane of the Add REST Service window, open the HTTP tab
 .
. Make sure the Request Body type in the drop down is set to Text, and click within the Body section.
Press CTRL+V to paste the contents of the request into the pane. Make sure that there are no extra spaces before or after the body text.
-
Modify the element values within the XML body as required.
UFT One versions 2021 R1 and later: To insert an encrypted password into your request body or encrypt a plaintext password included in your request body, do the following:
-
In the Text editor, put your cursor where you want to insert or highlight the password you want to encrypt, and then click
 Password. Alternatively, you can just click the corresponding input box in the Grid view, and then click Password.
 -
In the Input Password dialog box that opens, enter your plaintext password. UFT One automatically encrypts the password and inserts it into your request body.
-
Note: If you need to use a multipart request with your REST Service methods, this is done after dragging the REST method to the canvas, For details, see Send a multipart HTTP or REST Service request.
Link the body request to a data source - optional
This section describes how to enter the Request body through a data source.
-
Return to the design document for the REST service and copy the request body to the clipboard.
-
In the right pane of the Add REST Service dialog box, open the HTTP tab
. Make sure the Request Body type in the drop down is set to Text, and click within the Body section. -
Click the Link Body button
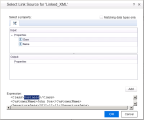
 to the right of the pane, to open the Select Link Source dialog box.
 -
In the Select Link Source dialog box, click Custom Expression to expand the dialog box. Paste the clipboard contents, the Request body, into the Expression area.
-
In the Expression area, highlight the value of the element you want to link. In the upper pane, double-click on the custom property you defined earlier in the properties list. The property is now linked to a value.
The modified expression appears in the Expression area. In the following example the custom Class property is linked to Class element in the REST document.
<Class>{Step.InputProperties.RestMethod.Class}</Class> -
Click OK. UFT One places the data in the Body section.
-
UFT One versions 2021 R1 and later: To insert an encrypted password into your request body or encrypt a plaintext password included in your request body, do the following:
-
In the Text editor, put your cursor where you want to insert or highlight the password you want to encrypt, and then click
Password. Alternatively, you can just click the corresponding input box in the Grid view, and then click Password. -
In the Input Password dialog box that opens, enter your plaintext password. UFT One automatically encrypts the password and inserts it into your request body.
-

Note: If you need to use a multipart request with your REST Service methods, this is done after dragging the REST method to the canvas, For details, see Send a multipart HTTP or REST Service request.
Test the method
Click the Run Method button  on the toolbar to test the method with its property values. The results are displayed in the lower section of the window.
Save the service model to your test
In the REST Service editor, click OK in the Design REST Service dialog box. UFT One adds the REST service along with its resources and methods to the Toolbox pane, under the Local Activities category.
Expose input and output properties
You can forward built-in HTTP properties to the REST method wrapper. This is useful for making specific HTTP properties available at the wrapper level.
Note: If you created a REST method in UFT One 11.52 or Service Test 11.52 or later, all REST Service method properties are incorporated into the REST activity step itself without a wrapper.
-
Double-click a REST method from the Toolbox pane to add it to the canvas. Expand the method to show the HTTP Request frame.

-
Click in the HTTP Request frame. Select a property in the Properties pane and select Expose as Input Property or Expose as Output Property from the right-click menu.
-
Provide a name for the property in the New Exposed Property dialog box.
-
Click the REST method wrapper in the canvas, and view the newly exposed property in the Properties pane's Custom Input/Checkpoints tab
.
 See also: