Share this page


This lesson describes how to create and run a REST service API test, using a prototype model of the service in UFT One.
Add a REST service test to your MyFlight Application solution to test the Web (API) later of the MyFlights app.
Do the following:
-
Start with UFT One and the MyFlight Application solution open.
For more details, see Plan your test and create a solution.
- Select the New dropdown
 in the toolbar, and then select New Test.
 -
In the New Test dialog:
- Select API Test.
- In the Name field, enter MyFlightRESTService.
- In the Location field, ensure that the test is saved in the C:%HOMEPATH%\UFT One directory.
Click Create to add the test to your solution.
- Continue with Create a REST service structure.

This exercise describes how to create a model in UFT One of your rest methods and properties, for UFT One to use in test steps when testing the REST service performance.
Create a service, resource, and method
Do the following:
-
Start the Flight API app. For details, see Flight API layer.
Note: Keep the Micro Focus Service APIs dialog open while performing this lesson to ensure that the Flights API service is running while UFT One runs the test.
-
In the Micro Focus Flights Service APIs dialog, click Help to display a browser window with all method details.
-
In UFT One, click the Add REST Service
 toolbar button.
 -
In the Add REST Service dialog, do the following:
- Replace the New Service name with Flights REST Service.
- Click the Add Resource toolbar button
 .
.
A new Resource node is added to the tree. Change the name of this resource to FlightOrders.
-
Still in the Add REST Service dialog, click the Add Method toolbar button
 .
. A new Method node is added to the tree. Change this method name to ReserveOrder.

- Continue with Configure the REST service method model URL.
Configure the REST service method model URL
Provide UFT One with the application's service URL, at the service, resource, and method levels.
Do the following:
-
Still in the Add REST Service dialog, select the Flights REST Service node in the tree.
-
In the General tab on the right, define the URL property value as:
http://localhost:8000
-
Select the FlightOrders node in the tree on the left. Notice that the URL you just entered is shown as the URL value here.
In the General tab on the right, define the Relative URL property value as:
Flights_REST
- Continue with Add request information for the ReserveOrder method model.
Add request information for the ReserveOrder method model
Define property values for the ReserveOrder method.
Do the following:
-
Still in the Add REST Service dialog, select the ReserveOrder node in the tree on the left.
-
On the right, click the HTTP Input/Checkpoints tab
 tab, and define the following property values:
Relative URL /FlightOrders HTTP method POST -
Click the HTTP tab
 on the right, and do the following:
-
From both the Request Body and Response Body dropdowns, select XML.
-
In the Request Body text editor area, enter the following code:
<FlightOrderDetails xmlns="HP.SOAQ.SampleApp">
  <Class>Business</Class>
  <CustomerName>John Parker</CustomerName>
  <DepartureDate>2115-02-28</DepartureDate>
  <FlightNumber>3233</FlightNumber>
  <NumberOfTickets>1</NumberOfTickets>
  </FlightOrderDetails>
Click
 to view the properties you entered in a grid view.
-
-
Click the HTTP Input/Checkpoints tab
again. -
In the Input area, scroll down to and expand the Request Headers > Request Headers [1] nodes.
Note the settings for this response, as you'll need them for subsequent steps.

- Continue with Create output properties for the ReserveOrder method model.

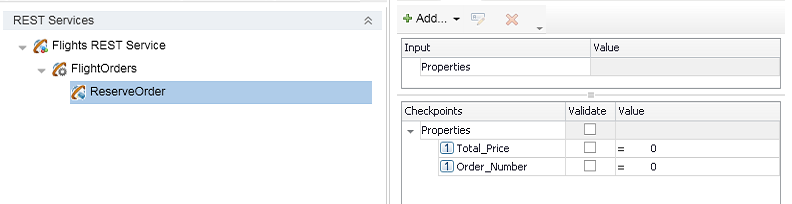
Create output properties for the ReserveOrder method model
Do the following:
-
Still in the Add REST Service dialog, with the ReserveOrder node selected in the tree on the left, select the Custom Input/Checkpoints tab
 on the right.
 -
Click Add > Add Output Property.
-
In the Add Output Property dialog, enter the following values:
- Name. Total_Price
- Type. Int
Click OK to add the property.
-
Repeat the previous step to add another output property, named Order_Number, of type Int.

- Continue with Test the ReserveOrder method model.
Test the ReserveOrder method model
Test the model you created in the previous steps before you finish adding it to your test.
Do the following:
-
In the Add Rest Service dialog box, with the ReserveOrder method node selected on the left, click the Run Method
 toolbar button.
You may need to expand the left pane to see it.

UFT One runs the method to test it, and displays the results at the bottom of the Add REST Service dialog.
For example:

- Click OK to add the service model you've created to the Toolbox.
- Continue with Add methods to your REST Service Test.

Add the methods you created in the REST service model above to your REST API test.
Import a data source to your test
-
Import a data source to use in your test. In the Data pane (View > Data), click New Data source
 and select Excel.
 -
In the New Excel Data Source dialog, in the Data Source name field, enter Flights_REST.
-
Browse to and select the Excel file saved in the <UFT One installation folder>\samples\Flights Application directory.
-
Select Link to the Excel file in its original location, and click OK to add the data in the Excel file to your test.
- Continue with Add a step and link its properties to the data source.
Add a step and link its properties to the data source
Do the following:
-
From the Toolbox pane, expand the Local Activities > Flights REST Service node, and drag the ReserveOrder step to the canvas.

-
Select the ReserveOrder step in the canvas to display the Properties pane.
-
Click the HTTP tab
on the right. Click the Grid button, and define the following values, using values from the Data source column:
- Class
- CustomerName
- DepartureDate
- FlightNumber
- NumberofTickets
For each property, do the following;
- Click or hover in the Value cell and click Link to a data source
 .
. - In the Select Link Source dialog, select Data source column, and then select the Flights_REST! input node on the left.
- On the right, select the relevant column for the property you are parameterizing.
- Continue with Set a checkpoint for the ReserveOrder step.
Set a checkpoint for the ReserveOrder step
Add a checkpoint to your test to verify the API response value.
Do the following:
-
Select the ReserveOrder step in the canvas to display the Properties pane, and then select the HTTP tab
. -
Save the following code to a file named response.xml on your UFT One machine:
<?xml version="1.0"?> <CreatedOrderParams xmlns:i="http://www.w3.org/2001/XMLSchema-instance" xmlns="HP.SOAQ.SampleApp"> <OrderNumber>93</OrderNumber> <TotalPrice>374.400024</TotalPrice> </CreatedOrderParams> -
In the HTTP tab
, in the Response area at the bottom, ensure that XML is selected as the Response Body. -
Click
 , and browse to and select the response.xml file you just created.
UFT One loads the XML schema.

-
In the new schema loaded, update the following values:
OrderNumber > 10 TotalPrice < 500 - Continue with Run the REST service test.
Run the test you created in the previous exercises and view the run results.
Do the following:
-
Ensure that the Flight API app is still running. For more details, see Plan your test and create a solution.
-
Define the number of test iterations. In the canvas, select the Test Flow box.
-
In the Input tab
on the Properties pane:- Select the 'For' Loop option.
- In the Number of Iterations field, enter 8.
-
Configure how UFT One handles your data during a test run. Do the following:
-
In the canvas, select the Test Flow box to display the Properties pane for the test flow.
-
In the Properties pane, select the Data Sources tab
 .
. -
Select the Flights_REST!Input entry in the table and click Edit.
-
In the Data Navigation dialog, specify the data navigation details as follows:
Start at: First row Move by: 1 rows Forward End at: Last row Upon reaching the last row Wrap around -
Click OK, and save your test.
-
-
Click the Run toolbar button
 .
.Ensure that the MyFlightRESTService test is selected, and then click Run to run your test.
-
When the test is complete and the run results are shown, navigate down in the Test Flow and select any of the ReserveOrder nodes.
In the Captured Data area on the right, view the Request and Response data generated during the test run.
-
Click any of the links in the table to view the full request or response code.
For example:

-
Scroll all the way down to view the checkpoint data.
In this case, one of the checkpoints failed because there was a price included that was larger than 500.

-
- Continue with Resolve a REST service conflict.

Resolve a REST service conflict if the service model's properties changed after you created the test. This exercise describes how UFT One's Resolve Conflict wizard can help you update your test.
Edit the service model properties
Edit the service model properties to create a conflict in your test, when compared to the updated service model.
Do the following:
-
In the Toolbox pane, right-click the Local Activities > Flights REST Service node, and select Edit Service.
-
In the Edit REST Service dialog, select the ReserveOrder node.
-
On the right, select the Custom Input/Checkpoints tab
. -
Select the Total_Price property, and then click the Edit Property button
 at the top.
-
Change the name to TotalPrice (remove the underscore between the words).
-
Repeat the previous steps to change the Order_Number property name to OrderNumber.
-
Click OK to make the change to your service and close the dialog box.
UFT One saves the changes, and now shows an alert in the canvas, indicating that the values no longer match.

- Continue with Resolve the conflict you created.
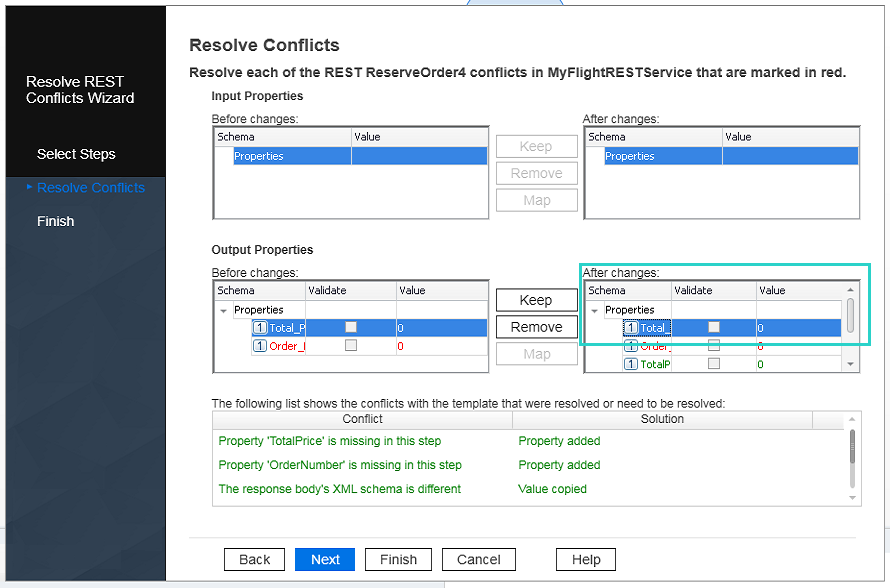
Resolve the conflict you created
Now that you have a conflict between your test and your API service model, resolve it to update your test with the new values.
Do the following:
-
Click the alert in the canvas to display its details, and then click on the alert text to open the Resolve REST Conflicts wizard.
-
In the first screen (Select Steps), select the checkbox for the ReserveOrder step, and click Next.

-
The Resolve Conflicts screen in the wizard highlights all steps with conflicts in red.
In the Output Properties area at the bottom, in the After changes box, select the Total_Price property.

-
Click the Remove button between the Before.. and After.. boxes to remove the Total_Price property.
-
Repeat these steps to remove the Order_Number property too.
-
Click Next. The Finish screen should confirm that you have successfully removed all conflicts.
-
Click Finish to exit the wizard, and confirm that the alert was removed from the canvas.
The property names in the test have now been updated to reflect the new name in the service model.

- Save your test, and continue with other lessons in the tutorial.
 Next steps: