Share this page


This exercise describes how to create object repositories, which are collections of test objects used to test your app's user interface.
Define UFT One Record and Run settings
Configure UFT One to learn objects in the MyFlight application as WPF test objects.
Do the following:
-
Start with the MyFlightApplication solution and MyFlight test opened in UFT One. For details, see Plan your test and create a solution and Create and run GUI tests.
-
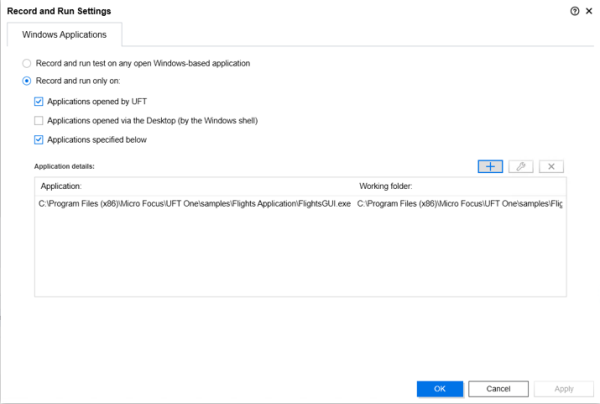
Set UFT One's Record and Run Settings to define how UFT One learns objects in the app.
-
Select Record > Record and Run Settings.
-
Select Record and run only on: Applications opened by UFT One and Applications specified below
-
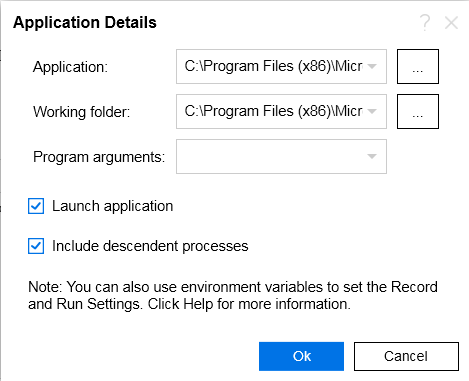
Click the Add
 button and browse to the FlightsGUI.exe file at: <UFT One installation folder>\samples\Flights Application\FlightsGUI.exe
Leave the other options in the Application Details dialog box with their default values.
-
-
Click OK to return to the Record and Run Settings dialog box.
-
Click OK again to return to the main UFT One window.
Then, continue with Spy on objects in the MyFlight application.


Spy on objects in the MyFlight application
Spy on the available properties and operations for some objects in the MyFlight application.
Do the following:
-
Open the MyFlight sample app.
If it's already open, close it and re-open it to enable UFT One to recognize it properly. For more details, see Explore the sample MyFlight application.
-
In UFT One, click the Object Identification Center
 button in the UFT toolbar.
 -
Toggle on the Multi-object Spy switch
 and click the Start spying button
  to spy on multiple objects at a time.
The OIC window is replaced by the OIC widget
 , the cursor is changed to a hand icon
  , and UFT One is hidden to display MyFlight app.
 Switching to a regular Windows cursor
When switching back and forth between the OIC and any other app, press CTRL to change the cursor from the hand to a regular Windows cursor.
Hold down the CTRL button for as long as you need the Windows cursor and release it to switch back to the OIC's hand icon.
-
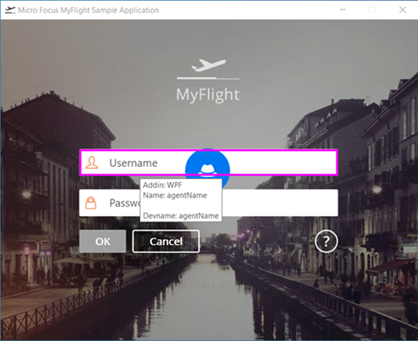
Place the hand on an object in the MyFlight app and watch the captured properties and values displayed in the tooltip.
-
Click in the MyFlight Username edit box and Password edit box, and then click the OK button on the Login page.
The OIC widget shows the number of captured objects.
When you are done, click the OIC widget to open the OIC window again. The window displays the list of objects you spied.
Note: If you enable the Hover mode before spying, you can hover over an object and the OIC will automatically capture the object.
-
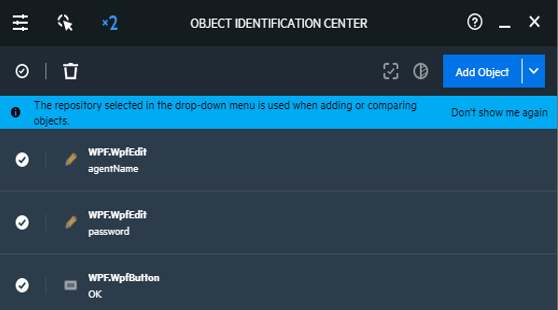
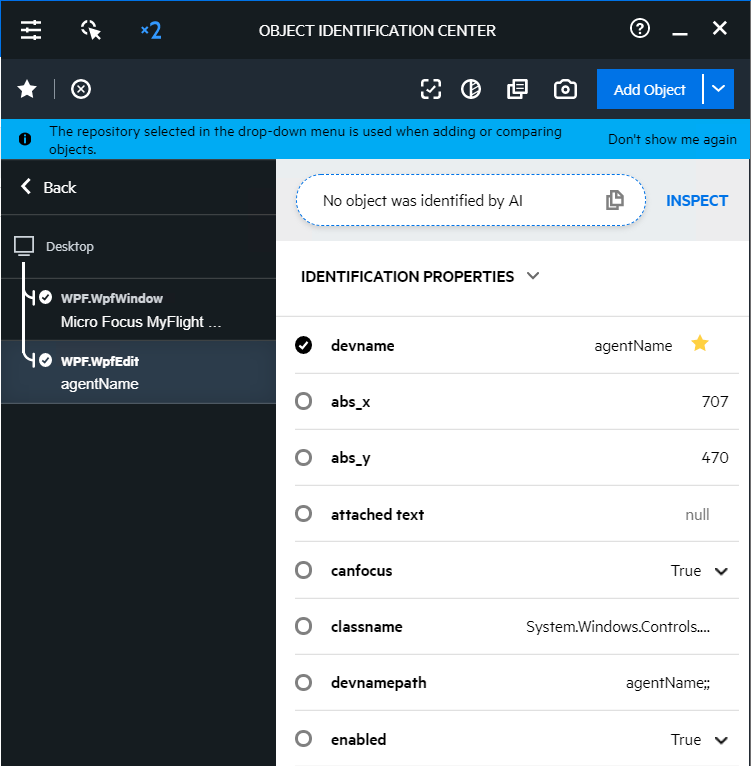
In the OIC window, hover over a spied object and click the Edit button to enter the Edit view. The Edit view shows the object's hierarchy and identification properties.
- Click Close to close the OIC.
Add specific objects to the object repository
Add specific objects required for your test to the object repository, one by one.
Do the following:
-
In UFT One, select Resources > Object Repository Manager. The Object Repository Manager enables you to manage the object repositories associated with your test, and contain your test objects.
-
In the Object Repository Manager window, select Object > Add Objects. Both UFT One and the Object Repository Manager are hidden.
-
Click in the MyFlights app Username edit box, and then select the agentName object, and click OK.

The agentName object is added to the Object Repository along with its parent object, the Micro Focus MyFlight Sample window object.
-
Repeat the previous two steps to add test objects for the Password edit box and the OK button.
 Drill down to the agentName test object
In the Test Objects tree, select the agentName object, and notice the object properties shown in the right pane of the object repository. These are descriptive, or identification properties that UFT One uses to identify the object during a run session.

-
-
In the Saved Shared Object Repository dialog, browse to folder where your solution and test is saved, and create a new folder named TutorialObjectRepositories.
By default, the solution and test folder is C:%HOMEPATH%\My Documents\UFT One.
- In the File name field, enter the name as Login.
Note: This step only saves the object repository. It is not yet associated with your test.
-
-
Associate the Login object repository with the Login action in your test.
This enables you to use objects in this repository with any step in the Login action. Do the following:
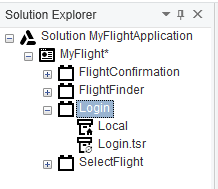
- In UFT One's Solution Explorer, browse to and right-click the Login node.
- Select Associate Repository with Action, and then browse to the Login.tsr file you created in the previous step. Click Yes in the message box that opens.
The object repository is now associated with the Login action, and is displayed in the Solution Explorer as a child element of the action.
-
Save your test. Then, continue to add object repositories for other areas of the MyFlight app.
For details, see Create object repositories and Navigate and learn.

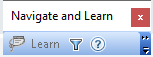
Navigate and learn
Use UFT One's Navigate and Learn feature to create shared object repositories for each of the remaining pages in the MyFlight app. Navigate and Learn enables you to learn all objects in a page or section of an application at once.
Do the following:
-
In the MyFlight app, log in to display the Book Flight page. Log in using the following credentials:
- Username: john
- Password: hp
-
Create a new shared object repository. In UFT One's Object Repository Manager window, click New
 .
. -
Continuing in the Object Repository Manager, select Object > Navigate and Learn.
Both UFT One and the Object Repository Manager windows are hidden, and the Navigate and Learn toolbar appears.
-
Click the Define Object Filter button
 , and then select Default object types.
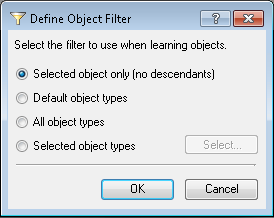
-
Have UFT One learn all objects in the Book Flight page of the MyFlight app. Do the following:
- In the MyFlight app, click the Book Flight's title bar to bring it into focus.
- In the Navigate and Learn toolbar, click Learn.
Note: The MyFlight app flickers, and UFT One adds test objects to your new object repository.
Do not interact with the MyFlight app as UFT One completes this process.
-
Close the Navigate and Learn toolbar to return to UFT One and the Object Repository Manager windows.
-
Save your object repository in the TutorialObjectRepositories directory you created earlier, and name it FlightFinder.
-
Associate the new FlightFinder.tsr object repository with the FlightFinder action in your test flow.
For more details, see how you did this above for the Login action.
Create additional object repositories
Repeat these steps to create additional object repositories for the remaining MyFlight app page. Save your test as you go, and name each object repository according to the associated action name.
Note: Before learning a page, ensure you've selected items or entered text to ensure that all buttons are enabled. This ensures that UFT One learns these button objects properly.
Action and repository summary
When you're done, your test will have object repositories for the following pages:
| MyFlight page name | Object repository name | Associated action |
|---|---|---|
| Login | Login | Login |
| Book Flight | FlightFinder | FlightFinder |
| Select Flight | SelectFlight | SelectFlight |
| Flight Details | FlightConfirmation | FlightConfirmation |
More about objects and object repositories
UFT One uses test objects to recognize objects in your apps while running your test.
Each of these test objects is based on UFT One's test object model, which is a large set of object types, or classes. Each test object class has:
- A list of available description properties that UFT One can learn the object
- A list of relevant operations that UFT One can perform on that object.
Each test object class is part of a larger test object hierarchy. For example, the agentName test object is a child object of the Micro Focus My Flight Sample window object.
Run-time objects are the actual objects in your app. When you add an object to an object repository, UFT One learns the properties of the run-time object and translates them into UFT One test objects.
Object repository recommendations
We recommend:
Create separate shared object repository for each section/page of your app.
This ensures that it's simple to find the correct object when making updates.
Store test objects in shared repositories to reuse them in multiple actions or tests.
Updates made to these test objects are used in all associated locations.
Include only the test objects needed for your testing purposes.
This keeps your repositories small and manageable.
Provide logical names for your test objects and repositories.
This ensures that others can easily select the correct objects when creating or modifying tests.
 Next steps: