Share this page


Generate data to drive your test
Relevant for: GUI tests and business process tests
The Test Combinations Generator helps you prepare test configuration data by using the parameters in your test and their possible values to create multiple data combinations.
By default, you must provide this data yourself. Depending on the number of parameters you have, this task can grow exponentially. Use the Test Combinations Generator to do the work for you.

Get started with the Test Combinations Generator
Do one of the following, depending on the type of test you're working with.
In your GUI test, get started as follows:
Create your data table parameters in the Global sheet before you start generating values.
-
Double-click a parameter name in the first row of the Data table (Data pane > Global tab) and enter the parameter name.
- Save your test before continuing with the Test Combinations Generator.
To open the Test Combinations Generator, display your test or action, and then click the Test Combinations Generator toolbar button  .
.
In your BPT test, get started as follows:
Create your test parameters before you start generating values.
-
In the Parameters tab of the Properties pane, click Add > select Add Input Parameter.
-
Define the parameter details in the grid.
- Save your test before continuing with the Test Combinations Generator.
To open the Test Combinations Generator, select the Properties pane > Test Configurations tab and click the Combinations Wizard button. For example:
By default, if you've added parameters without saving your test, UFT One prompts you to save your test.
In this message prompt, select Always do as selected to have UFT One always save your test by default. If you select this option, UFT One will not show this message again.
To change this default and view this prompt again if needed, click Restore Factory Defaults in your UFT One Options. For more details, see Global options.
Define parameter values
In the Test Combinations Generator, enter possible values for your parameters using the following methods. Then, continue with View your data and Generate your test configuration.
- Enter values manually
- Generate parameter values
- Capture list values from your UI
- Import values
- Define Happy and Error Path values
- Join parameter values
- Exclude columns
Use the Undo  / Redo
  buttons if you change your mind on any of the following actions: Edit, Delete Value, Paste, Generate Data, Add Happy Path, Add Error Path, Reset Happy, Reset Error Path.
In the Test Combinations Generator table, click a cell to enter parameter values as needed.
Have the Test Combinations Generator generate parameter values.
-
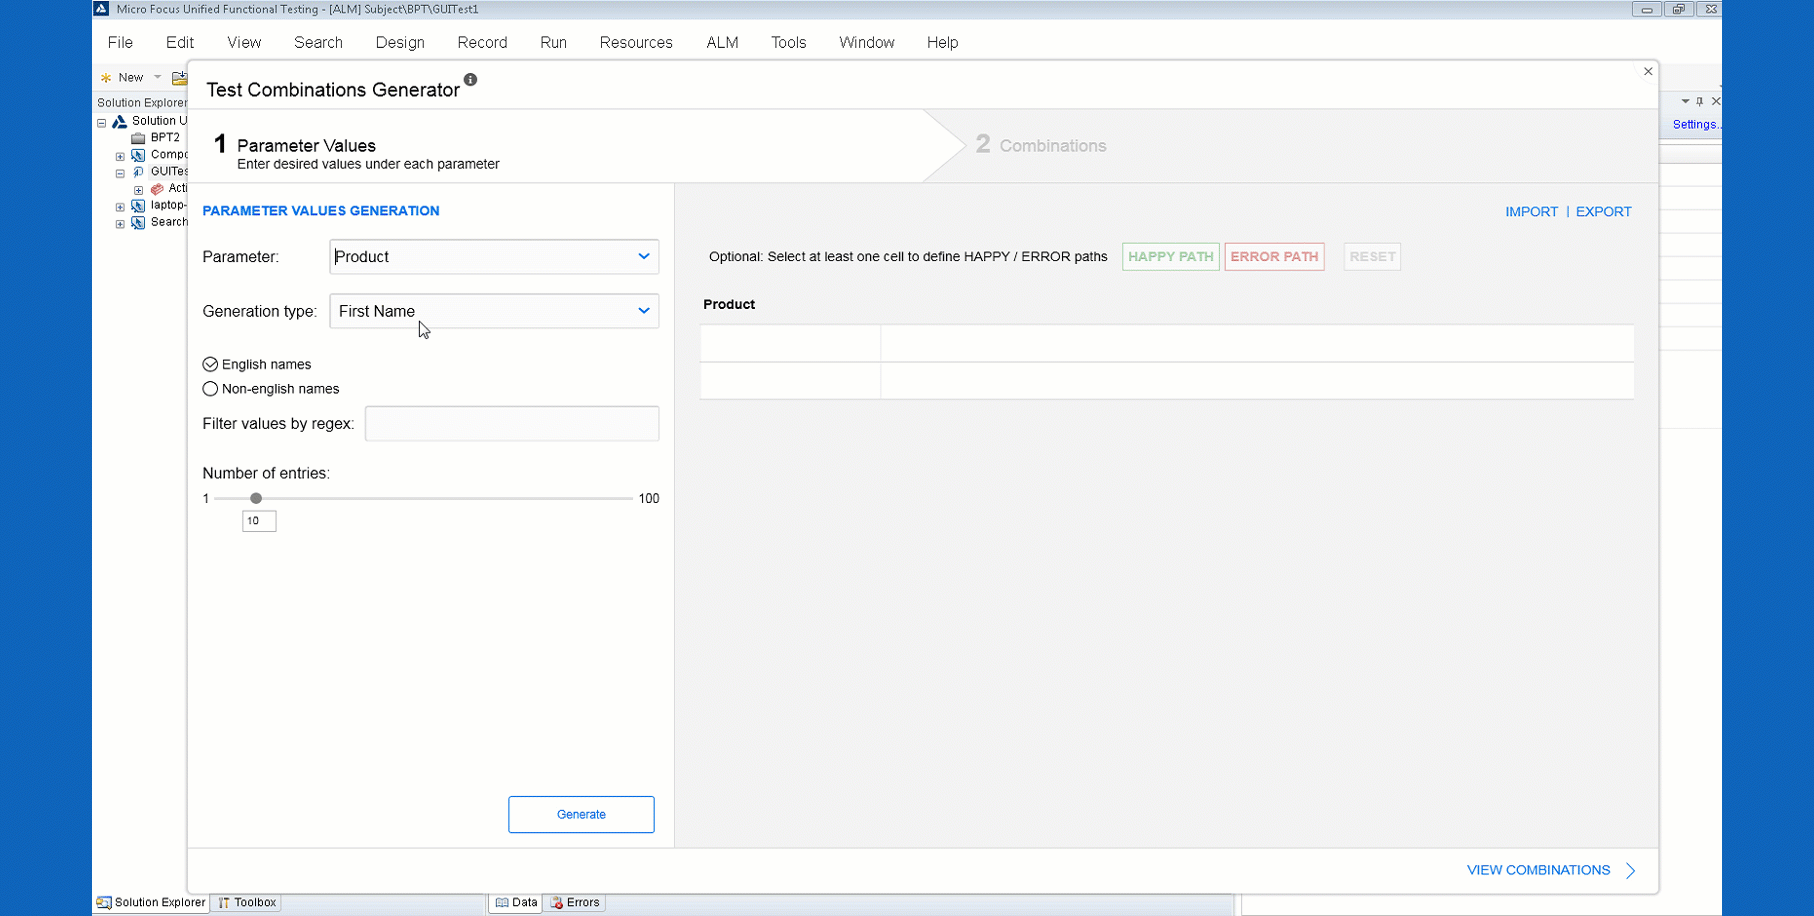
On the left of the Test Combinations Generator wizard, select a parameter name and generation type, depending on the type of values you want to enter.
-
Certain types of values will require you to select other options.
For example, for the First Name or Full Name value type, select English or Non-English.
-
To generate values based on the data in your list object, select Capture from UI.
For more details, see Capture list values from your UI.
-
-
Drag the Number of entries slider to define the number of values you want to generate.
The Test Combinations Generator only generates unique items, without duplicating values.
For example, if you instruct UFT One to generate 20 entries, but limit the available values to the numbers between 95 and 100, only 6 entries are generated.
-
At the bottom of the left pane, click Generate to populate the table with generated values.
Capture list values from your UI
To capture values directly from the list object in your application.
Capture from UI is supported for list objects in the following technologies: Delphi, Java, Mobile, .NET, SAP, Standard Windows, Web, and Windows Presentation Foundation.
Do the following:
-
On the left, select your parameter name, and then select the Capture from UI generation type.
-
In the Object Name field, click
 to select an object in your application. Select the list in your application with the values you want to capture.
 -
Then, under the Object Name field, select one of the following options:
Select from the captured list of values
Select the specific values you want to include from the Captured list of values below. Generate randomly from captured values Allow UFT One to choose the values to include in your data.
-
Define the number of entries you want to enter, and click Generate to populate the values in the table.
Note: Leading and trailing spaces are trimmed from your values. For example, " London " is captured as "London".
View a demo:
Import parameter values from an Excel file saved locally, or in ALM. At the top right of the Test Combinations Generator, click Import.
If you’ve added parameters and values to your test after opening the Test Combinations Generator, your default value is imported in for a BPT test only.
In a GUI test, the parameter names in your Excel file must match those in your test. If the parameter names do not match exactly, the parameter names are imported, but not the values. In such cases, add your parameter values manually.
Tip: Alternatively, if you are working in a GUI test, select a data table as follows:
- Select File > Settings > Resources and select the Other location option.
- Browse to your data table to pull the parameter values.
Define Happy and Error Path values
After populating the parameter values, further define your data by setting each value as a Happy Path or Error Path value.

|
Values that should not cause errors or exceptions in your test. These values are highlighted in green. |

|
Values that should cause expected errors or exceptions. These values are highlighted in red. |
Join parameter values to combine them when generating your data. For example, you may want to join a First Name and Last Name value to create one set of name permutations.
In the table in the Parameter Values tab, use the CTRL key to select the columns you want to join. Then, right-click a selected column header and select Join.
The columns are colored in grey and locked together.
To exclude a full column of data from your generated configurations, exclude it in the parameter values table.
Right-click the header for the column you want to exclude, and select Exclude.
When columns are excluded, default parameter values are used when generating the configuration.
For more details, see Generate your test configuration.
View your data
After the Test Combinations Generator table is populated with all of the possible values, click View Combinations at the bottom right to display all possible combinations.
UFT One displays all possible combinations for your parameter values as follows:
| PERMUTATIONS tab |
Lists all possible value combinations. From the ALGORITHM dropdown at the top right, select one of the following to update the values accordingly:
The Pairwise and Triplewise algorithms assume that many errors in your application are not caused by single parameters, but rather interactions between pairs or triples of parameters. |
| ERROR PATHS tab | Lists all possible combinations using the ERROR PATH values. |
For more details, see Define Happy and Error Path values.
To generate your configuration files, continue with Generate your test configuration.
Generate your test configuration
In the Combinations pane of the Test Combinations Generator, do the following:
-
In the CONFIGURATION NAME field, enter a unique name for your configuration.
-
If you've defined values as HAPPY or ERROR PATH values, and want to exclude one or more of these types of data from your configuration, do the following:
-
At the top right, click FILTER.
-
Select the types of data you want to create:
Happy Paths Select to create a configuration file with all Happy Path value combinations.
Error Paths Select to create a configuration file with all Error Path value combinations.
Regular Paths Select to create a configuration file with all value combinations except for Error Path values.
Note: By default, no filter is applied. If you've defined HAPPY and ERROR PATH values and do not apply a filter, three files will be created, one for each type of data.
-
- At the bottom right, click CREATE CONFIGURATIONS.
The configuration is saved with the test, in the test folder by default. This ensures that it's available for use with the test.
If you specified HAPPY or ERROR PATH values, they are handled as follows:
| GUI tests |
Separate sheets are added to the /Configurations directory with a _Happy and _Error suffix added to the name. The configuration is also displayed in the Test Combinations Generator dropdown list in the toolbar. All values are placed in the same sheet in the Global table. |
| BPT tests |
If you specified Happy path or Error Path values and instructed UFT One to generate these combinations, additional parameters are created, named TCG_IsHappy and TCG_IsError. In addition, relevant columns are added to the data resource file. |
Tip: Extra characters are added to any cell value for a Happy or Error path value: &h for Happy Path values and &e for Error Path values.
If you need to use these excel sheets elsewhere with the exact values, first remove these characters manually.
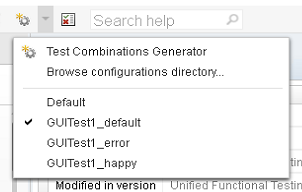
If you are working in a GUI test, access the configuration files for your test from the Test Combinations Generator button in the UFT One toolbar.
For example:
If your GUI test is stored in ALM, continue with Add your test data to your ALM test.
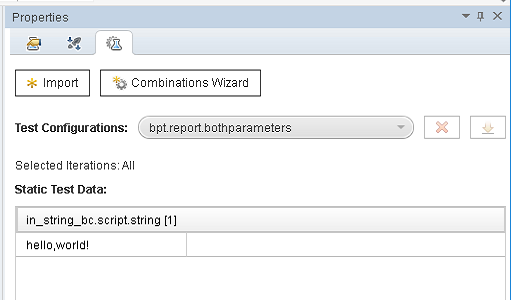
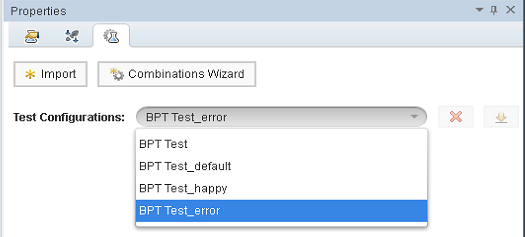
If you are working in a BPT test, access the configuration files via the Test Configurations tab of the Properties pane.
Select a configuration file from the Test Configurations dropdown:
Add your test data to your ALM test
If you are working with a GUI test that is saved in ALM, your test configuration is not saved in ALM automatically.
Instead, upload your configuration to the ALM Test Resources module manually as follows:
-
In ALM's Testing module, select Test Plan.
-
Browse to and open your test, or create a new test configuration. Click the ID link to open the Test Configuration Details dialog box.
-
In the Test Configuration Details dialog box, select Data on the left, then select Override test data resource.
-
From the Data Resource drop-down, select the data table resource you uploaded earlier.
-
In UFT One, reopen the test, and set the data table to the data table resource now saved in ALM.
-
Open the Test Settings Resources pane (File > Settings > Resources).
-
In the Data Table area, select Other location, and browse to and select your data table.
-
The data source is added to the Data Table area of the Resources pane.
For more details, see Create a data resource file.
Add a custom data generator
If UFT One's default dictionaries for generation do not suit your needs, create a custom data generator for the parameter types in your test:
- Create an .xml file for your data generator.
-
In the XML file, add the following XML:
<Generators>
 <DataGenerator name="[CustomGeneratorName]" type="[GeneratorType]" title="[GeneratorTitle]" returnType="[GeneratorResultType]">
 ...
 </DataGenerator>
</Generators>
name A unique name for the generator type. type The generator type. Possible values:
-
HP.UFT.TCG.DataGeneration.Generators.RegExpGenerator: to specify the value format using a regular expression
-
HP.UFT.TCG.DataGeneration.Generators.BaseRepositoryGenerator: to specify the values with standard strings or numbers.
title The title of the Generation Type as it is displayed in the Test Configurations Generator. returnType The format of the values to return. Supported types include:
-
String
-
Password
-
Number
-
Date
Note: You can add multiple generator types in this XML file.
-
-
In the Data Generator attribute, specify the parameter details using the Parameter element:
<Generators>
 <DataGenerator name="[CustomGeneratorName]" type="[GeneratorType]" title="[GeneratorTitle]" returnType="[GeneratorResultType]">
	<Parameters>
		<Parameter .... />
	</Parameters>
 </DataGenerator>
</Generators>
The attribute values for the Parameter element differ if you are using the regular expression type (HP.UFT.TCG.DataGeneration.Generators.RegExpGenerator) or the regular tyle (HP.UFT.TCG.DataGeneration.Generators.BaseRepositoryGenerator):
Regular expression -
name: must be the string pattern
-
defaultValue: the default regular expression pattern
-
type: must be the string System.String
Non-regular expression -
name: a unique name for the parameter
-
defaultValue: the default parameter value
-
type: must be the string System.Boolean
-
title: the parameter title
-
-
For non-regular expression-based parameter types, add the Repositories element:
<Generators>
 <DataGenerator name="[CustomGeneratorName]" type="[GeneratorType]" title="[GeneratorTitle]" returnType="[GeneratorResultType]">
	<Parameters>
		<Parameter .... />
		</Parameter>
	</Parameters>
	<Repositories>
		<Repository.... />
		</Repository>
	</Repositories>
 </DataGenerator>
</Generators>
The Repository element must contain the following attributes:
name A unique name for the repository. path The path to the Excel file containing the possible values. useWhenCheck The name of the parameter entered in the Parameter element. This instructs UFT One to use the repository when a checkbox for one of the parameter values is checked.
rule The format for data generation. -
Add the XML file to the <UFT One installation folder>/dat/DataGenerators folder.
Sample Data Generators XML file:
<?xml version="1.0" encoding="utf-8"?><Generators><DataGenerator name ="FullNameGenerator" type ="HP.UFT.TCG.DataGeneration.Generators.BaseRepositoryGenerator" title="Full Name" >
<Parameters>
<Parameter name ="english" defaultValue ="true" type ="System.Boolean" title = "English"/>
<Parameter name ="non-english" defaultValue ="false" type ="System.Boolean" title = "Non-English"/>
</Parameters>
<Repositories>
<Repository name ="fr_full_names" path ="FrenchFirstLastNames.xlsx" useWhenCheck ="non-english">
<Rule>[MaleName] [Surname]</Rule>
<Rule>[FemaleName] [Surname]</Rule>
</Repository>
<Repository name ="en_full_names" path ="EnglishFirstLastNames.xlsx" useWhenCheck ="english">
<Rule>[MaleName] [Surname]</Rule>
<Rule>[FemaleName] [Surname]</Rule>
</Repository>
<Repository name ="jp_full_names" path ="JapaneseFirstLastNames.xlsx" useWhenCheck ="non-english">
<Rule>[MaleName][Surname]</Rule>
<Rule>[FemaleMaleName][Surname]</Rule>
<Rule>[FemaleName][Surname]</Rule>
</Repository>
<Repository name ="ru_full_names" path ="RussianFirstLastNames.xlsx" useWhenCheck ="non-english">
<Rule>[MaleName] [MaleSurname]</Rule>
<Rule>[MaleName] [FemaleMaleSurname]</Rule>
<Rule>[FemaleName] [FemaleSurname]</Rule>
<Rule>[FemaleName] [FemaleMaleSurname]</Rule>
</Repository>
</Repositories>
</DataGenerator>
</Generators>
 See also: