Share this page


Relevant for: API testing only
This topic describes how to use Flow Control activities.
In this topic:
Add a conditional step
Conditional steps enable you to specify different test path alternatives depending on the outcome of a previous step. This is the equivalent of an If...Else function in an application's code.
-
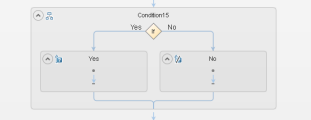
In the Toolbox pane, expand the Flow Control activities node and drag a Condition step to the canvas.
The canvas displays a branched test step, with Yes and No branches:
-
Set the trigger for each branch of the step.
You can the trigger for the Yes or No branches in the following ways:
Specify a condition for the output of a test step -
In the Condition tab
 in the Properties pane, select the Use condition option. The condition properties are displayed.
 -
In the Variable field, click the Link to data source button
 .
. -
In the Select Link Source dialog box, link to the output of a previous step.
You must link the Variable field to a previous step to set the value to meet to trigger the condition.
-
Specify the expected Value and the Operator for the step selected in the Variable field.
Use an event handler -
In the Condition tab
in the Properties pane, select the Use event option. -
In the Events tab
 , in the Condition row, click the drop-down arrow and select Create a default handler. The TestUserCode.cs file opens in the document pane.
 -
In the IfElse<#>_OnCondition section of the TestUserCode.cs file, replace the TODO section with your event handler code:

-
-
Drag activities to the Yes and No branches of the Condition step to create the steps to run based on the results of the condition.


Add a loop
-
In the Toolbox pane, expand the Flow Control activities node and drag a Loop step to the canvas.
-
In the Input tab of the Properties pane, select the Loop type and define the loop properties.
Select one of the following loop types:
-
'For' Loop
This loop runs the included steps the specified number of times. Set the number of iterations to run the loop.
Note: If the number of iterations is defined elsewhere (the result of a previous step or a data table), link to the property by clicking the Link to data source button
in the Value cell for the Number of Iterations property. -
'Do While' Loop
This loop runs indefinitely until a specific condition is met. When the condition is met, the test advances to the steps following the loop.
You can set the loop run properties in the following ways:
Specify a condition -
In the Condition tab
in the Properties pane, select the Use condition option. The condition properties are displayed. -
In the Variable field, click the Link to data source button
. -
In the Select Link Source dialog box, link to the output of a previous step.
You must link the Variable field to a previous step to set the value to meet to trigger the condition.
-
Specify the Value and the Operator for the value of the step selected in the Variable field.
Use an event handler -
In the Condition tab
in the Properties pane, select the Use event option. -
In the Events tab
, in the Condition row, click the drop-down arrow and select Create a default handler. The TestUserCode.cs file opens in the document pane. -
In the Loop_OnCondition section of the TestUsercode.cs file, replace the TODO section with your event handler code.
-
-
'For Each Loop
This loop runs one time for each item in a selected collection (usually an array). To link this loop to a collection from a different step, click the Link to data source button
and select the collection in the Select Link Source dialog box.
-
-
Drag activities inside the loop.
-
Associate data sources with the loop.
You can assign a specific data source to use with the current loop. The data from this data source is then available for all steps included in the loop. For details, see Add a data source to the Test Flow or test loop.
Add steps to pause and restart the test
You can add any of the following steps to your test to pause and restart the test:
-
Break. This step stops the test. You insert a Continue step to resume the test.
-
Continue. This step resumes the test after a Break step stops it.
-
Sleep. This step temporarily pauses the test for a specified number of milliseconds. Enter the number of milliseconds to wait in the Input/Checkpoints tab for the step.
Add a wait step
Wait steps are mandatory when your application uses an asynchronous service call. After the call to the service, you insert the Wait step. While the test is waiting for the response from the service call, the test waits the amount of time specified in this step.
-
In the Toolbox pane, expand the Flow Control activities node and drag a Wait step to the canvas.
-
In the Input/Checkpoints tab in the Properties pane, Set the step properties:
-
Timeout: the number of milliseconds to pause the test.
-
Start timeout from step: the step for which UFT One is waiting for a response.
-
Action on Timeout: what happens when the end of the timeout is reached and the step's response is not received.
-
Completion events: the events that signify completion of the timeout.
-