Share this page


Relevant for: API testing only
Access a step property
-
From the Toolbox pane, drag the activity for which you want to access properties or add a custom code activity or event handler to an existing activity. Make sure that the custom code activity is after the activity for which you want to define properties.
-
In the canvas, select the step.
-
In the Properties pane, open the Events tab
 .
. -
In the Events tab, create an event handler. A TestUserCode.cs file opens in the document pane.
-
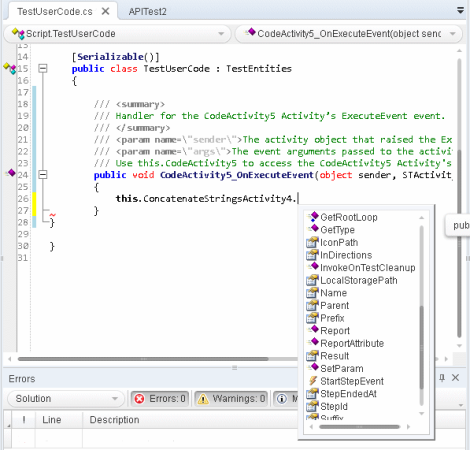
In the TODO section of the TestUserCode.cs file, use the this object to access the properties of the activity for which you want to set properties, using the following syntax:
this.<activity name>.Input.<property name>Note: For more details on the this object, see http://msdn.microsoft.com/en-us/library/dk1507sz.aspx.
-
Enter the step name for which you want to set properties followed by a . character.
-
Enter the property name of the activity to set properties, followed by a . character.
In this example, you set the Prefix and Suffix properties for the ConcatenateStringsActivity step.

Access a step's parent activity
The Parent property of a step refers to the loop, condition, or parent activity that encloses a test step.
-
To access the activity's parent, use the this object as described in the Access a step property step
-
Instead of entering the step's properties, enter the Parent property for the step.
-
If you want to get the parent loop for an activity, enter the GetParentLoop method, using the following syntax:
this.<activity name>.GetParentLoop();
The following code retrieves the parent activity and converts it into a string:
string ParentName = this.ConcatenateStringsActivity5.Parent.Name
Set the value of a step's properties
-
In the canvas, select the step for which you want to set property values.
-
In the Properties pane, open the Events tab
. -
In the Events tab, create an event handler. The TestUserCode.cs file opens.
-
In the TODO section of the TestUserCode.cs file, enter the parameter value for the parameters/properties, using this syntax:
this.<activity name>.Input.<parameter name> = <parameter value>;or
this.<activity name>.Output.<parameter name> = <parameter value>;You cannot set checkpoint values using the this.<activity name> object. You must use the args.Checkpoint object instead.
Important: Make sure that the value is the same type as the type entered when you created the parameter, i.e. a string parameter must have a string value.
When your test runs, UFT One passes the value as specified in your custom code step to the other activity.
The following code sets the value of the Prefix and Suffix value for a Concatenate Strings activity:
CodeActivity6.Input.a = "Hello";
CodeActivity6.Input.b = "World";
this.ConcatenateStringsActivity4.Prefix = CodeActivity6.Input.a;
this.ConcatenateStringsActivity4.Suffix = CodeActivity6.Input.b;
Access the value of a step's property in runtime
You can also report the runtime value of a test step's property or parameter in the Output pane during a test run. This is useful if you want to watch the value of a particular operation or object during the test run, without having to stop and debug the test.
To do this, you can use a UserLogger object:
-
Add an event handler for the OnAfterExecuteStep event to the step for which you want to watch a property/parameter value.
-
Use the UserLogger object to report the value to the compilation log in the Output pane, using the following syntax:
Context.UserLogger.Info(<activity name>.<property name>);Note: Using the Context object in an event handler or custom code enables you to get the contextual value for the property/parameter (i.e., the runtime value), instead of the entered value (what you enter in the Properties pane, for example).
When the compilation log is displayed in the Output pane, you will see a line with the property/parameter value displayed as part of the compilation log. Note that the Output pane does not list the property/parameter name with the value, so you must search within the step where you placed the code to find this value.
For example:

The following code retrieves the value of the Prefix property of a ConcatenateStrings activity:
Context.UserLogger.Info(ConcatenateStringsActivity4.Prefix);
Enable or ignore selected checkpoints - optional
You can instruct UFT One to ignore the checkpoints for any test step. This is useful if you need to switch between enabling and ignoring checkpoints on different test runs.
You use the Checkpoint object to access the checkpoint's properties:
-
In the canvas, select the step for which you want to enable or ignore the checkpoints.
-
In the Properties pane, select the Events tab
. -
In the Events tab, create an event handler for the OnCodeCheckpointEvent event. The TestUserCode.cs file opens.
-
In the TODO section of the TestUserCode.cs file, enable or ignore a checkpoint for an event using the following syntax:
args.Checkpoint.RunUICheckpoints = true (to enable a checkpoint)or
args.Checkpoint.RunUICheckpoints = false (to disable a checkpoint)
Set the value of a checkpoint
In addition to enabling or ignoring a checkpoint, you can also set the value (expected or not expected) of a checkpoint. This can be useful both to validate that your application works as expected but also does not allow unexpected behaviors.
-
Enable a checkpoint for the step, as described in Enable or ignore selected checkpoints - optional
-
Following the line containing your code for enabling the checkpoint (args.Checkpoint.RunUICheckpoints = true), enter the value of your checkpoint, using the following syntax:
args.Checkpoint.Assert.Equals("<actual value>", "<expected value>");For details on the supported methods for the args object in UFT One, see Assert object.
-
The following code sets the value of a checkpoint for a ConcatenateStrings step:
args.Checkpoint.Assert.Equals(this.ConcatenateStringsActivity4.Prefix+this.ConcatenateStringsActivity4.Suffix, this.ConcatenateStringsActivity4.Result); -
This code checks if the text value (alphabetical order for a string) of the prefix is less than the suffix. To ensure that the checkpoint succeeds, enter a prefix value that is greater than the suffix, for example a prefix of aa and a suffix of bb.
 See also: