
Share this page


Learn business process tests and flows
Relevant for: business process tests and flows
This task describes how to learn areas of your SAP application in order to create business process tests and flows. This enables you to create components based on screens or areas of your SAP application quickly.
Prerequisites
Before learning business process tests and flows, you must do the following:
-
Install and load the Web and SAP Solutions Add-in or the SAPUI5 add-in.
-
Log in to your SAP application.
-
Create or open a business process test or flow.
-
You must be part of an ALM user group with the following task permissions: Modify Folder (Test Plan), Modify Test, Add Component Folder, Add Component, Add Step, Add Parameter, Add Resource, Modify Component, Modify Step, Modify Parameter, Modify Resource, and Delete Resource.

Set component reuse options
In the BPT Packaged Apps Kit pane of the Options dialog box (Tools > Options > BPT Testing tab > BPT Packaged Apps Kit node), select the appropriate option to instruct UFT One on how to reuse similar or identical components:
| Manually select components for reuse: | This option enables you to select the components in the Learn Summary dialog box after finishing the learning session. |
| Automatically reuse identical components: | This automatically uses existing components that are identical without prompting you after learning the application. |
| Ignore comments when comparing scripts | This instructs UFT One to ignore comment steps when comparing learned components to existing ones. |
| Component Type: | Select from Keyword GUI or Scripted GUI components. |
Set parameter options
In the BPT Packaged Apps Kit pane of the Options dialog (Tools > Options > BPT Testing tab > BPT Packaged Apps Kit node), select how you want UFT One to reuse parameters:
-
Automatically parameterize steps using Business Component parameters: Enables you to use the Business component parameters as the step value parameters
-
Use the default values from the learned flow: Uses the values you entered when learning the flow
-
Use the values from the reused components: Use the values from the components you select for reuse.
Perform user actions in your SAP application
-
Do one of the following:
-
In UFT One, with a business process test or flow selected, in the toolbar, press the Learn button
 . UFT One is minimized and the Learn toolbar is displayed.
 -
In the BPT View, click the Smart Record a New Business Process Test or Flow button.
-
-
Perform user actions in your SAP application. As you perform actions, the Learn toolbar provides a count of the number of steps performed in the application:

-
When you are finished performing all the necessary actions, press the Stop button
 . UFT One displays a progress indicator, and adds the components to your test and to your ALM project.
Optional - add checkpoints and output values while learning
Using the Learn Toolbar, you can also add checkpoints and output values while learning your SAP application. This eliminates the need for you to add these steps after learning components.
-
While performing user actions in your SAP application, in the Learn toolbar, click the Insert Checkpoint or Output Value
 button and select the type of checkpoint to insert.
 -
If necessary, in the Object Selection dialog box, select the object on which you want to insert the checkpoint or output value.
-
In the Checkpoint Properties dialog that opens, select the test object properties to check and click OK. The Learn toolbar counter changes to note that you added a checkpoint or output value step. In addition, this checkpoint step will be part of the learned component that is created after you stop learning the application.
Select components
After you finish learning the screens/areas in your application, UFT One displays a summary of the learning session in the Learn Summary dialog box.
If you want to keep the learned components without reusing similar or identical components, click Create. UFT One creates the new components and saves them in your ALM project. In addition, the learned components are added to the open business process test.
Reuse an existing component
If UFT One detects that a learned component is similar or identical to an existing component, UFT One displays the number of similar components next to the component name in the component tree.
-
In the learned component list, select the component for comparison. In the right pane, UFT One displays the list of possible components to reuse.
-
In the right pane, display the Available Components for Reuse section.
Tip: If you want to view details about a similar or identical component, in the Available components list, click the arrow to the left of the component name. UFT One then displays further details about the component, including areas of similarity and the steps used in the component to be reused:
-
From the list of available components for reuse, select a component and click the Reuse button. UFT One replaces the learned component with the existing component, and updates it with an icon in the learned components list:

-
Repeat this process for each component that you wish to reuse.
-
When you are finished selecting the components that should be reused, click Create. UFT One creates the new components and saves them in your ALM project.
Remove a learned component
-
In the component list, select the component to remove.
-
To the left of the component, click the X button.
-
After you have removed all the unnecessary components, click Create. UFT One creates the new components and saves them in the specified location in the ALM project.
Resume learning components
After you create an initial test with learned components, you can resume learning components in the same test.
-
In the document pane or the Solution Explorer, select the business process test or flow to which you want to add learned components.
-
In the toolbar, click the Learn button.
-
When prompted, decide how to insert newly learned components:
Yes If you select Yes, the existing components in the test are removed and newly learned components are inserted instead. No If you select No, UFT One inserts the newly learned components after the already existing components in the test. -
Continue learning the screens/areas in your application as described in Perform user actions in your SAP application.
Edit table parameters
When learning your application, you have the additional option to learn and create special table parameters which represent a table object in the application. When UFT One creates the components after learning, the parameter is created and you can edit the values of the parameter (like other test and component parameters) using a special dialog.
To create and edit table parameters, do the following:
-
Create or open a GUI test.
-
In the SAP General pane of the Options dialog box (Tools > Options > GUI Testing tab > SAP > General node). select the Auto-parameterize table and grid controls option.
-
Close the GUI test.
-
Create or open a business process test.
-
Perform user actions on the table objects in your application. While you perform these actions, UFT One learns the application and creates components accordingly.
-
After performing all necessary user actions, stop the learning session and approve/reject the learned components in the Learn Summary report.
-
In the test grid, select the component containing the table parameter. The Properties pane tabs are changed to represent the component properties.
-
In the Properties pane, select the Parameters tab
 .
. -
In the Parameters tab, select the parameter representing your table object. The Properties pane identifies these by labeling them in the Value column as Table Data:
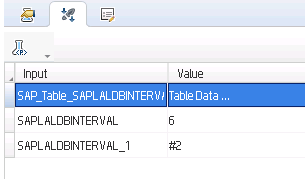
-
In the row containing the table parameter, click the Parameter Table button
 . The Parameter Table Editor dialog box opens.
 -
In the Parameter Table editor, edit the parameter values as needed.
-
When you have finished editing the table parameter, click OK to save your changes.


