
Share this page


Use the Object Identification Center
Relevant for: GUI tests and components
The Object Identification Center (OIC) is a next-generation spy tool that enables you to create unique and robust descriptions for any object in an open application.
Overview
As the default spy, the OIC lets you spy on objects in your application, determine how to identify those objects, and add them to your tests and object repositories.
Use the OIC to:
- Spy on single or multiple objects
- Create customized object descriptions
- Add single or multiple objects to object repositories
- Drag single or multiple objects into your test to create steps
- Copy object descriptions to use in programmatic descriptions
- Compare the descriptions of two objects
- Capture images of objects in an application
- Spy on a remote Mac computer
Note: In UFT One 2021 and earlier, the OIC is supported as a technical preview.

Prerequisites for spying on a web-based application
Before you spy on a web-based application, review the following steps:
- Make sure your browser is set up to work with UFT One. For details, see Test Web apps on specific browsers.
-
Open UFT One, and then open your browser.
UFT One cannot spy, record, or run tests on a browser window opened before UFT One.
Tip: For web tests, if you did not select the Web add-in when opening UFT One, see also known issues.
- (Optional) Configure how UFT One identifies objects. For details, see Configure object identification for a test object class.
Access the OIC
Do the following to access the OIC:
Click the Object Identification Center button  in the UFT toolbar.
You can also access the OIC from the Record toolbar, AI Record toolbar, Object Repository window toolbar, and Object Repository Manager window toolbar
Spy on objects in your application
Start spying on your open application to obtain description properties for the spied objects. You also can use the OIC to create AI objects that represent the objects in your application.
To spy on a single object or multiple objects:
-
Do one of the following to start spying on your application.
Spy mode Start spying by... Single-object spy In the OIC window, click the Start spying button
 to spy on one object at a time.
The OIC window is minimized and re-opens after you have selected an object from the open application.
Multi-object spy In the OIC window, toggle on the Multi-object Spy switch
 and click the Start spying button to spy on multiple objects at a time.
The OIC window is replaced by the OIC widget
 . After you have finished selecting your test objects, click the widget to return to the OIC window.
Note: To spy on objects in UI Automation mode or UIA Pro mode, make sure that you load the UI Automation or UIA Pro add-in, and then click UIA or UIA Pro button in the OIC window.
-
To enable spying by hovering over objects, move the Hover Mode switch
 to On. You can click the Settings button
  to edit more settings for the Hover Mode.
- Hover mode highlight: Enable this option to highlight the object you want to spy in your application.
- Hover mode Time Out: Use this option to decide how long you hover over an object. The default value is 1.3 seconds.
Note: The selected spy mode and Hover Mode settings remain the same the next time you open the OIC.
-
Click an object or multiple objects in your application.
The object you clicked is highlighted. A tooltip displays basic information about it, including the add-in name, object name, and mandatory description properties.
-
In single object spy mode, when you click an object, the OIC spies on it and directly displays the object properties in edit mode.
-
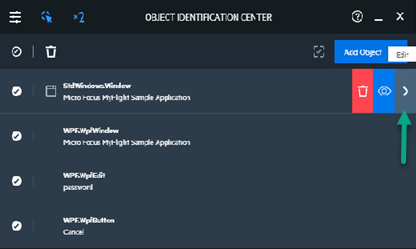
In multi-object spy mode, when you are done and click the OIC widget, the OIC window opens, displaying the list of objects you spied.
Note: The OIC widget shows the number of captured objects. Wait until the spinner in the OIC widget completes spinning before you select another object.
- To temporarily pause the spying operation and bring another application into focus, long press Ctrl.
- To stop or cancel the spying operation, press Esc.
-
-
To make sure that you have the object that you intended, in the OIC window, hover over the object, and click the Highlight button
 to highlight it.
 -
You can perform the following in multi-object spy mode only.
-
To remove multiple objects from the list, click the Clear all button
 first, then select their rows and click the Delete button
  .
. -
To add more objects to the current list, click the Spy additional objects button
 .
. -
To start a new spying session, click the Delete button
to delete all objects, and then click the Start spying button . -
To view test object details, hover over an object, and click the Edit button
 .
.
-
To spy on a remote Mac computer
Supported on UFT One versions 2021 R1 and later:
Before you spy on objects running in Safari on a Remote Mac computer, make sure that UFT One is connected to that computer. Then click the Remote Object Spy button  in the OIC.
To identify AI objects
The OIC is set up with AI Auto Inspection enabled by default. When you finish spying on a web or mobile object, the OIC Edit view suggests an AI object you could use to represent the object in your test. The OIC also enables you to identify all AI objects in your application. For details, see To identify single objects.
View and edit object descriptions
By default, the OIC automatically selects a set of recommended properties and values to use for object identification. You can override these suggestions and create customized object descriptions.
To edit object descriptions
-
Enter the Edit view.
-
In single object spy mode, the OIC automatically opens in the Edit view.
-
In multi-object spy mode, hover over an object in the object list view, and click Edit
to enter the Edit view.
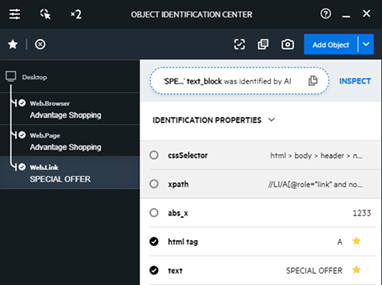
In the Edit view, the left pane displays the object's hierarchy. If you select a different object in the object's hierarchy and return to the object list view, the selected object is the one included in the list of spied objects when you go back to the object list view.
By default, the right pane displays the full list of identified properties for the selected object and the current values captured from your application. Stars in the right pane indicate the properties that UFT One recommends to identify your object.
You can click the down arrow next to IDENTIFICATION PROPERTIES to select to view the native properties, native operations, and test operations of the object.
UFT One versions 2021 R1 and later: For password edit boxes in WPF and Web applications, the spied password values are hidden in the Edit view.
-
- Select the properties and edit their values as required.
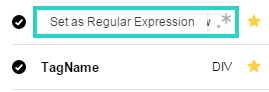
To enter regular expression values for string properties, click the Set as Regular Expression star to the right of the value box.
- Use the Clear selections button
 and the Apply recommended identifications button
  to easily clear or apply the UFT One recommended identifications.
-
Use the Validate button
 to validate your new object identification.
The OIC window displays a message, telling you how many objects match the description.
If no objects were identified or multiple objects were identified, adjust the set of properties that you selected and their values to create a unique identification and validate again.
Add multiple steps with newly-spied objects
Use the OIC to add multiple spied objects to your test, to create multiple test steps, as well as to update your local object repository.
To add new steps with newly-spied objects
- Open an action of your test in the Editor.
- Use the OIC to spy on objects. For more details, see Spy on objects in your application.
-
Drag and drop your spied objects from the OIC window to the Editor.
UFT One creates new steps in your test and adds the objects to your local object repository.
- If you modify the test object name in the OIC window and then drag the test object into the test, the test object name is updated in the test and the local object repository at the same time.
- If you modify the name of a test object that is used in other tests as well, you must manually rename the test object in those tests.
- If your spied object is an AI object, the text box in the OIC window is filled with AI-based script. Click the Drag & Drop to the script button
 to copy the script to the Editor.
Tip: Make sure that all the objects are selected before you perform drag and drop.
Manage the object repository list
The object repository selected in the object repository list will be used when you add spied objects or compare spied objects.
Make sure the correct repository is selected before adding objects or performing a comparison.
To manage the object repository list
-
In the OIC window, click the down arrow next to the Add Object button to display the object repository list.
By default, the list shows local and shared repositories associated with your open test. If you connect to ALM, object repositories on ALM that are associated with the open test are also displayed. The local associated repository is automatically selected in the list.
-
To add an external object repository to the list, do the following:
UFT One version 2021 -
Click the Add Object Repository button.
-
In the dialog box that opens, select an existing external object repository or create a new object repository.
The external object repository you selected or created is displayed and selected in the object repository list.
UFT One version 2021 R1 and later -
Click the Add Object Repository button. In the dialog box that opens, select an existing external object repository. It can be an object repository on your local machine or on ALM.
-
Click the New Object Repository button. In the dialog box that opens, create an external object repository on your local machine or on ALM.
The external object repository you selected or created is displayed and selected in the object repository list.
Note: The external object repository you added to the list is not displayed once you close the OIC and reopen the OIC.
-
Add objects to an object repository
Add the spied objects to an associated local or shared object repository, or to an external object repository.
To add an object to an object repository
-
Open an existing test in the Solution Explorer and open the application related to the test.
-
In the UFT toolbar, click the Object Identification Center button
. -
Spy on objects in your application, as described in Spy on objects in your application.
-
(Optional) Before you add an object, click the down arrow next to the Add Object button and select an object repository from the list.
To select an external object repository, you need to first add the repository to the list. See Manage the object repository list.
UFT One versions 2021 R1 and later: You can close the application while you add the object.
-
Click the Add Object button.
- If you add an object to an external object repository, the object is added automatically to the repository.
- If you add an object to a local associated object repository, save the test to successfully add the object to the repository.
- If you add an object to a shared associated object repository, the Object Repository Manager window opens. You need to perform an extra save operation in the window to successfully add the object to the repository.
Compare between two objects
Supported in UFT One versions 2021 R1 and later:
The OIC enables you to compare two spied objects or compare a spied object with an existing object in your object repository.
To compare two spied objects
-
Use the multi-object spy mode to spy on multiple objects.
-
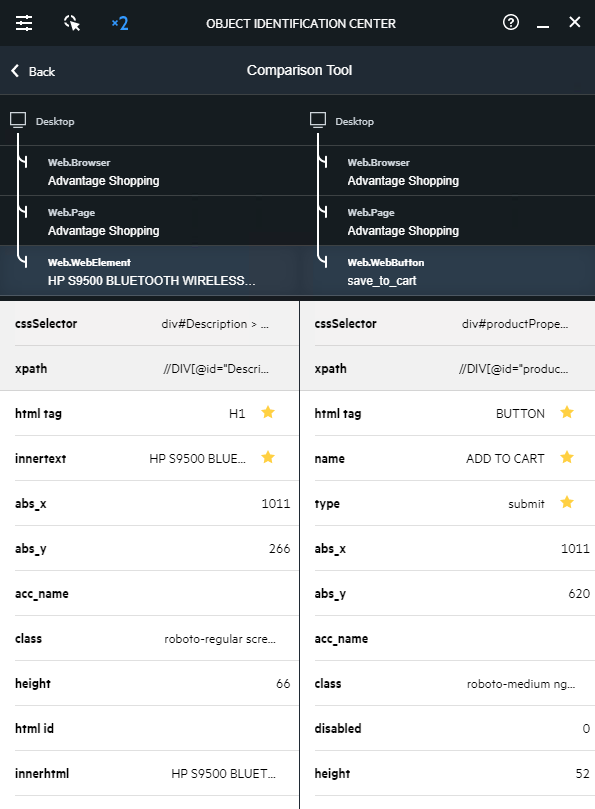
In the object list view of OIC, select two spied objects and click the Compare
 button.
 The OIC displays details about both of your spied objects side by side, using both an object tree hierarchy and a list of properties. See the Example.
To compare an object with an existing object in an object repository
-
Spy on an object using OIC.
-
(Optional) Click the down arrow next to the Add Object button, select an object repository from the list.
To select an external object repository, you need to first add the repository to the list. See Manage the object repository list.
-
Click the Compare
button. -
In the dialog box that opens, select an object in the object repository and click OK.
The OIC displays details about both of your objects side by side, using both an object tree hierarchy and a list of properties. See the Example.
Copy description properties to the clipboard
Use the OIC to copy description properties to the clipboard, then to any document in programmatic descriptions.
To copy description properties to the clipboard
-
In single object spy mode, click the Copy Code button
 in the OIC window.
 -
In multi-object spy mode, select one object for which you want to generate the corresponding properties and values from the list, enter the edit mode, and click the Copy Code button in the OIC window.
Note: You can copy the description properties of only one object at a time.
The copied properties and values are formatted in standard programmatic description syntax with line breaks between each property-value pair.
For example:
"Class Name:=Image",
"abs_x:=585",
"abs_y:=573",
"alt:=Specials",
For more details, see Programmatic descriptions.
Capture an image of an object
Capture an image of an object in your application that corresponds to the currently selected object in the object hierarchy tree, and save the image to the file system. This can be useful for image verification.
Note:
- You can capture the image for only one object at a time.
- Make sure no other application is covering any part of your application while performing the image capture.
To capture an image of an object
-
In single object spy mode, click the Capture object image button
 .
. -
In multi-object spy mode, select an object from the list, enter the edit mode, and click the Capture object image button
in the OIC window. - In the displayed dialog box, name your image file.
- Save the file.
 See also:
- Known issues: Spying


