Relevant for: GUI tests and components
This scenario describes the process you would follow to define a visual relation identifier for a specific test object that would otherwise require the use of ordinal identifiers.
Note: For a task related to this scenario, see Maintain test objects in object repositories.
Background
-
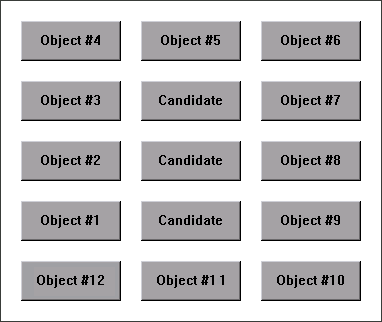
The application you are testing contains three identical instances of the Candidate object.
-
When UFT One learned the objects in the application, it assigned an ordinal identifier to each Candidate test object.
-
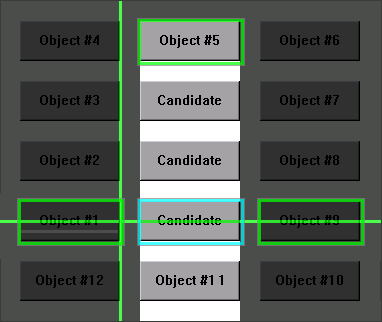
For the purpose of this exercise, Object #1 and Object #9 make up an object pair, which is always to the left and right of the Candidate object to identify. You want to instruct UFT One to identify the instance of the Candidate object that is located between the Object #1 and Object #9 object pair during every run session, even if the sorting order of the object pairs changes between run sessions.
Open the Visual Relation Identifier dialog box
-
In UFT One, open the relevant object repository and select the Candidate test object to identify.
-
Verify that you have selected the correct test object by selecting View > Highlight in Application, and making sure that the correct object is highlighted in the application.
-
In the Visual Relation Identifier Settings row of the Object Repository window or Object Properties dialog box, click in the Value cell.
Highlight the objects that match the test object's description
In the Visual Relation Identifier dialog box, click the Preview button. This instructs UFT One to highlight all objects that match the test object description (ignoring the ordinal identifiers). The main UFT One window is hidden, and each instance of the Candidate object in the application is highlighted, including the instance of the test object you want to identify.
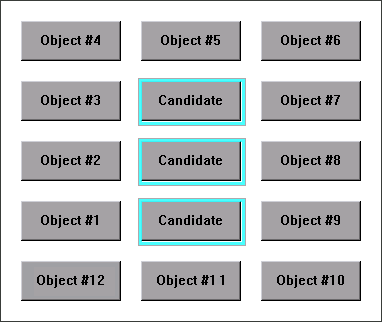
Click the Preview button again to restore the UFT One window.
Define the first related test object using horizontal visual relations
-
In the Related Objects area, click the Add button. The Select Test Object Dialog Box opens, enabling you to either select a test object from the object repository, or add an object from the application.
For the purpose of this scenario, the first related test object is Object #1, which is located to the left of the Candidate object in the application.
-
In the Relation Details area, select the first checkbox and then select Left from the drop-down list. The description area displays a summary of the visual relation identifier.

-
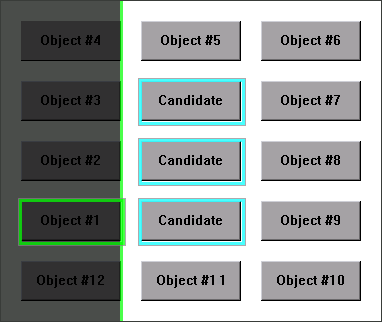
To verify that the visual relation is defined correctly, click the Preview button again. The main UFT One window is hidden, and the visual relation identifier displays the objects that match the test object's description, including the currently defined visual relation. It also highlights the selected related object, and a visual representation of the defined relation details. Since Object #1 is to the left of all three Candidate buttons, all three buttons are still highlighted when you use the Preview button.
Define the second related object using vertical visual relations
-
In the Related Objects area, click the Add button. The Select Test Object Dialog Box opens, enabling you to select or add another object.
For the purpose of this scenario, the second related test object is Object #5, which is located above and vertically in line with the Candidate object.
-
In the Relation Details area, select the second check box. From the drop-down list select Above, and then select the In line (vertically) checkbox. The description area displays a tooltip of all the selected visual relations.

-
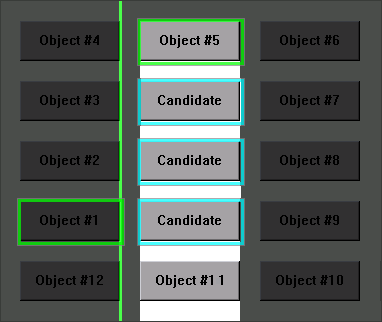
To verify that the visual relations are defined correctly, click the Preview button again. Since Object #5 is above all three Candidate objects, all three are still highlighted. That means you still need to select another related object to create a visual relation identifier that uniquely identifies your object.
Define the third related object using distance visual relations
-
In the Related Objects area, click the Add button. The Select Test Object Dialog Box opens, enabling you to select another test object.
For the purpose of this scenario, the third related test object is Object #9, which is the closest object to the right of the Candidate object.
-
In the Relation Details area, select the third checkbox and then select Closest on the Y-axis from the drop-down list. The description area displays an updated summary of the visual relation identifier.

-
To verify that the visual relations are defined correctly, click the Preview button again. you can now see that this third related object enables UFT One to uniquely identify the correct object.
Results
After you finish defining all of the necessary visual relations:
-
The desired Candidate object is the only object in the application that is identified when you use Preview.
-
UFT One can now correctly identify the desired Candidate object during every run session, even if the user interface changes, as long as the Candidate object maintains it's relative location to the three related objects you defined.
-
The Ordinal Identifier property is disabled in the Object Repository Manager or window.


