
Share this page


Relevant for: API testing only
This task describes how to update a Swagger or WSDL-Based web service that was already imported and incorporated into a test.
Ensure your service is accessible
Before you start, ensure that you can access the location of your Web service.
For example, to update a web service from a file stored in ALM, make sure you have an open connection to the ALM server.

Update a Swagger service
In the Toolbox pane, right-click the service and select one of the following:
- Update Swagger to update from the original location
- Update Swagger Service From > URL or File and enter the URL or file path
The Swagger service is updated with the new data.
Update a WSDL service
In the Toolbox pane, right-click the main service node and select one of the following:
- Update WSDL to update from the original location
- Update WSDL from > URL or UDDI
- Update WSDL from > File or ALM Application component
Accept any warning or informational pop-ups.
Note: The Update WSDL option may not be available if the user credentials changed or if the service was imported using Service Test or an earlier version of UFT One.
Update port security (optional)
If UFT One detects a change in the port path (<service name:port name> combination) the Update Port Security Wizard opens. Follow the steps of the wizard to resolve all of the Service/Port conflicts.
- The wizard only opens if you configured security settings for the original service.
-
The wizard imports all services defined, even those deleted manually before the update. To remove them from the Toolbox pane, delete them again manually, after the update.
Resolve conflicts
If a test step became invalid because schema or property values were changed, the canvas marks the step with a warning marker.
The step's properties become read-only until you resolve them with the help of the wizard.
Do the following:
-
In the canvas, click the warning marker to display the message: This step must be resolved. Resolve step.
Then, click the message text to open the resolve conflict wizard.
-
On the Select Steps wizard page, select the steps you want to resolve, and click Next.
-
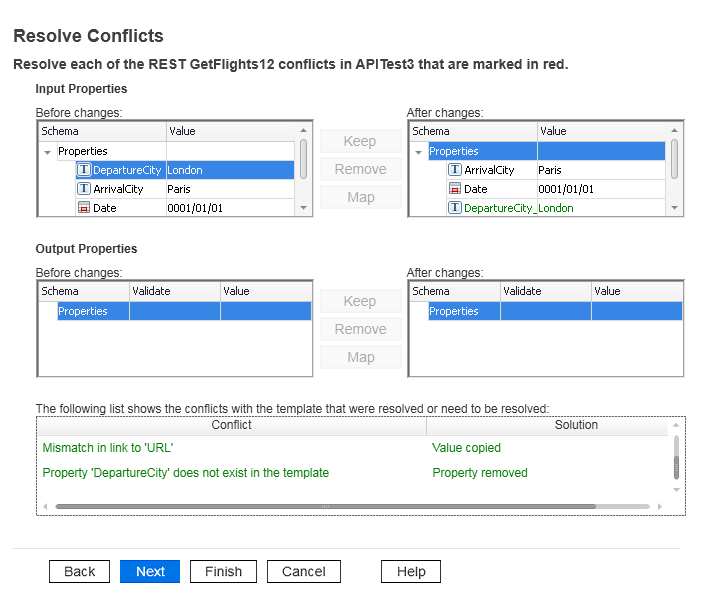
On the Resolve Conflicts wizard page, define the values you want to keep, remove or map (using the buttons between the change tables).
Your changes are displayed in the table at the bottom of the wizard.
For example:

-
Click Finish to save your change and close the wizard.
 See also:


