
Share this page


Add steps from the Toolbox Pane
This exercise describes how to add steps using the Toolbox pane, to check out your cart and complete your purchase.
Add steps to check out your cart
This procedure describes how to add steps from the Toolbox pane to check out your cart.
Do the following:
-
In UFT One, open the Checkout action, either from the Solution Explorer, or the canvas.
-
Make sure that you can view the Toolbox pane. By default, it's located on the left, behind the Solution Explorer. Otherwise, select View > Toolbox.
The Toolbox pane shows all the test objects in your object repository. Add them as steps by dragging specific test objects on to your action.
Tip: You can do this either in the Keyword View or the Editor.
-
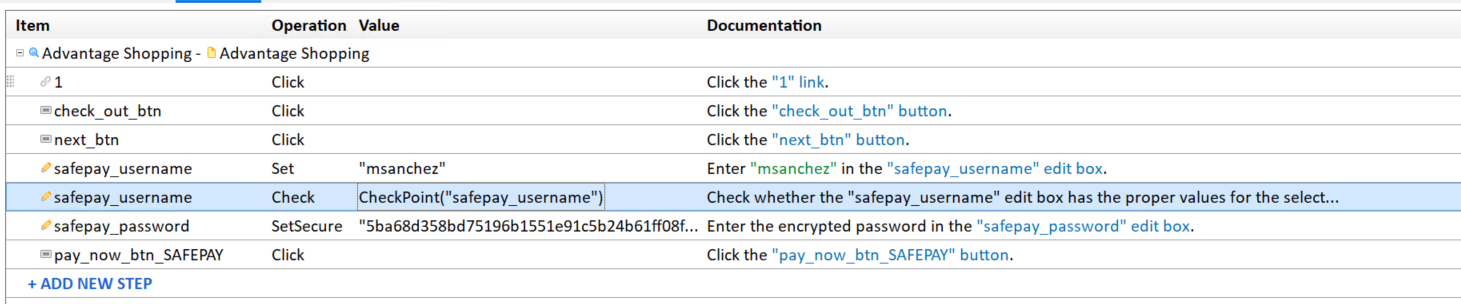
Add the following test objects to your test to browse to your cart, check out, and complete your purchase:
- The
 1 link object. This is the test object that clicks the cart link to open your cart.
 -
The
 check_out_btn button object. This clicks the CHECKOUT button.
 - The next_btn button object. This clicks the NEXT button.
- The
 safepay_username edit object. This enters text in the SafePay username field.
 - The safepay_password edit object. This enters text in the SafePay password field.
- The pay_now_btn_SAFEPAY button object. This clicks the PAY NOW button.
Steps are added with the default Click or Set methods.
Tip: To find a specific object, use the Highlight object feature. For details, see Highlight objects.
- The

Add values to your text field steps
Add specific values to enter in the SafePay username and password fields.
The actual values that you enter do not matter, and they are not saved on the site. However, for the password field, practice using the Password Encoder tool to enter an encoded value.
The instructions below provide details for adding values in either the Keyword View, or the Editor. Use the method with which you are more comfortable and find to be more efficient for you.
Do the following:
-
Add a value to set in the safepay_username step.
In the Keyword View Enter a username in the Value column. In the Editor Enter a username, in quotes, after the Set method name.
For example: ...Set "msanchez"
-
Change the safepay_password value to SetSecure.
In the Keyword View Click the Operation column value, and select SetSecure.
In the Editor Replace the Set method name with SetSecure.
-
Create an encoded password using the UFT One Password Encoder (Start > All Programs > Micro Focus > Password Encoder).
-
In the Password Encoder, enter your password in the Password field, and click Generate.
The encoded password appears in the Encoded string field.
- Click Copy to copy it to the clipboard.
-
-
Back in UFT One, paste your encoded password into your step as the SetSecure value.
In the Editor, make sure to surround your value in quotes.
- Save your test.
For more details, see Password Encoder Tool.
Add a checkpoint and an output value step
The following section is an exercise that teaches you how to use checkpoints and output values in GUI web testing.
A checkpoint can verify the value of an object while an output value step retrieves the value of an object so that you can use it as the input for subsequent steps.
Add a checkpoint:
- For the Checkout action, open the Keyword view and select safepay_username.
- Select Design > Checkpoint > Standard Checkpoint.
-
Make sure that value is checked and selected.
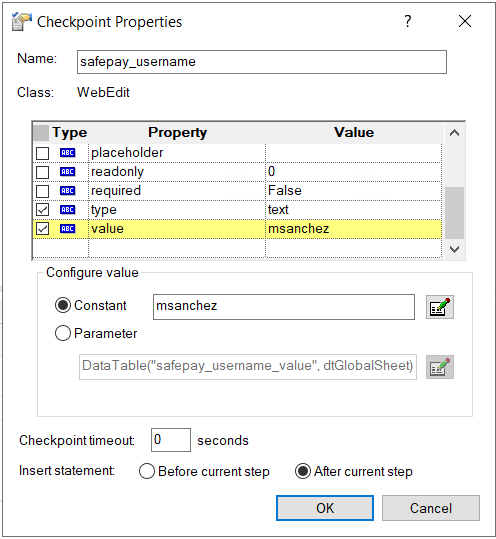
- In the Constant box, enter your safepay_username value.
-
Select to insert the statement After current step and click OK.
Create an output value:
- For the Login action, open the Keyword view. Right click the username and select insert output value.
-
Select the value property and indicate After current step.
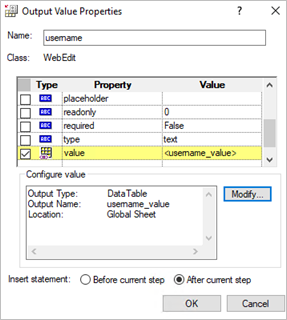
-
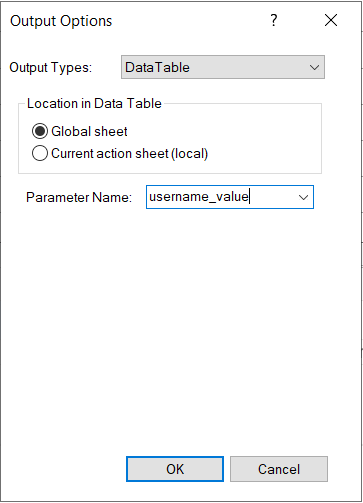
Click Modify. In the Output Options dialog box, enter username_value for the Name. Accept the default location Global sheet. Click OK.
-
Make sure there is a value in the Value property column and click OK.

Use the output value as the input for the checkout action:
-
For the Checkout action, open the Keyword view. For the safepay_username row, select the Value column. Click the Configure value
 button.
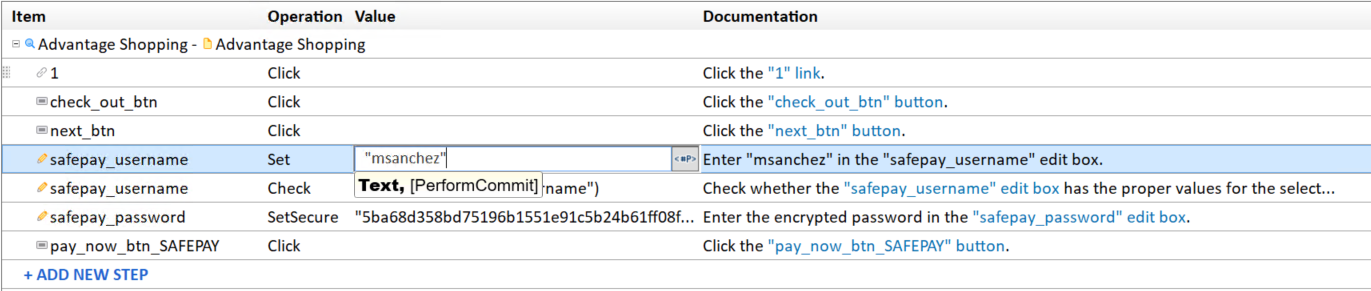
-
Select DataTable and then select the username_value row.

Note: Run your test and view the result. See Run your test and analyze results. You can find that after the Login action has passed, there is a value in Global sheet row 1, and it will become the safepay_username value in the Checkout action.
Highlight objects
To help you find objects in a repository, you can highlight them.
Find the check_out_btn button object:
- Open Checkout.tsr in the Object Repository Manager.
- Select the check_out_btn object
- In the Explorer, make sure the SHOPPING CART tab is selected.
-
Click the Highlight button
 in the toolbar. The Explorer highlights the Checkout button.
Keyword View sample
When you're done adding steps to this action, your Keyword View should look like this:
Editor sample
Switch to the Editor ( ) to view the code for each step you added. Your code should look like this:
Browser("Advantage Shopping").Page("Advantage Shopping").Link("1").Click
Browser("Advantage Shopping").Page("Advantage Shopping").WebButton("check_out_btn").Click
Browser("Advantage Shopping").Page("Advantage Shopping").WebButton("next_btn").Click
Browser("Advantage Shopping").Page("Advantage Shopping").WebEdit("safepay_username").Set DataTable("username_value", dtGlobalSheet)
Browser("Advantage Shopping").Page("Advantage Shopping").WebEdit("safepay_username").Check CheckPoint("safepay_username")
Browser("Advantage Shopping").Page("Advantage Shopping").WebEdit("safepay_password").SetSecure "5ba68d358bd75196b1551e91c5b24b61ff08fa7ab3a0e7a3c03200ff"
Browser("Advantage Shopping").Page("Advantage Shopping").WebButton("pay_now_btn_SAFEPAY").Click
 Next steps:


