Share this page


The information displayed in the Run Results Viewer and the available options are determined by the type of checkpoint or output value step you select.
Accessibility Checkpoints
When you include accessibility checkpoints in your test, the Run Results Viewer displays the results of each accessibility option that you checked.
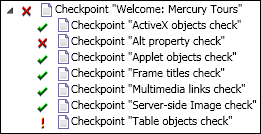
The run results tree displays a separate step for each accessibility option that was checked in each checkpoint. For example, if you selected all accessibility options, the run results tree for an accessibility checkpoint may look something like this:
The run result details provide information that can help you pinpoint parts of your Web site that may not conform to the W3C Web Content Accessibility Guidelines. The information provided for each check is based on the W3C requirements.
Note: Some of the W3C Web Content Accessibility Guidelines that are relevant to accessibility checkpoints are cited or summarized in the following sections. This information is not comprehensive. When checking whether your Web site satisfies the W3C Web Content Accessibility Guidelines, you should see the complete document at: http://www.w3.org/TR/WAI-WEBCONTENT/.
| ActiveX Check |
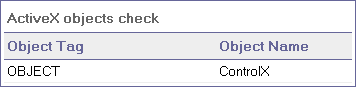
Guideline 6 of the W3C Web Content Accessibility Guidelines requires you to ensure that pages are accessible even when newer technologies are not supported or are turned off. When you select the ActiveX check, UFT One checks whether the selected page or frame contains any ActiveX objects. If it does not contain any ActiveX objects, the checkpoint passes. If the page or frame does contain ActiveX objects then the results display a warning and a list of the ActiveX objects so that you can check the accessibility of these pages on browsers without ActiveX support. For example:
|
| Alt Property Check |
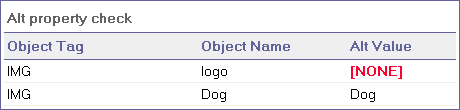
Guideline 1.1 of the W3C Web Content Accessibility Guidelines requires you to provide a text equivalent for every non-text element. The Alt property check checks whether objects that require the Alt property under this guideline, do in fact have this attribute. If the selected frame or page does not contain any such objects, or if all such objects have the required attribute, the checkpoint passes. If one or more objects that require the property do not have it, the test fails and the run result details display a list that shows which objects are lacking the attribute. For example:
The Captured Data pane displays the captured page or frame, so that you can see the objects listed in the Alt property check list. |
| Applet Check |
The Applet Check also helps you ensure that pages are accessible, even when newer technologies are not supported or are turned off (Guideline 6 of the W3C Web Content Accessibility Guidelines), by finding any Java applets or applications in the checked page or frame. The checkpoint passes if the page or frame does not contain any Java applets or applications. Otherwise, the results display a warning and a list of the Java applets and applications. For example:
|
| Frame Titles Check |
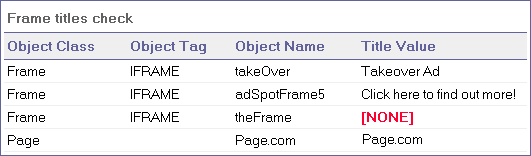
Guideline 12.1 of the W3C Web Content Accessibility Guidelines requires you to title each frame to facilitate frame identification and navigation. When you select the Frame Titles check, UFT One checks whether Frame and Page objects have the TITLE tag. If the selected page or frame and all frames within it have titles, the checkpoint passes. If the page, or one or more frames, do not have the tag, the test fails and the run result details display a list that shows which objects are lacking the tag. For example:
The Captured Data pane displays the captured page or frame, so that you can see the frames listed in the Frame Titles check list. |
| Multimedia Links Check |
Guidelines 1.3 and 1.4 of the W3C Web Content Accessibility Guidelines require you to provide an auditory, synchronized description of the visual track of a multimedia presentation. Guideline 6 requires you to ensure that pages are accessible, even when newer technologies are not supported or are turned off. The Multimedia Links Check identifies links to multimedia objects so that you can confirm that alternate links are available where necessary. The checkpoint passes if the page or frame does not contain any multimedia links. Otherwise, the results display a warning and a list of the multimedia links.` |
| Server-Side Image Check |
Guideline 1.2 of the W3C Web Content Accessibility Guidelines requires you to provide redundant text links for each active region of a server-side image map. Guideline 9.1 recommends that you provide client-side image maps instead of server-side image maps except where the regions cannot be defined with an available geometric shape. When you select the Server-side Image check, UFT One checks whether the selected page or frame contains any server-side images. If it does not, the checkpoint passes. If the page or frame does contain server-side images, then the results display a warning and a list of the server-side images so that you can confirm that each one answers the guideline requirements. For example:
|
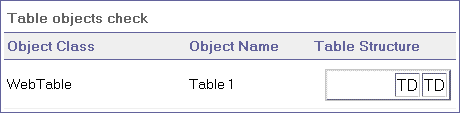
| Tables Check |
Guideline 5 of the W3C Web Content Accessibility Guidelines requires you to ensure that tables have the necessary markup to be transformed by accessible browsers and other user agents. It emphasizes that you should use tables primarily to display truly tabular data and to avoid using tables for layout purposes unless the table still makes sense when linearized. The TH, TD, THEAD, TFOOT, TBODY, COL, and COLGROUP tags are recommended so that user agents can help users to navigate among table cells and access header and other table cell information through auditory means, speech output, or a Braille display. The Tables Check checks whether the selected page or frame contains any tables. If it does not, the checkpoint passes. If the page or frame does contain tables, the results display a warning and a visual representation of the tag structure of the table. For example:
|


Bitmap Checkpoints Results
The Result Details pane displays the checkpoint step results, including its status (Passed or Failed), the date and time the checkpoint was run and the portion of the checkpoint timeout interval that was used (if any).
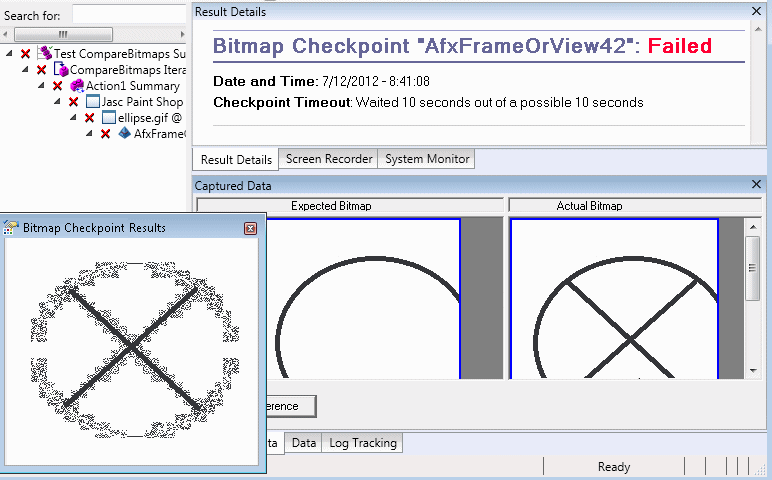
When Comparing Expected Bitmaps with Actual Bitmaps
The Captured Data pane shows the expected and actual bitmaps that were compared during the run session, and a View Difference button. When you click the View Difference button, UFT One opens the Bitmap Checkpoint Results window, displaying an image that represents the difference between the expected and actual bitmaps. This image is a black-and-white bitmap that contains a black pixel for every pixel that is different in the two images. Similar results would be displayed for a component.
When Locating Specified Bitmaps in Actual Bitmaps
The Captured Data pane shows the actual bitmap of the runtime object in the application and the source bitmap that UFT One attempted to locate within the object. It may also show the coordinates of a possible candidate that was found, and the image similarity percentage used to find the candidate.
Note: By default, the information in the Captured Data pane is available only if the bitmap checkpoint fails. You can change the conditions for when bitmaps are saved in the run results, using the Save still image captures to results option in the Screen Capture pane (Tools > Options > GUI Testing tab > Screen Capture node) of the Options dialog box.
Considerations
-
When comparing bitmaps, if the checkpoint is defined to compare only specific areas of the bitmap, the run results display the actual and expected bitmaps with the selected area highlighted.
-
When comparing bitmaps, if the dimensions of the actual and expected bitmaps are different, UFT One fails the checkpoint without comparing the bitmaps. In this case the View Difference functionality is not available in the results.
-
The View Difference functionality is not available when viewing results generated in a version of QuickTest earlier than 10.00.
-
If the bitmap checkpoint is performed by a custom comparer:
-
UFT One passes the bitmaps to the custom comparer for comparison even if their dimensions are different.
-
The Result Details pane also displays the name of the custom comparer (as it appears in the Comparer box in the Bitmap Checkpoint Properties dialog box), and any additional information provided by the custom comparer.
-
The difference bitmap is provided by the custom comparer.
-
File Content Checkpoints
The Result Details pane displays detailed results of the selected checkpoint, including its status (Passed or Failed), and the date and time the checkpoint was run. It also displays the number of lines that were checked, the number of changes found in the checked lines, and the total number of changed lines found in the file (including both the lines that were selected in the checkpoint and the lines that were not).
The details area also specifies whether the checkpoint includes the following options: Match case, Ignore spaces, Verify page count, and Fail checkpoint for added or removed lines
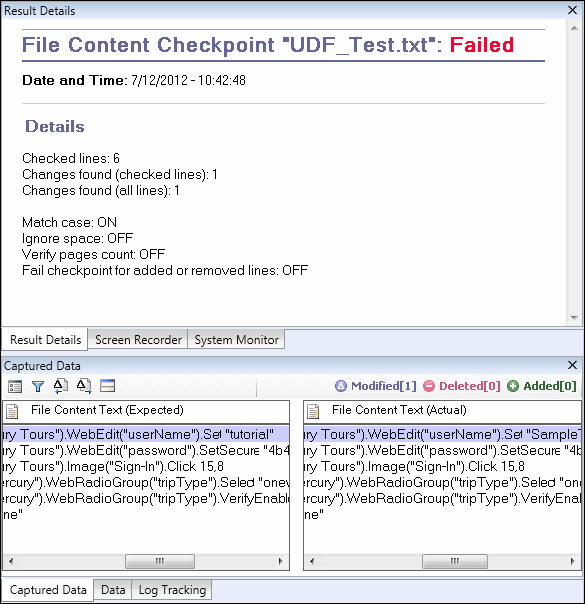
For failed steps, the Captured Data pane displays any differences found for all lines in the actual file, regardless of whether they were selected for comparison in the checkpoint. An asterisk (*) adjacent to the line number indicates that a regular expression was selected for comparison against the actual file.
In the following example, the details of the failed checkpoint indicate that the expected results and the current results do not match.
-
The expected value in line 1 is not identical to the actual value.
-
The asterisk (*) in line 1 indicates that a regular expression was selected for comparison against the actual file and the lines in the expected and actual files are different.
-
Lines that were selected for comparison are displayed in black.
Lines that were not selected for comparison are displayed in light grey. -
The last line exists in the source (expected) file but is missing from the actual file. This line was not selected for comparison, so its textual content is displayed in grey instead of black.
-
No lines were added to the actual file.
Standard Checkpoint Results
The Result Details pane displays detailed results of the selected checkpoint, including its status (Passed or Failed), the date and time the checkpoint was run, and the portion of the checkpoint timeout interval that was used (if any). It also displays the values of the object properties that are checked, and any differences between the expected and actual property values.
The Captured Data pane displays the image capture for the checkpoint step (if available).
In the following example, the details of the failed checkpoint indicate that the expected results and the current results do not match. The expected value of the flight departure is Paris, but the actual value is Frankfurt.
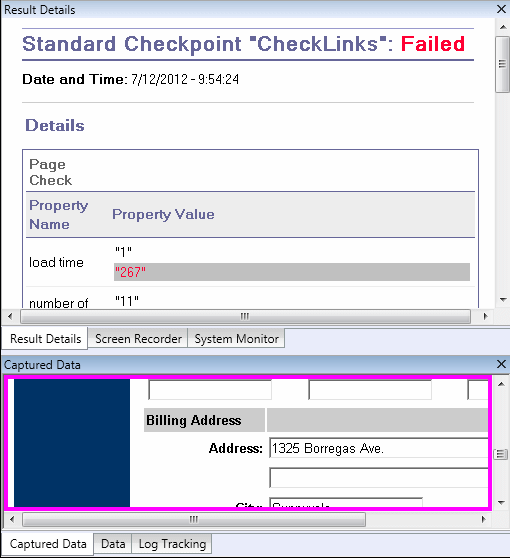
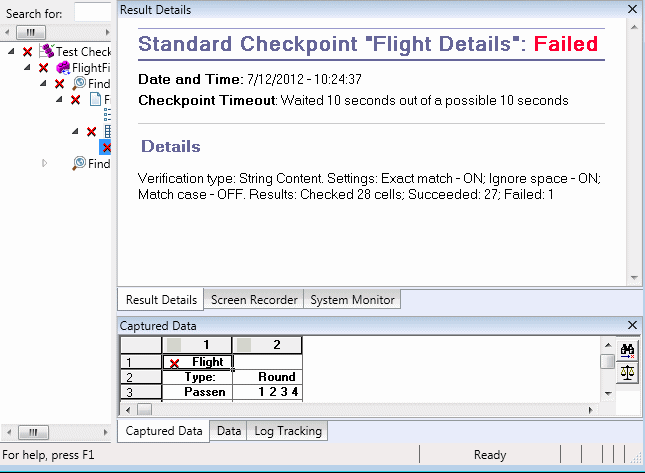
Table and Database Checkpoint Results
The results displayed for table and database checkpoints are similar. The Result Details pane displays the checkpoint step results, including its status (Passed or Failed), the date and time the checkpoint was run, the verification settings you specified for the checkpoint, and the number of individual table cells or database records that passed and failed the checkpoint.
If the checkpoint failed, the Captured Data pane shows the table cells or database records that were checked by the checkpoint. Cell values or records that were checked are displayed in black; cell values or records that were not checked are displayed in gray. Cells or records that failed the checkpoint are marked with a failed
 icon.
icon.
The following is an example of the results for a table checkpoint:
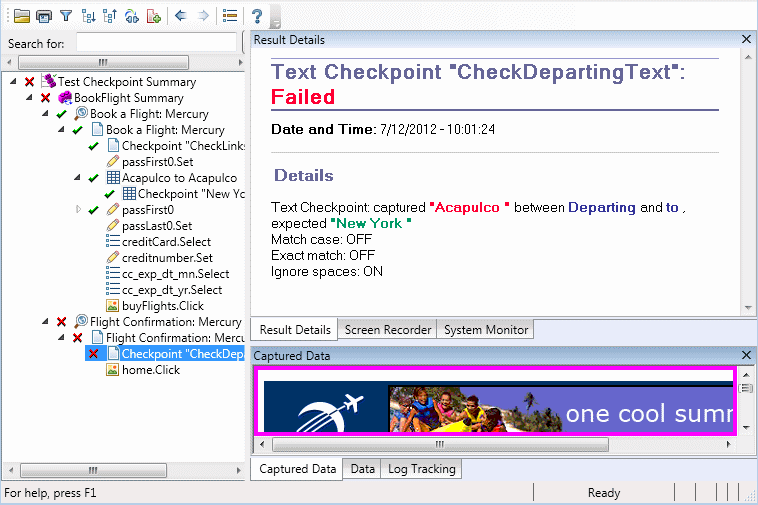
Text and Text Area Checkpoint Results
The Result Details pane displays the checkpoint step results, including its status (Passed or Failed), the date and time the checkpoint was run and the portion of the checkpoint timeout interval that was used (if any). It also shows the expected text and actual text that was checked, and the verification settings you specified for the checkpoint.
The following is an example of the results for a text checkpoint:
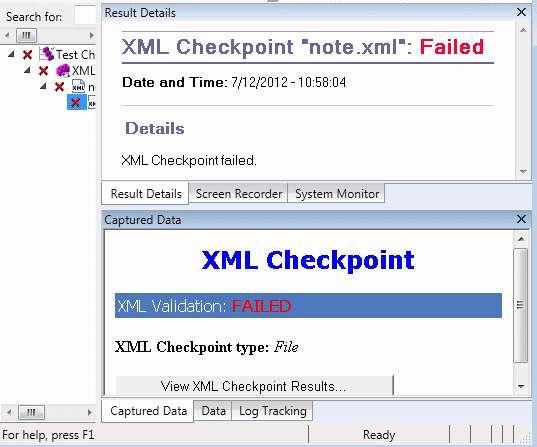
XML Checkpoint Results
The Result Details pane displays the checkpoint step results.
The Captured Data pane shows the details of the schema validation (if applicable) and a summary of the checkpoint results. If the schema validation failed, the reasons for the failure are also shown.
If the checkpoint failed, you can view details of each check performed in the checkpoint by clicking View XML Checkpoint Results in the Captured Data pane. The XML Checkpoint Results window opens, displaying details of the checkpoint's failure.
The following is an example of the results for an XML checkpoint:
Note: By default, if the checkpoint passes, the View XML Checkpoint Results button is not available. The availability of these detailed results is dependent on the Save still image captures to results setting in the Screen Capture pane (Tools > Options > GUI Testing tab > Screen Capture node) of the Options dialog box.
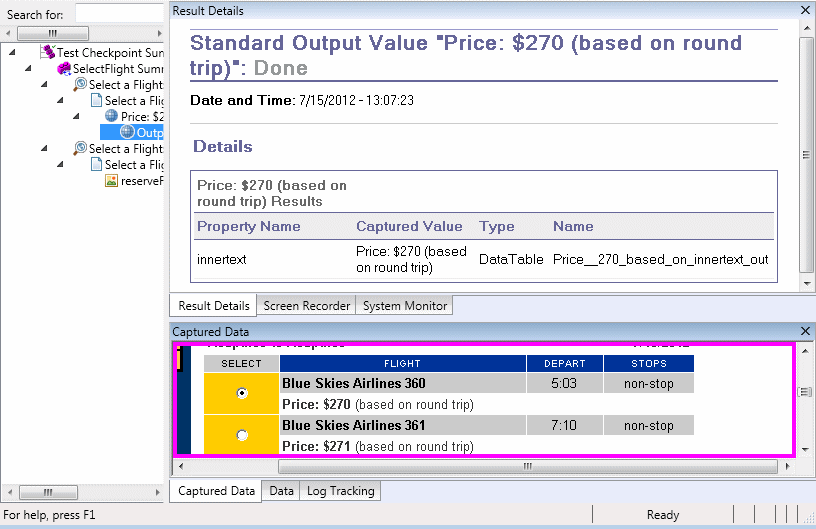
Output Value Results
The Result Details pane displays detailed results of the selected output value step, including its status, and the date and time the output value step was run. It also displays the details of the output value, including the value that was captured during the run session, its type, and its name, as shown in the following example. Similar results would be displayed for a component.
File Content Output Values
The Result Details pane displays the results of the file content output value step, including its status, the date and time the step was run, and details for the parameterized file content output value. This pane also shows the configuration settings (whether match case and ignore spaces were set), as shown in the following example.

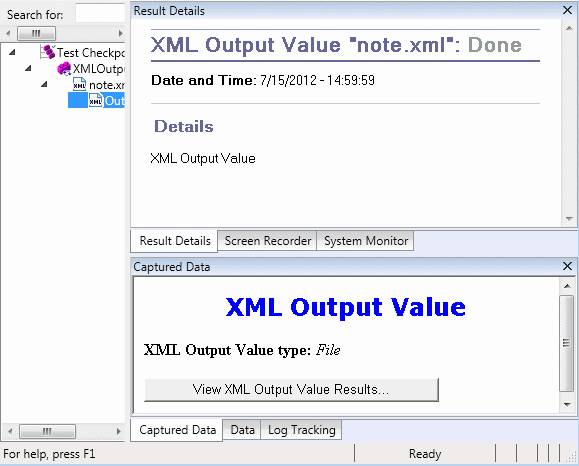
XML Output Values
The Result Details pane displays a summary of the output value results.
From the Captured Data pane, you can view detailed results by clicking View XML Output Value Results to open the XML Output Value Results window.
The following is an example of the results for an XML output value:
Note: By default, the View XML Output Value Results button is available only when an error occurs. The availability of these detailed results is dependent on the Save still image captures to results setting in the Screen Capture pane (Tools > Options > GUI Testing tab > Screen Capture node) of the Options dialog box.