Share this page


This exercise describes how to add steps to your test using UFT One's Step Generator. The Step Generator is another convenient method of adding steps to your test by selecting objects, methods, and parameter values.
This exercise requires that you've added the relevant object repositories and test objects to your test. For details, see Create object repositories.
Add steps to the FlightConfirmation action
This procedure describes how to add steps to the FlightConfirmation action using UFT One's Step Generator.
Do the following:
-
Start with the MyFlightApplication solution and MyFlight test open to the FlightConfirmation action, and the Editor displayed.
-
In the first line of the Editor, right-click and select Step Generator.
-
In the Step Generator dialog > Object dropdown, confirm that Micro Focus MyFlight Sample is displayed.
Note: You might need to select the Test objects category to show the Object dropdown.
Click Select Object
 .
. -
In the Select Test Object dialog, expand the Micro Focus MyFlight Sample node, and select the passengerName edit box object.
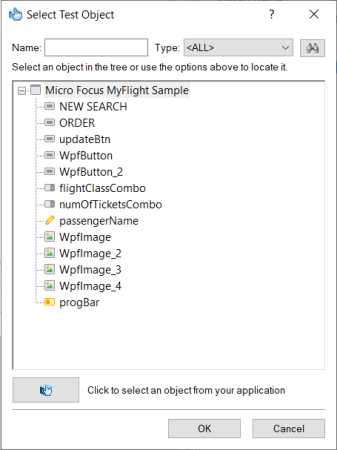
-
The Step Generator fields are populated with the default values for the passengerName object.
Update these values just as you would in the Keyword View.
-
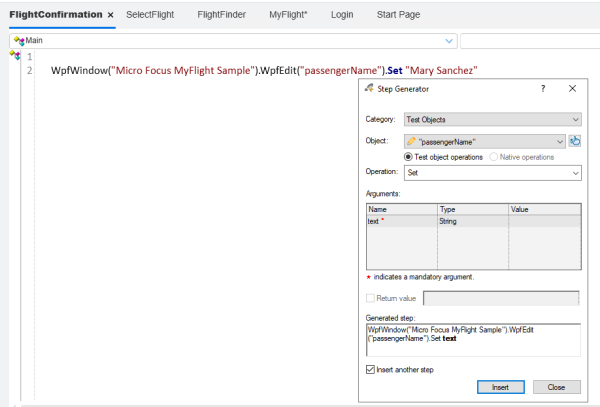
Leave the Set method defined in the Operation field.
-
In the Arguments table, click the cell in the Value column and enter a passenger name of your choice.
- Select the Insert another step option to open the Step Generator dialog again after adding this step.
-
-
Click Insert to add your step.
The Step Generator dialog remains open, but notice the step added in the Editor behind it.
-
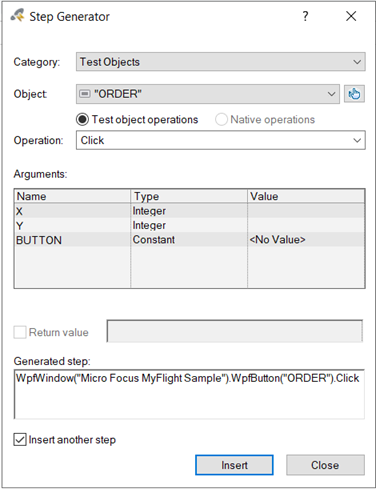
Add another step to click the ORDER button in the MyFlight app, and complete your flight order.
In the Step Generator, do the following:
- From the Object dropdown, select the
 ORDER object.
 - Leave the default method, Click, defined in the Operation field.
- Leave the Arguments table blank.
- Select the Insert another step option, and then click Insert to add your step.

- From the Object dropdown, select the
-
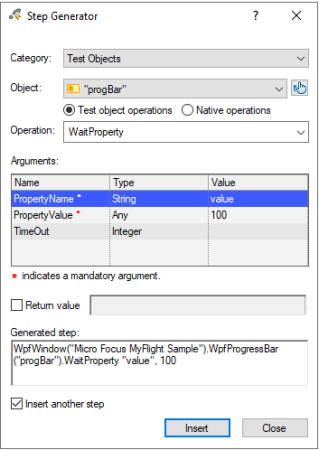
Add another step, to wait for the progress bar in the MyFlight app window to load.
Note: Wait steps are helpful when you expect a specific amount of time for your app to move to the next step.
Use the Step Generator, defining the values as follows:
- From the Objects dropdown, select the
 progBar object.
 - From the Operation dropdown, select the WaitProperty method.
- In the Arguments table, define the PropertyName parameter as value, and the PropertyValue parameter as 100.
- Select the Insert another step option, and then click Insert to add your step.
- From the Objects dropdown, select the
-
Add another step to click the NEW SEARCH button in the MyFlight app to go back to the beginning of the app.
Use the Step Generator as you did before, defining the values as follows:
- From the Object dropdown, select the NEW SEARCH object.
- Leave the default method, Click, defined in the Operation field.
- Leave the Arguments table blank.
- Clear the Insert another step option
- From the Object dropdown, select the
-
Save your test, and continue with one of the following:


View your steps in the Keyword View
In the Keyword View, the FlightConfirmation action should look like this:

View your steps in the Editor
In the Editor, the FlightConfirmation action should look like this:
WpfWindow("Micro Focus MyFlight Sample").WpfEdit("passengerName").Set "Mary Sanchez"
WpfWindow("Micro Focus MyFlight Sample").WpfButton("ORDER").Click
WpfWindow("Micro Focus MyFlight Sample").WpfProgressBar("progBar").WaitProperty "value", 100
WpfWindow("Micro Focus MyFlight Sample").WpfButton("NEW SEARCH").Click
 Next steps: