This window displays the XML file hierarchy.
-
Expected XML Tree pane. Displays the expected results—the elements, attributes, and values, as stored in your XML checkpoint.
-
Actual XML Tree pane. Displays the actual results—what the XML document actually looked like during the run session.
-
Checkpoint Summary pane. Displays results information for the check performed on the selected item in the expected results pane.
| To access |
In the Captured Data pane of the Run Results Viewer, click the View XML Checkpoint Results button. |
| Important information |
When you open the XML Checkpoint Results window, the Checkpoint Summary pane displays the summary results for the first checked item in the expected results pane. Tip: You can double-click any element value in this window to open the Element Value dialog box, which displays the value in a multi-line edit control. For details, see Element Value Dialog Box (Run Results Viewer) (GUI Tests Only). |
User interface elements are described below:
|
UI Elements |
Description |
|---|---|

|
View Checkpoint Summary. Displays the Checkpoint Summary pane, which provides a detailed description of which parts of an element passed or failed. Menu option: View > Checkpoint Summary. |

|
View Attribute Details. Displays the Expected Attributes and Actual Attributes panes, for an element whose attributes were checked. Menu option: View > Attribute Details. |

|
Find Next Check. Jumps directly to the next checked item in the XML Tree. Menu option: View > Find Next Check |

|
Find Previous Check. Jumps directly to the previous checked item in the XML Tree. Menu option: View > Find Previous Check |

|
Find Next Error. Jumps directly to the next error in the XML Tree. Menu option: View > Find Next Error |

|
Find Previous Error. Jumps directly to the previous error in the XML Tree. Menu option: View > Find Previous Error |

|
Scroll Trees Simultaneously. Synchronizes the scrolling of the Expected and Actual XML Trees. If this option is selected, the Expected and Actual XML Trees scroll simultaneously as you navigate through either of the tree structures. If this option is not selected, you can scroll only one tree at a time. Menu option: View > Scroll Trees Simultaneously |

|
Help Topics. Opens the help for the XML Checkpoint Results window. Menu option: View > Help Topics |
Sample XML Checkpoint Result Scenarios
Below are four sample XML checkpoint scenarios. Each example describes the changes that occurred in the actual XML document, explains how you locate the cause of the problem in the XML checkpoint results, and displays the corresponding XML Checkpoint Results window.
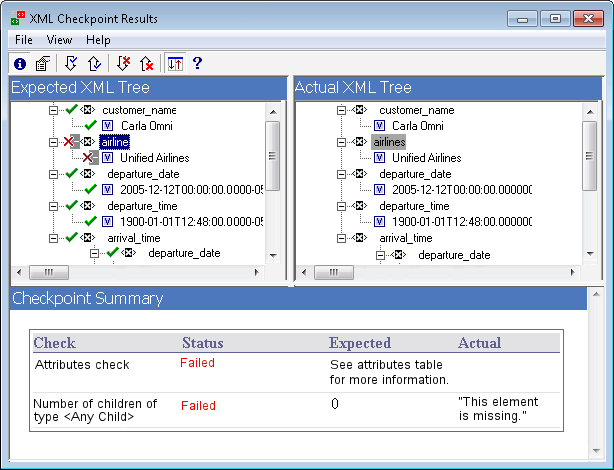
In the following example, the airline element tag was changed to airlines and the XML checkpoint identified the change in the tag structure. The airline element's child element check also failed because of the mismatch at the parent element level.
To view details of the failed element, select the airline tag from the Expected XML Tree and select View > Checkpoint Summary to view the Checkpoint Summary in the bottom pane in the XML Checkpoint Results window.
The text "This element is missing" indicates that the airline element tag changed in your XML document.

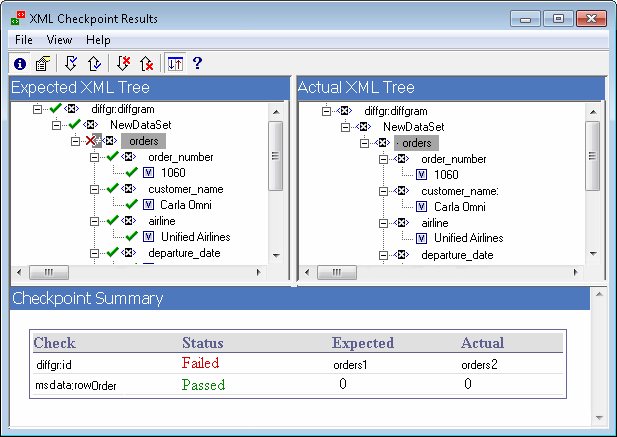
In the following example, an attribute that is associated with the orders element tag was changed from the original, expected value of orders1, to a new value of orders2.
To view details of the failed attribute, select the failed element from the Expected XML Tree and select View > Attribute Details. The Expected Attributes and Actual Attributes panes are displayed at the bottom of the XML Checkpoint Results window.
Using the Expected Attributes and Actual Attributes panes, you can identify which attribute caused the error and which values were mismatched.

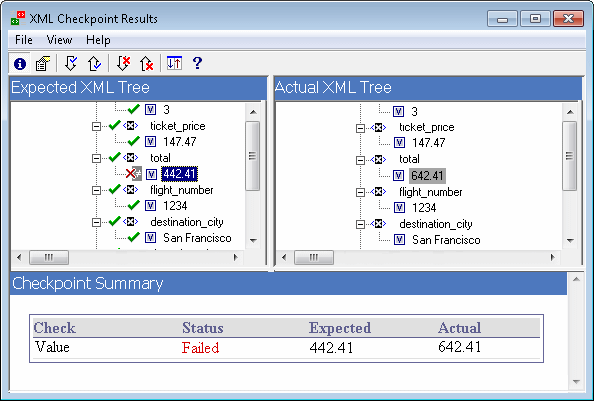
In the following example, the actual value of the total element was changed between execution runs, causing the checkpoint to fail.
To view details of the failed value, select the failed element from the Expected XML Tree and select View > Checkpoint Summary to view the Checkpoint Summary in the bottom pane in the XML Checkpoint Results window.
Using the Checkpoint Summary pane, you can compare the expected and actual values of the total element.

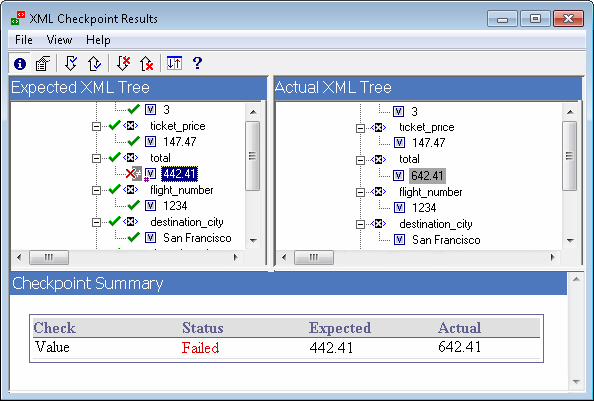
In the following example, the value of the total element was parameterized and the value's content caused the checkpoint to fail in this iteration.
The value icon
 is displayed with a pound symbol
 to indicate that the value was parameterized.
To view details of the failed value, select the failed element from the Expected XML Tree and select View > Checkpoint Summary to view the Checkpoint Summary in the bottom pane in the XML Checkpoint Results window. The procedure for analyzing the checkpoint results does not change even though the value was parameterized.
Using the Checkpoint Summary pane, you can compare the expected and actual values of the total element.


