Include and ignore areas when comparing a bitmap - Use-case scenario
Relevant for: GUI tests and components
Suppose you want to compare an expected bitmap with an actual bitmap of the object in your application, but there are areas of this runtime bitmap that might be affected by dynamic values and parameters. If you include these areas in the checkpoint, running the steps with different values may cause the checkpoint to fail.
This use-case scenario describes the process you would follow to define which areas to ignore and include in a bitmap checkpoint that compares an expected bitmap with a runtime bitmap.
Note: For a task related to this scenario, see Insert a checkpoint step.
-
In OpenText Functional Testing, start a recording session and open the Windows Calculator application (for example, Start > Accessories > Calculator).
-
Record steps that multiply 7 by 5 and display the result.
-
Select Design > Checkpoint menu, or click the Insert Checkpoint or Output Value button
 in the toolbar, and then select Bitmap Checkpoint. OpenText Functional Testing is hidden, and the pointer changes to a pointing hand.
 -
Select the Calculator application. If the Object Selection Dialog Box opens, select the top-level object and click OK. The Configure checkpoint details opens.
Note: (For tests and scripted components) For the purpose of this use-case scenario, you insert the bitmap checkpoint while recording your steps. However, the options are relevant also when inserting a bitmap checkpoint from the Active Screen.
-
In the Bitmap Checkpoint Properties dialog box, select the Compare selection with runtime bitmap radio button. For the purpose of this scenario, you will compare a bitmap of the entire Calculator application.
-
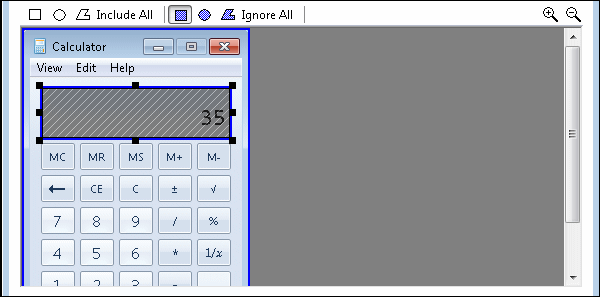
Because the value in the number line may change, depending on parameters that are used during the run session, you can ignore the number line when comparing the expected bitmap with the runtime bitmap.
To do this, click the Mark Rectangle to Ignore button
 in the toolbar, and then select the entire number line. Modify the size and position of your selection as needed. When you are finished, double-click to finalize the selection.
The following example shows the bitmap display area when the number line is selected to be ignored:

-
(Optional) If you need to modify your ignored selection after you finalize it, you can do so by clicking the Mark Rectangle to Include button
 in the toolbar, and then selecting the areas that you want to clear. Any areas that you clear from the ignored selection are included in the comparison.
The following example shows the bitmap display area after a part of the ignored selection is selected for clearing (double-click the area to finalize):

-
(Optional) If you want additional areas to be ignored, click the Mark Rectangle to Ignore button
 , select the relevant areas, and double-click to finalize.
-
Click OK to close the Bitmap Checkpoint Properties dialog box and insert the bitmap checkpoint. When you run your steps, the bitmap checkpoint ignores the area that you selected, and the checkpoint passes even if the value in the number line changes.


