Navigate within a data source
Relevant for: API testing only
When using data in an API test, multiple options enable you to use a customized selection of the data.
What is data navigation?
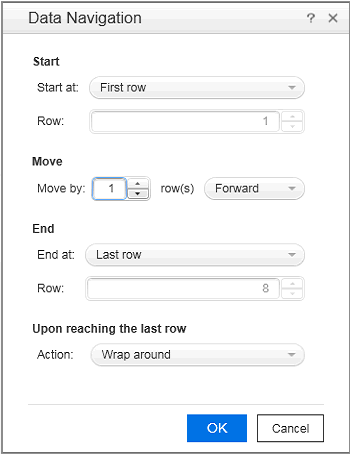
When running a test, data is stored in multiple sources and is used in different step properties. In these cases, use the Data Navigation Dialog Box to instruct OpenText Functional Testing:
-
how to use the data sources, including where in the data source to begin calling data values.
-
how to navigate through the data source
-
where to stop using values from the data source

Data navigation properties enable you to continue to add data to a data source while the data source is used in a test. For example, if you add new data to a data source, but the new data is not complete, instruct OpenText Functional Testing to begin at the row containing the old data and stop before calling the new data values.
Parent/Child data source relations
If your test uses multiple data sources to provide data for your test step properties, create a hierarchy of relations between data sources. Use data relations when you use one specific data source as the primary data source for a test but require other data sources to populate property values within the same test.
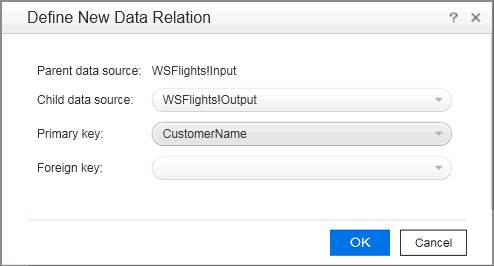
You assign the primary data source to the Test Flow or selected test loop. Then, in the Define New Data Relation dialog box, specify any child data sources and map the columns of the parent data source to the columns of the child data source.

When the test runs, OpenText Functional Testing substitutes the child data as specified.
Add a data source to the Test Flow or test loop
-
Associate the necessary data sources with your test.
-
In the canvas, select the Test Flow or another test loop.
-
In the Properties pane, select the Data Sources tab
 . The list of all currently associated data sources is displayed.
 -
In the Data Sources tab, click Add. The Attach Data Source to Loop Dialog Box opens.
-
In the Attach Data Source to Loop dialog box, select the data source to add to the loop and click OK.
The selected data source is now added to the loop and you can use it to link property values.
If the selected Test Flow or loop is set as a ForEach type, the test runs the same number of iterations as the number of rows specified.
If the data is not designated as the data source for the loop, but contains values used in steps within the loop, the data navigation policy indicates the order in which the values are called from the data source. For example, if you specify to begin in the second row of your Excel data source, OpenText Functional Testing populates the property value with the values from the second row.
Specify the navigation properties for the data source
-
In the canvas, select the Test Flow or other test loop.
-
In the Properties pane, open the Data Sources tab
 . The list of data sources associated with the current loop is displayed.
 -
In the Data Sources tab, click Edit. The Data Navigation Dialog Box opens.
-
In the Data Navigation dialog box, specify the Start and End rows.
-
Indicate the direction in which to move when retrieving data from the table, Forward or Backward, and the number of rows by which to advance for each iteration. Alternatively, you can indicate to move to a random row.
-
Specify the action to do when reaching the last row- Wrap around or Keep using that row. Click OK.
Create a new child relation
This step enables you to specify parent-child data source relations between multiple data sources. You can use parent-child relations for Excel, Local Table, and Database type data sources.
-
Add at least two or more Excel, Local Table, or Database data sources.
Note: This can also be a single Excel file with two worksheets.
-
In the Data pane, select the data source that you want to designate as a parent.
-
In the Properties, open the Data Source Properties Tab (Properties Pane - API Testing)
 .
. -
Click the Add button. The Define New/Edit Data Relation Dialog Box opens.
-
Specify the details of the new relation:
-
The data source to use as the child data source
-
The primary key - the data column in the parent data source
-
The foreign key - the data column in the child data source. This column is used in place of the primary key column in the parent data source when running the test.
Click OK after specifying the data source details. The data relation is displayed in the Data Source Properties tab for the parent data source.
-


