Share this page


Creating a Custom Toolkit Support Set
After you determine the set of custom classes for which you want to extend UFT One support, you create the custom toolkit support set.
A Java Add-in Extensibility custom toolkit support set comprises the following java classes and XML configuration files:
One or more test object configuration classes (if this support set introduces new test object classes or extends existing ones)
Custom support classes (mapped to the custom classes)
The Java classes of the custom toolkit support set are packaged in a toolkit root package named com.mercury.ftjadin.qtsupport.<Custom Toolkit Name>. Within this package, the custom support classes are stored in a sub-package named com.mercury.ftjadin.qtsupport.<Custom Toolkit Name>.cs. The configuration files are stored under the UFT One installation folder and reference the java packages. For more information, see Deploying and Running the Custom Toolkit Support.
To create a custom toolkit support set:
Choose a unique name to represent the custom toolkit.
You use the custom toolkit name to compose the name of the toolkit support class and its packaging. The name must start with a letter and can contain only alphanumeric characters and underscores.
After you develop the support and deploy it to UFT One, UFT One displays the custom toolkit name in all of the dialog boxes that display lists of add-ins or supported environments. For example, when UFT One opens, it displays the custom toolkit name as a child of the Java Add-in in the Add-in Manager dialog box and the UFT One user can specify whether to load support for that toolkit.
Providing unique toolkit names allows a single UFT One installation to support numerous custom toolkit support sets simultaneously. For this reason, a name such as
MyToolkitis not recommended.Create the toolkit root package: com.mercury.ftjadin.qtsupport.<Custom Toolkit Name>.
Create the toolkit support class in the toolkit root package. Name the class <Custom Toolkit Name>Support.java.
For information on the content of this class, see Understanding the Toolkit Support Class.Create the toolkit configuration file. Name the file: <Custom Toolkit Name>.xml.
For information on the content of this file, see Understanding your Custom Toolkit Support Set.Note: The custom toolkit name that UFT One displays (in the Add-in Manager and other dialog boxes) is derived from this file name.
Consider the behavior (fields and methods) of the custom controls, and map the custom controls to a UFT One test object class. For more information, see Mapping a Custom Control to a Test Object Class.
If you require any new UFT One test object classes to map to controls in the custom toolkit, create the test object configuration file. Name the file <Custom Toolkit Name>TestObjects.xml.
For information on the content of this file and the locations in which to store it, see Understanding the Test Object Configuration File.
Note: In most cases, a custom toolkit support set has only one test object configuration file, named <Custom Toolkit Name>TestObjects.xml. However, you could store the definitions for different test object classes in different test object configuration files. You create all of the test object configuration file according to the
When UFT One opens, the UFT One user can select (in the Add-in Manager dialog box) the environments or custom toolkits for which to load support. UFT One then loads the test object class definitions (from the test object configuration files) for all custom Java toolkits whose support is loaded. This enables you to use the same test object class definitions when supporting different custom Java toolkits.
Create the com.mercury.ftjadin.qtsupport.<Custom Toolkit Name>.cs support class sub-package.
In the support class sub-package, create the custom support classes for the classes you want to support.
In most cases, you name the custom support class <Custom Class Name>CS. If your custom toolkit contains classes from different packages, you might have custom classes with the same name. In this case, you must provide different names for the custom support classes, because they are stored in one package. For information on the content of support classes, see Understanding Custom Support Classes.
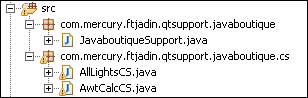
The following example illustrates the structure of the java classes in the custom toolkit support set for the custom toolkit named javaboutique. Within this toolkit, two custom classes are supported: AllLights and AwtCalc:
If you develop the custom support using the Java Add-in Extensibility wizard, the wizard defines the required environment variables. If you do not use the wizard, you must add the following items to the build path (the classpath used by the compiler):
<Java Add-in Extensibility SDK installation folder>\bin\Java\sdk\eclipse\plugins\com.mercury.java.ext.lib_1.0.0\mic.jar
<Java Add-in Extensibility SDK installation folder>\bin\Java\sdk\eclipse\plugins\com.mercury.java.ext.lib_1.0.0\jacob.jar
The locations of the compiled custom classes (these locations can be class folders or Java archives)
Note:
The build path must also include the locations of all parent classes of the custom classes. Add these locations manually to the build path if any custom classes are not derived directly from SWT, AWT, or JFC (Swing) and the parent classes are not located in the same location as the custom classes.
If, at any time, the custom controls are modified in a way that might affect the support, you must recompile the support classes, adjusting them if necessary.
 See also: NOTE TO WRITER: Add your link/cross-reference in a bullet list after the snippet. Apply the SeeAlso style to the <ul> tag.
Next steps: