Preparing for This Lesson
Before you extend UFT One support for a custom control, you must have access to its class and an application that runs it.
In this section, you create an Eclipse project containing the Javaboutique custom toolkit classes. The AllLights class can run as an Applet, so there is no need for an additional application containing the custom control.
To create a new Java project with the Javaboutique sample in Eclipse:
Run Eclipse and select File > New > Project. The New Project dialog box opens.
Select Java Project and click Next. The New Java Project dialog box opens.
Enter
Javaboutiquein the Project name box.Select the Create project from existing source option.
Click the Browse button and browse to the <UFT One Java Add-in Extensibility SDK installation folder>\samples\Javaboutique\src folder. Click OK to return to the New Java Project dialog box.
Click Finish. A new Java project is created with the Javaboutique sample source files. The new project, named Javaboutique, is displayed in the Package Explorer tab.
Note: The steps for creating a new project in Eclipse may vary, depending on the Eclipse version that you use.
After you create the Javaboutique project, expand the project to view its content. The Javaboutique\src package folder contains the org.boutique.toolkit package. This package contains three custom controls: AllLights, AwtCalc and ETextField.
In this lesson, you create the UFT One Java Add-in Extensibility project for the Javaboutique custom toolkit and the support class for AllLights.
You can find a ready-made example of the support for AllLights and for AwtCalc in the <UFT One Java Add-in Extensibility SDK installation folder>\samples\JavaboutiqueSupport folder. (If you deploy this example manually, you must compile the Java classes before deploying.)
Run the AllLights application to become familiar with the behavior of the AllLights control:
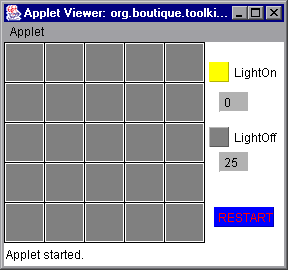
In the Eclipse Package Explorer tab, right-click the Allights.java class in the org.boutique.toolkit package and select Run As > Java Applet. The AllLights application opens:

Click different locations in the frame:
Clicking in different parts of the grid area turns different lights on (or off), according to an internal set of rules, updating the LightOn and LightOff counters.
Clicking the RESTART button turns off all of the lights. The LightOn and LightOff counters are updated accordingly.
Clicking in other areas has no effect.
The object of the game is to turn on all of the lights, at which point a congratulation message is displayed.
 Next steps:


