Creating a New UFT One Custom Support Class
In this section you create a custom support class for the ImageButton control, as part of the ImageControls toolkit support. To do this, you use one of the wizards provided by the UFT One Java Add-in Extensibility plug-in in Eclipse. The details you specify in each wizard screen reflect the decisions you made when planning the custom support. In the subsequent sections you implement the methods that the wizard creates in this class.
Note: The following sections describe only the options in the wizard screens that are relevant to this lesson. For a complete description of all options available in the wizard screens, see Using the UFT One Java Add-in Extensibility Eclipse Plug-In.
Open the New UFT One Custom Support Class wizard.
In the Eclipse Package Explorer tab, select the new UFT One Java Add-in Extensibility project, ImageControlsSupport. Select File > New > Other. The New dialog box opens.
Expand the UFT One folder and select UFT One Custom Support Class.
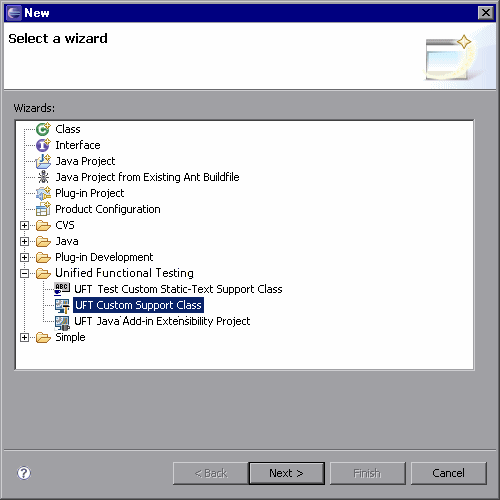
Click Next. The Custom Class Selection screen opens.
Select the custom class to support, and set the options for the support class.
Expand the com.demo package and select the ImageButton class.
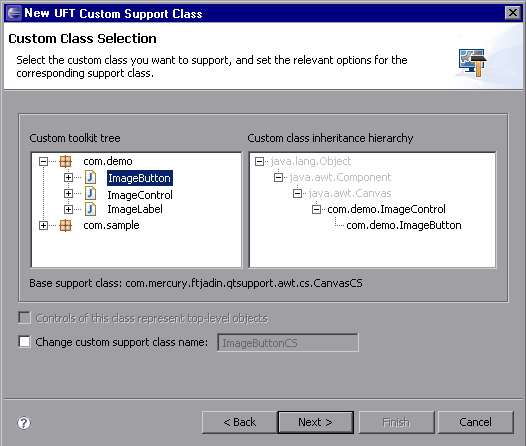
In the Custom toolkit tree pane, you can see the structure of the ImageControls project, which you selected for the custom toolkit class location, in Creating a New UFT One Java Add-in Extensibility Project. The com.demo package contains the ImageControls custom toolkit, with its custom classes, as described in Preparing for This Lesson.
Note: The com.sample package is included in the ImageControls sample project, only to provide convenient access for running the sample application. The main content of the ImageControls project is the ImageControls custom toolkit, contained in com.demo package.
In the Custom class inheritance hierarchy pane, you can see the hierarchy of the ImageButton class you have selected. It extends the ImageControl class, which is part of the same toolkit, and is therefore shown in black.
The ImageControl custom class is not supported, but the Canvas class does have a matching support class, provided in the com.mercury.ftjadin.support.awt.cs package. Therefore the Base support class for the ImageButton support class you are creating is CanvasCS. This is the class that your new support class extends.
The Controls of this class represent top-level objects option is disabled because the ImageButton class is not a container class.
The name for the ImageButton support class is, by default,
ImageButtonCS. It is recommended to keep the default name.Click Next. The Test Object Class Selection screen opens.
Select a test object class to represent the custom control.
In this screen, you map the custom control to a test object class. In UFT One tests, the custom class controls are represented by test objects of this test object class. This is the first and most important decision you make when creating a custom support class.
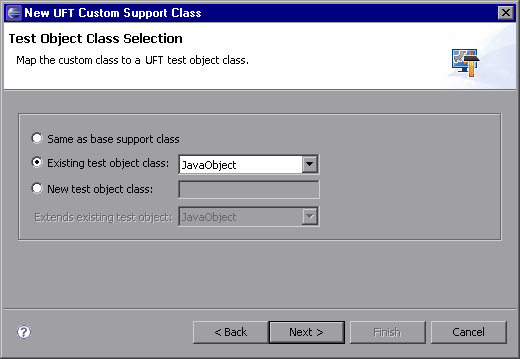
In the previous screen, you determined the support class that the new support class extends. When the test object mapped to the class whose support you are extending is also a logical test object for the custom class, you select Same as base support class. The ImageButtonCS class extends CanvasCS, whose test object class does not adequately represent ImageButton controls.
The existing JavaButton test object does answer the needs of your custom support.
Select the Existing test object class option and select JavaButton from the list. The list of existing test objects contains all of the Java objects that UFT One currently supports. If you define new test objects for custom support, they are included in the list as well.
Click Next. The Custom Support Test Object Identification Properties screen opens.
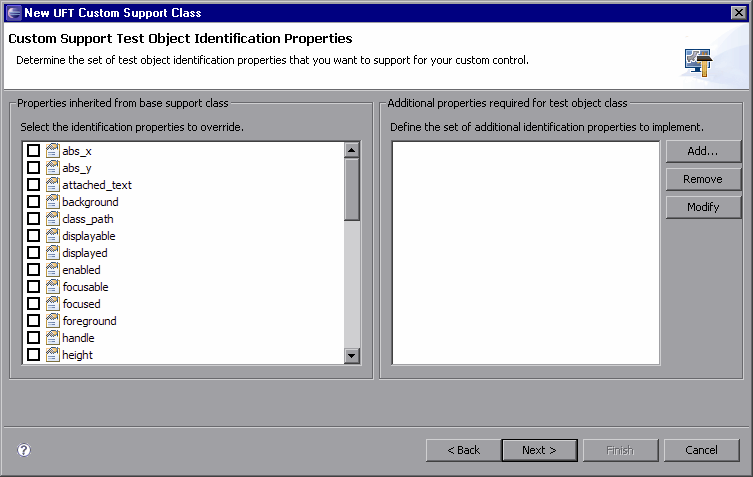
Determine the set of test object identification properties to implement in ImageButtonCS.
This screen displays the identification properties supported by the base support class you are extending, as well as additional properties that are defined in the test object class you selected, but are not yet supported. It enables you to select properties whose support you want to implement or override with new functionality and to add new properties.
The left pane shows all of the identification properties whose support is implemented by CanvasCS, and therefore inherited by the new ImageButtonCS support class. For most of the properties in this list, the default implementation is sufficient.
Select the label property by clicking the check box. After you finish generating the support files using the wizard, you override the existing support for this property with a custom implementation that matches the needs of the custom control.
Click Next. The Custom Support Test Object Methods screen opens.
Determine the set of test object methods to implement in ImageButtonCS.
This screen displays the test object methods defined in the test object class you selected. It enables you to select methods whose support you want to implement or override with new functionality and to add new methods.
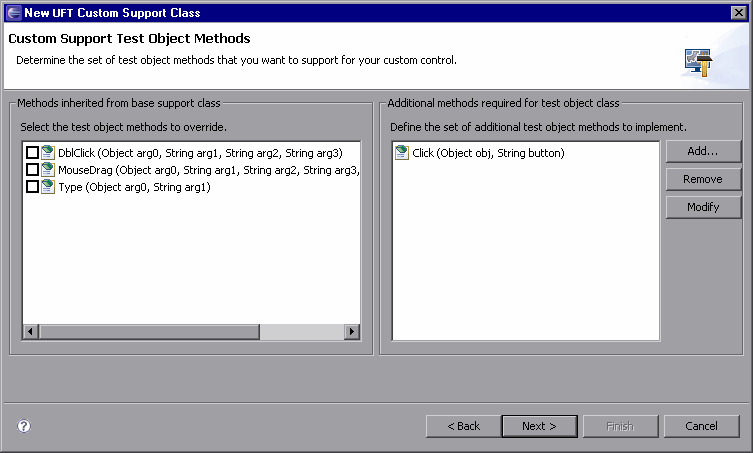
The left pane shows all of the test object methods (defined in the test object class you selected) whose support is implemented by CanvasCS, and therefore inherited by ImageButtonCS. This existing implementation is sufficient for ImageButton so there is no need to select any methods to override.
In the right pane, you can see the test object methods that are defined for the JavaButton test object class, but are not supported by CanvasCS.
Note that there is only one such method—Click(Object obj, String button). After you finish generating the support files using the wizard, you implement the ImageButton support for this method.
Click Next. The Custom Control Recording Support wizard screen opens.
Determine the set of events for which to listen, to support recording on the ImageButton control.
This screen displays the event listeners implemented by the support class you are extending. It enables you to select event handler methods whose implementation you want to override with new functionality and to add new event listeners to implement.

In the left pane, you can see the listeners implemented by CanvasCS. You do not have to override any of these for the ImageButtonCS custom support class.
In the right pane, you specify the listeners you want to add for ImageButtonCS. Each listener you select implies a set of event handler methods that the wizard adds to the support class.
Perform the following:
Click Add to add the ActionListener.
The Listener dialog box opens.
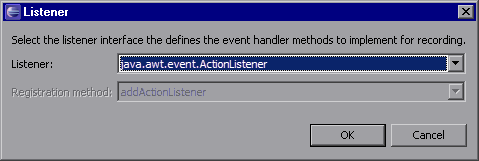
If it is not already selected, select java.awt.event.ActionListener from the Listener list. If the selected listener had more than one registration method, you would also select a method from the Registration method list.
Click OK. The Listener dialog box closes and the ActionListener, and all of the event handler methods it includes, are added to the list in the right pane of the wizard screen.
On the Custom Control Recording Support screen, select the Override low-level mouse event recording check box to prevent low-level events (coordinate-based operations) from being recorded instead of the events you want to record. For more details on this option, see Understanding Event Recording Support.
Click Finish. The Custom Control Support Class Summary screen opens.
View the custom control support class summary.
Review the planned content of the custom support class, and click OK.
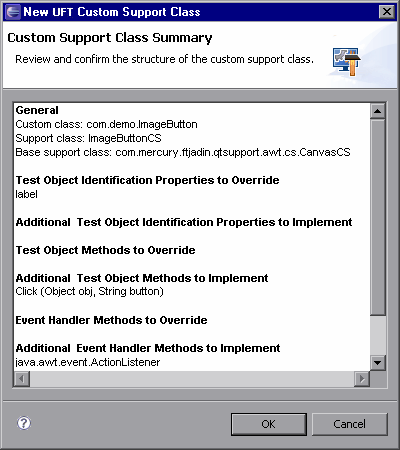
The following changes are made in the ImageControlsSupport project:
A new UFT One custom support class, ImageButtonCS, is created in the com.mercury.ftjadin.qtsupport.imagecontrols.cs package. The file is opened and displayed in a tab in the right pane.
A new ImageControlsTestObjects.xml file is created in the Configuration\TestObjects folder.
The ImageControls.xml file is modified.
For a detailed explanation of these changes, see Understanding the New Custom Support.
The asterisk (*) next to the ImageButtonCS file name (in the ImageButtonCS tab) indicates that it has not been saved. The changes made by the wizard are codependent, and must be saved to prevent discrepancies. Select File > Save, or click the Save button.
 Next steps:


