Share this page


Preparing for This Lesson
This topic explains how to set up and get started with this tutorial.
Before you begin
Before you extend UFT One support for a custom control, you must:
Make sure you have full access to the control.
Understand its behavior and what functionality needs to be tested.
Have an application in which you can see and operate the control.
Have access to the class that implements it. (Although you do not modify any of the custom control classes when creating your custom support, you reference the compiled classes, and rely on information you can gain from the source files.)
Follow the instructions below to create an Eclipse project containing the ImageControls custom toolkit classes and a sample application containing the custom controls.
Note: The sample application is designed to run from the default <UFT One Java Add-in Extensibility SDK installation>\samples folder. If you install the SDK to another location, you need to modify the sample application slightly before you begin this lesson. For information, see Modifying the Sample Application to Run From Another Location.

Create a new Java project with the ImageControls sample in Eclipse
Run Eclipse and select File > New > Project. The New Project dialog box opens.
Select Java Project and click Next. The New Java Project dialog box opens.
Enter
ImageControlsin the Project name box.Select the Create project from existing source option.
Click the Browse button and browse to the <UFT One Java Add-in Extensibility SDK installation folder>\samples\ImageControls\src folder. Click OK to return to the New Java Project dialog box.
Click Finish. A new Java project is created with the ImageControls sample source files. The new project, named ImageControls, is displayed in the Package Explorer tab.
Note: The steps for creating a new project in Eclipse may vary, depending on the Eclipse version that you use.
Expand the ImageControls project to view its content. The ImageControls\src package folder contains two packages:
The com.sample package contains the sample application: SampleApp.
The com.demo package contains three custom controls: ImageButton, ImageControl and ImageLabel.
The following diagram shows the inheritance hierarchy of the classes in the com.demo package.
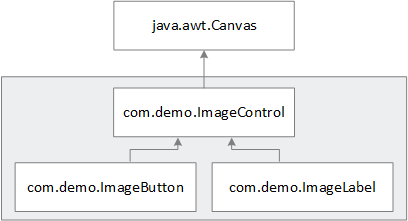
The functionality provided by the classes in this package is as follows:
ImageControl. This class extends the Canvas class, and displays an image on the control.
ImageLabel. This class extends the ImageControl class, and allows writing additional text over the image displayed on the control.
ImageButton. This class extends the ImageControl class, and draws a button-like rectangle around the control. It listens for low-level events on the control, and triggers an Action event when the button is clicked.
Modifying the Sample Application to Run From Another Location
The sample application assumes that the UFT One Java Add-in Extensibility SDK is installed in the default installation folder. Otherwise, you must modify the sample application before performing this lesson.
The default installation folder:
UFT One 2023 and earlier: C:\Program Files (x86)\Micro Focus\UFT One
UFT One 23.4 and later: C:\Program Files (x86)\OpenText\UFT One
To modify the sample application:
After you copy the ImageControls source files into Eclipse, browse to the package ImageControls\src\com.sample in Eclipse and open the SampleApp.java file.
Locate the code containing the image file paths:
UFT One 2023 and earlier:
C:\Program Files (x86)\Micro Focus\UFT One\samples\ImageControls\images\mercury.gif
C:\Program Files (x86)\Micro Focus\UFT One\samples\ImageControls\images\JavaExt1.gif
UFT One 23.4 and later:
C:\Program Files (x86)\OpenText\UFT One\samples\ImageControls\images\mercury.gif
C:\Program Files (x86)\OpenText\UFT One\samples\ImageControls\images\JavaExt1.gif
Replace the default installation folder in these paths with the actual installation folder to enable the sample application to function properly.
 Next steps: