Share this page


Testing the Application with OpenText Functional Testing After Registering the Testing Agent
In this section, you register the Testing Agent for the QuickID application and repeat the steps you performed before to record an OpenText Functional Testing GUI test with the assistance of the Testing Agent. The new test uses the more meaningful test objects and test object methods defined by the Testing Agent.
Register the Testing Agent and record an OpenText Functional Testing GUI test on the QuickID application:
Deploy the Testing Agent provided in the sample:
In a user account with administrator privileges, open a command window and navigate to <Testing_Extensibility_installdir>\samples\QuickID<Visual Studio version>\bin. Run install.bat to register the Testing Agent.
Note: When UAC is on, run the install.bat using “Run as administrator”.
The Testing Agent for the QuickID application is registered.
Copy the <Testing_Extensibility_installdir>\samples\QuickID\<Visual Studio Version>\dat\TEASampleEnvironment.xml testing environment file to the <OpenText Functional Testing installdir>\dat\Extensibility\TEA folder to deploy the test object definitions for the QuickID sample.
Run the sample application:
Browse to the <Testing_Extensibility_installdir>\samples\QuickID\<Visual Studio version>\bin folder and double-click the QuickID.exe file.
Caution: For the QuickID sample, you must run the application before opening OpenText Functional Testing. When you run the QuickID application, it creates a singleton Testing Agent. When OpenText Functional Testing is then opened, it uses this instance. However, if you open OpenText Functional Testing before opening the application, OpenText Functional Testing and the application each create separate Testing Agents that do not communicate with each other.
Open OpenText Functional Testing. OpenText Functional Testing recognizes the registered Testing Agent and displays its environment's name (TEAQuickIDSample) in the Add-in Manager dialog box. (If the Add-in Manager dialog box does not open, see the OpenText Functional Testing Help Center for instructions.)
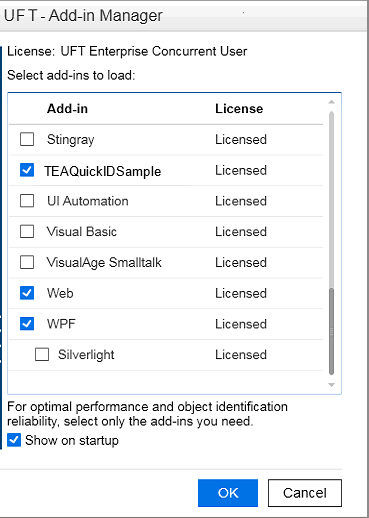
Select the check box for TEAQuickIDSample and click OK. OpenText Functional Testing opens and runs the Testing Agent.
In OpenText Functional Testing, make sure that the Record and run test on any open Windows-based application option is selected in the Record and Run Settings dialog box, and start a recording session. For more information, see the OpenText Functional Testing Help Center .
Perform the following operations on the QuickID application:
Enter your name in the text box.
Click the down arrow and select a city from the list.
Click the OK button.
OpenText Functional Testing records the operations you perform.
In OpenText Functional Testing, stop the recording session. The recorded test steps should look something like this:
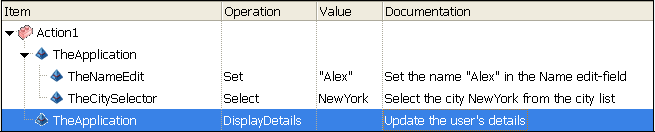
OpenText Functional Testing now recognizes the objects in this application more specifically, using environment-specific test objects to represent them. Each test object also uses specific test object methods. This Testing Agent does not define specific icons to use for its test objects, therefore OpenText Functional Testing displays a generic icon for the test objects.
After the Testing Agent is registered you can also create tests in OpenText Functional Testing without using the recording mechanism. In the Define New Test Object dialog box, select the TEAQuickIDSample environment and then select from the environment-specific test objects that OpenText Functional Testing displays. A default test object method is defined for each test object.