Share this page


Use Azure DevOps to run a local test
This topic describes how to use Azure DevOps Server or Services to run a test stored on your local machine from Azure DevOps Server (formerly known as TFS).
Note: This topic describes working with OpenText Functional Testing Azure DevOps extension 26.3.*. To benefit from the latest functionality, we recommend updating existing tasks' versions to 26.3.*. When using this extension version, make sure that you installed the corresponding UFT.zip file from the ADM-TFS-Extension GitHub repository.
Run a test saved on your local machine
In Azure DevOps Server:
-
Create a pipeline. (Note: If you are using TFS, skip this step)
-
Create a build pipeline or a release pipeline, with the Empty job template.
Note: A build pipeline is the pipeline type created when you do not explicitly create a release pipeline.
-
Select the agent pool that includes the agent on which you want to run your tests.
-
In the pipeline variables, add a UFT_LAUNCHER variable. The variable's value should be the full path to the UFTWorking folder.
For more details, see the Microsoft Azure documentation.
-
-
(Optional) To run tests using the open OpenText Functional Testing visible instance, if it exists, instead of opening a new instance for each run:
Define a new pipeline variable:
LEAVE_UFT_OPEN_IF_VISIBLE, and set its value to true (or yes or 1).OpenText Functional Testing remains open at the end of the run as well.
-
(Optional) To run tests as a Windows user that is different from the currently logged-in Windows user, define two new pipeline variables:
Variable Type Description UFT_RUN_AS_USER_NAME String The username for running the tests.
Note: If the authentication fails, specify the value in the UPN format username@DNS_domain_name.
UFT_RUN_AS_USER_PASSWORD String/Secret The password for the specified user.
Click the lock icon to change the variable type to Secret.
-
Add an OpenText Functional Testing task and place the step in the correct place in the build order.
Note: If you are working with a release pipeline, add the task in the relevant stage, then place the step in the build.
-
From the Task catalog, select the Test tab. A list of all available test tasks is displayed.
-
From the Test tab, select the OpenText™ Functional Testing File System Run task and click Add. A new empty task is added as part of your build pipeline.
Note: If you are working with a release pipeline, the task is added as part of your deployment process.
-
-
Provide the following information for your build step.
Option Description Display name By default, the Azure DevOps Server CI system uses a preset descriptor for the task. Provide a more meaningful name for your step.
Tests The test, test batch file, or folder containing the tests to run. For multiple tests, the test path, name, or test result path should be separated by a comma. Timestamp pattern Define the value format of the timestamp field used for reporting in the Extensions tab.
The default value is yyyy-MM-dd HH:mm:ss.
Timeout The amount of time (in seconds) to wait if there is a problem opening or running a test. If the field is left blank, there is no timeout.
Cancel run on first failure Select whether to cancel the entire job if one test in your test run failed.
Generate JUnit report Select whether to generate a JUnit report of the test run. After the run, this report is available in the junit_report.xml file located in the UFTWorking/res/Report_<build run number> folder. Generate 'Failed Tests' report Select whether to generate a report which provides information on your tests' failed steps. After the run, the report is available in the Extensions tab.
Tip: This report is based on the JUnit run results report. Therefore, this option is available only if you select Generate JUnit report.
Alternative: Use a batch file
Alternatively, indicate a batch file that contains a list of tests and their parameters.
- Specify multiple tests, or the same test several times with different parameters each time.
- Use the reportPath parameter to define a specific path for your test result.
The batch file should have an .mtbx extension and use the following syntax:
<Mtbx>
 <Test name="test1" path="c:\tests\APITest1">
 <Parameter name="A" value="abc" type="string"/>
 ....
 </Test>
 <Test name="test2" path="c:\tests\test2">
  <Parameter name="p1" value="123" type="int"/>
  <Parameter name="p4" value="123" type="float"/>
   ....
 </Test>
 <Test name="test3" path="c:\tests\APITest3" reportPath="c:\reports\APITest3">
</Mtbx>
-
(Optional) Configure the run step to upload OpenText Functional Testing's test result information to an Azure Storage location.
Uploading the OpenText Functional Testing results to Azure Storage lets you to access the results from the Azure DevOps portal after the test run.
Make sure you performed the steps described in Set up Azure Storage for your test results.
Then enter the following options in your Run From File System build step:
Option Description Do you want to upload the Functional Testing report to the storage account? Select Yes.
Artifacts to upload Select whether to upload only the html run results report, an archive of all the run result files, or both.
Note: When running an API test we recommend uploading the archive, as the standalone html run results report does not contain any information on the captured data. The content for RequestBody and HttpRawRequest steps is available in the html file contained in the archive.
Report file name Accept the default file name, which is based on the pipeline name and build number, or enter a name of your choice.
-
To run a local test on a mobile device or cloud browser, configure the Functional Testing Lab settings.
Settings you define in the Azure task override the ones defined in the OpenText Functional Testing Record and Run settings. For anything you don't specify in Azure, the Record and Run settings are used.
When upgrading a task from a version earlier than 24.2.0: The OpenText Functional Testing Lab settings in the Azure tasks are now grouped under the Use Functional Testing Lab option. When you upgrade your Azure tasks to the new extension, you must select this option so the Functional Testing Lab settings continue to take effect.
Configure the connection to OpenText Functional Testing Lab:
Option Description Server Provide the address of your lab server, in the format of http[s]://<server name>:<port>. Authentication type Select the authentication mode to use for the connection:
-
Basic authentication. Authenticate using user name and password.
-
Access key authentication. Authenticate using an access key you receive from OpenText Functional Testing Lab.
User name and Password. If you selected Basic authentication, enter your login credentials for the OpenText Functional Testing Lab server.
Access key. If you selected Access key authentication, enter the access key you received from OpenText Functional Testing Lab.
Use proxy settings Provide the following information if you selected to connect using a proxy:
Proxy Server: The address of your proxy server, in the format of <proxy server name>:<port>.
Use proxy credentials. Select if your proxy server requires authentication.
Proxy user name and password. The credentials used for authentication by the proxy server.
Workspace Name
Version 26.3 and later
Use the default workspace or click Get Workspaces and select the appropriate workspace from the list. (Relevant for multi-workspace servers)
Select Use Device Lab to specify details about the device and application you want to test:
Option Description Device Specify the device information of your mobile test, including DeviceID, Manufacturer, Model, OSType, and OSVersion.
You can retrieve the values of these fields by running the Get Functional Testing Lab Resources task (formerly named UFT Mobile Get Resources).
If the value of DeviceID is provided, the other fields will be ignored.
Examples:
DeviceID: "123456789"Manufacturer: "Samsung", Model: "SM-G920F"OSType: "ANDROID", OSVersion: "7.0"Launch on start Select which app you want to launch automatically at the start of your test.
-
Home Screen: The device home screen.
-
System App: Pre-installed system application on your device, such as camera.
-
Functional Testing Lab App: An application hosted on OpenText Functional Testing Lab.
System Application. Specify the system application that you want to test on your device.
Main Functional Testing Lab Application. Specify the main application that you want to test if you select Functional Testing Lab App.
The value format must be
Identifier: "<app identifier>", Packaged: "<Yes/No>", whereIdentifieris required andPackagedis optional. You can get the app identifier by running the Get Functional Testing Lab Resources task (formerly named UFT Mobile Get Resources).Additional Functional Testing Lab Applications Specify additional applications that you want to test.
The value format must be
Identifier: "<app identifier>", Packaged: "<Yes/No>", whereIdentifieris required andPackagedis optional. You can get the app identifier by running the Get Functional Testing Lab Resources task (formerly named UFT Mobile Get Resources).Install Select to install your application at the start of your test. Restart Select to restart your application at the start of your test. Uninstall Select to uninstall your application at the end of your test. Select Use Cloud Browser Lab to describe the browser to open for this test run:
-
Specify the URL of the application you want to test. The browser opens to this web page.
-
Specify the browser information, including it's geographic Location, the Operating System to run it on, the Browser type, and its Version.
You can retrieve the values to use for these fields by running the Get Functional Testing Lab Resources task.
You can specify a specific version or one of the following:
-
latest: the most recent version supported by your lab server.
-
latest-1: the second most recent version supported by your lab server.
-
latest-2: the third most recent version supported by your lab server.
For the list of supported versions, see the OpenText Functional Testing Lab Support Matrix.
-
-
-
Configure the CI system control options for the step, including:
Option Description Enabled Specify whether the step should be run as part of this build. Continue on error Instruct the CI system to stop or continue the build if there is an error on this step. -
Set your pipeline to run:
Build pipeline: Save and queue the pipeline.
Release pipeline: Create a release and deploy the pipeline.
When the pipeline runs, the tests run as part of the task you added.
View the test results
After the test run, you can view the run results in the following ways:
A visual report
In the Extensions tab of the run results, you can see a report including the following parts:
-
The Functional Testing Report section shows the test run status, as well as links to the OpenText Functional Testing report and archive, if they were uploaded to Azure Storage.
-
The Run Summary shows the number of tests that ran and the percentage of each status.
-
The JUnit report shows information on all your tests.
-
If you selected the Generate ‘Failed Tests’ report option, the Failed Tests section shows a detailed breakdown of any failed steps. This data is stored in a file named Failed Tests.html.
Note:
-
If you are working with a release pipeline, these results are available on the Stage level.
-
Sometimes, the Extensions tab is not displayed if you abort the job in the middle of the test run. Even if the Extensions tab is available and you selected the Generate 'Failed Tests' report option, the Failed Tests section is not shown.
Retrieve run result files
-
The JUnit report is available in the junit_report.xml file located in the UFTWorking/res/Report_<build run number> folder.
-
If the OpenText Functional Testing html report and the archive file were uploaded to Azure Storage, you can access these in the storage container.
-
If you abort a job in the middle of a test run, the results of all tests executed before the job stopped are saved into a Results###.xml file in the %UFT_LAUNCHER%\res\Report_###\ folder.
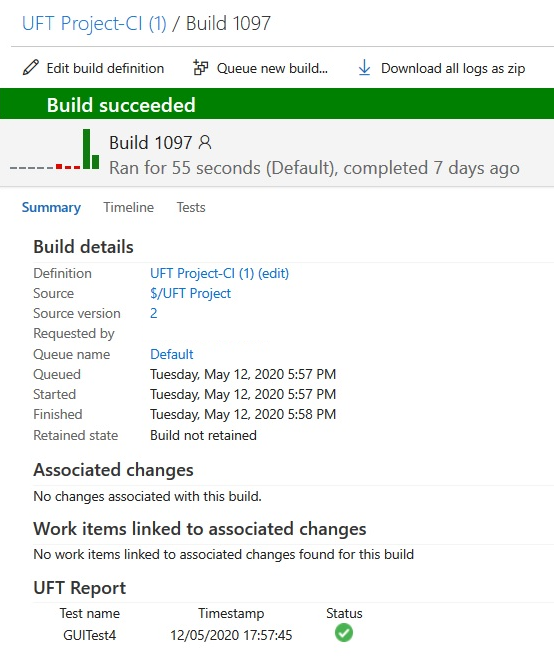
If you run your OpenText Functional Testing tests from Team Foundation Server (TFS)
You can also view OpenText Functional Testing run results in the Summary tab of the TFS build run results.
For example:
Release the OpenText Functional Testing license when a build is aborted
When you abort a build before it completes the test run, the OpenText Functional Testing license still remains in use.
To release the license, prepare a clean.vbs script and run the script directly from the command line after the build is aborted.
Alternatively, you can add a script task to your pipeline to let the task automatically release the license for you.
Note: If OpenText Functional Testing is visible and busy when the script runs, the cleanup.vbs might not be able to interrupt it. In that case, you need to stop OpenText Functional Testing manually and close it to release the license.
To release the license by running the script from the command line:
-
On the client machine where OpenText Functional Testing is running, create a clean.vbs file with the following contents:
Copy codeOn Error Resume Next
Set qtApp = CreateObject("QuickTest.Application")
If qtApp.Launched Then
qtApp.Test.Stop
qtApp.Test.Close
End If
qtApp.Quit
Set qtApp = Nothing -
Run the script from the command line after you abort the build.
-
Check whether the license was successfully released. See Check whether the license was released.
To add a script task that automatically releases the license to your pipeline:
-
Prepare a clean.vbs file. See Step 1.
-
In your pipeline , add a Command line task.
-
In the new task, enter the following:
-
In the Script box, enter:
cscript <path to your clean.vbs file> -
In the Run this task option, select Even if a previous task has failed, even if the build was canceled.
This Script task always runs automatically and closes OpenText Functional Testing to release the license at the end of the build, whether it was aborted prematurely or not.
Note: We recommend that you run the remote Azure agent as the admin.
-
After the build ends, check whether the license was successfully released. See Check whether the license was released.
To check whether the license was released:
-
On AutoPass License Server, click the Usage Reports menu.
-
Under UFT Enterprise Concurrent User, click the History tab.
-
In the table on the bottom of the page, check the CLIENT INFO column and find the record about your license.
-
If you can find the license record there, your license was successfully released.
-
If your license is on the In Use tab, your license remains in use.
-