このページを共有


セキュリティ保護された JMS の設定
このトピックでは,Tibco EMS SSL 接続を使用している場合にセキュリティ保護された JMS を設定する方法について説明します。
サーバ側の設定
セキュリティ保護された JMS サーバ・マシン上で,次の手順を実行します。
-
サーバ管理者から必要な証明書を入手します。たとえば,次のようなファイルが必要になります。
- server_root.cert.pem
- client_identity.cert.pem
- server_root.cert.pem
- server.cert.pem
- server.key.pem
- client_root.cert.pem
-
factories.conf ファイルを見つけて編集のために開きます。このファイルはサーバのインストール・ディレクトリにあります。
-
factories.conf ファイルで,JMSConnectionFactory の設定を定義します。
次の内容を定義します。
- type = queue
- url = バインドの SSL URL
- ssl_trusted = サーバ側の証明書のパス
- ssl_verify_host = false
例:
[JMSConnectionFactory]
type = queue
url = ssl://localhost:7243
ssl_trusted = C:\...\server_root.cert.pem
ssl_verify_host = false
-
引き続き factories.conf ファイルを編集して,直接 SSL ファクトリを作成します。
次の内容を定義します。
- ssl_identity = クライアント側の証明書のパス
- ssl_trusted = サーバ側の証明書のパス
例:
[SSLQueueConnectionFactory]
type = queue
url = ssl://localhost:7243
ssl_identity = C:\...\client_identity.cert.pem
ssl_trusted = C:\...\server_root.cert.pem
-
tibemsd.conf ファイルを見つけて編集のために開きます。このファイルはサーバのインストール・ディレクトリにあります。
-
tibemsd.conf ファイルで,次の値を定義します。
- authorization = enabled
- listen = バインドの SSL URL
- track_message_ids = enabled
- ssl_server_identity = サーバ側の証明書のパス
- ssl_server_key = サーバ側のキーのパス
- ssl_password = サーバ側のキーに関連付けられたパスワード
- ssl_server_trusted = クライアントの証明書のパス
例:
authorization = enabled
listen = ssl://localhost:7243
track_message_ids = enabled
ssl_server_identity = C:\...\server.cert.pem
ssl_server_key = C:\...\server.key.pem
ssl_password = ***
ssl_server_trusted =C:\...\client_root.cert.pem
-
サーバ側のユーザとグループを設定します。
- EMS 管理ツールを起動してログインします。
- グループを作成し,新しいグループにユーザを追加します。
- 新しいグループに,キューにアクセスする権限を付与します。
たとえば,ログイン後に次のコマンドを実行します。
create group securegroup
add member securegroup admin
grant queue inQueue group=securegroup send
grant queue inQueue group=securegroup receive
grant queue inQueue group=securegroup browse

クライアント側の設定
UFT One マシン上で,次の手順を実行します。
-
関連する .jar ファイルを EMS サーバ・マシンから UFT One マシンにコピーします。
-
テストの設定値を編集します。次に例を示します。
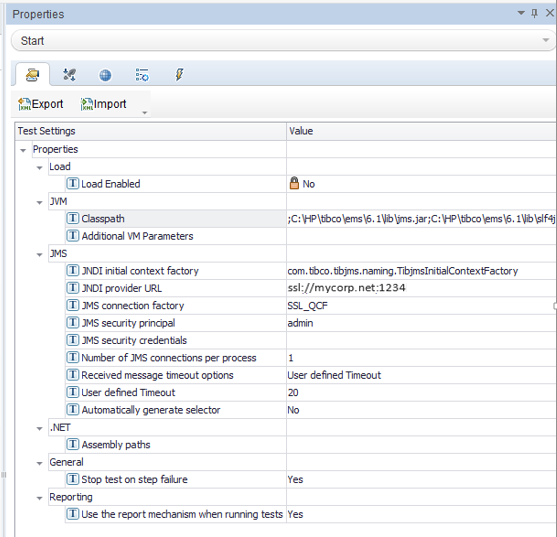
この例では,Classpath の値を以下の値に設定しています。
C:\HP\tibco\ems\6.1\lib\jms.jar;C:\HP\tibco\ems\6.1\lib\slf4j-api-1.4.2.jar;C:\HP\tibco\ems\6.1\lib\slf4j-simple-1.4.2.jar;C:\HP\tibco\ems\6.1\lib\tibcrypt.jar;C:\HP\tibco\ems\6.1\lib\tibemsd_sec.jar;C:\HP\tibco\ems\6.1\lib\tibjms.jar;C:\HP\tibco\ems\6.1\lib\tibjmsadmin.jar;C:\HP\tibco\ems\6.1\lib\tibjmsapps.jar;C:\HP\tibco\ems\6.1\lib\tibjmsufo.jar;C:\HP\tibco\ems\6.1\lib\tibrvjms.jar
詳細については,[テストの設定]タブ([プロパティ]表示枠 - API テスト)を参照してください。