Share this page


Test Recorder
The Test Recorder is a tool for recording user operations and verifications on applications and generating a test script from the recorded steps.
Supported applications
The Test Recorder is supported for applications of the following technologies:
| Technology | Windows | Linux/Mac |
|---|---|---|
| Web |

|
|
| Mobile (native, Web, and hybrid) |
|
|
| SAPUI5 |
|
|
| StdWin |
|

|
| .NET Winforms |
|
|
| .NET WPF |
|
|
| Java |
|
|
| PowerBuilder |
|
|
For recording on Web applications, the following browsers are supported:
Chrome, Firefox, Internet Explorer, Edge, and Safari (on iOS devices only).

Test Recorder benefits
The Test Recorder is a useful tool for accelerating test creation and can be beneficial for:
- Creating the main body of a test, which you can later add to and refine manually.
- Learning how to write tests gradually, assisting in your learning curve.
- Quickly adding steps to an existing test.
Prerequisites
-
For recording on Web, make sure that your browser is set up with the OpenText UFT Agent extension. For details, see Set up web browsers and controls.
-
Make sure that the UFT Developer runtime engine is configured to use the add-in for the technology on which you want to record. For details, see Customize UFT Developer runtime engine settings.
-
If you want to record on a mobile device connected to Digital Lab (UFT Mobile), make sure to configure the connection to Digital Lab (UFT Mobile) as described in Connect to the mobile device lab.
-
To record on a Web browser, you must use a browser window that was opened after the runtime engine started.
If the engine was not running when you opened the Test Recorder, the engine is started automatically along with the Test Recorder.
Record GUI operations using the Test Recorder
You can record on several browsers and mobile devices at a time. You can also record on multiple desktop applications in a single recording session.
If you are recording on a mobile device, open the mobile device in Digital Lab (UFT Mobile), as described in Select the device and application.
To record GUI operations and add verifications:
- In your IDE, open an existing test or create a new one.
-
-
From your IDE menu:
Click UFT Developer > Test Recorder or click the Test Recorder
 button.
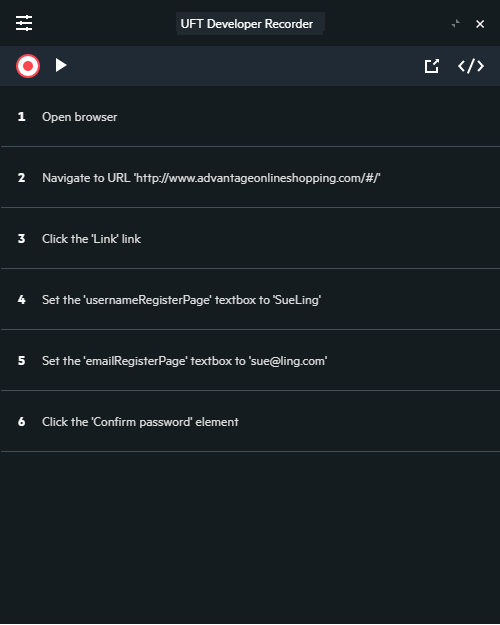
The IDE is minimized and the UFT Developer Recorder toolbar appears at the top of the screen.

UFT Developer 2021 or earlier: The Test Recorder option is only available when the UFT Developer runtime engine is running.
-
In standalone mode:
Windows Open Test Recorder (available from the Windows Start menu). Linux/Mac From <UFT_Developer_installdir>, open the Tools folder and run ./recorder-leanft.
The Test Recorder does not start recording as soon as you open it. Bring your application to the desired state before you start recording.
-
-
On the Recorder toolbar, click the Start recording
 button.
 -
Perform operations on your application. Each operation that you perform is recorded and a description for that operation is displayed as a step in the toolbar.
Note: When recording on a packaged mobile application, you can perform operations manually on the physical device, or using the remote access window. To record on a non-packaged application, you must perform the operations using a remote access window.
-
At any point during the recording session, you can do the following:
 Review the recorded steps
In the Recorder toolbar, click the Maximize button
 to display the steps.Add comments
Add comments to the recorded steps. The comment is added to the code after you generate it. You can also add comments to the code after you complete the recording session.
How to add a comment:
- To add a comment to the last recorded step, click the step's comment
 button to view the comment area, and replace the
 Enter commentplaceholder with your comment. - To add a comment to other steps, maximize the Recorder to display the steps. Enter your comment in place of the
Enter commentplaceholder, visible when you hover over the step.
Add verifications
Add verification steps, which will be included in the code that you generate from the session.
In the Recorder toolbar, click the Add verification
 button. Click an object whose state or behavior you want to verify. In the verification designer that opens, specify the properties to verify and the conditions they must meet. For details, see Add verification steps during a recording session.Edit verifications
Edit a verification step added in this recording session, to change its name or the properties and values that it checks.
Maximize the Recorder to display the steps, hover over the verification that you want to modify and click the Edit
 button. In the verification designer that opens, modify as needed and click UPDATE.Pause/Resume recording
Pause the recording session if you want to perform an operation that you do not want to record. For example, closing a pop-up dialog box that is not part of the test flow.
In the Recorder toolbar, click the Pause
 button. To resume the session, click the Resume
  button and continue recording.Delete a step.
Maximize the Recorder to display the steps, hover over the step you want to delete, and then click the Delete
 button.Close
Close the recording session . Click X to close the session without generating code.
- To add a comment to the last recorded step, click the step's comment
-
When you are done recording, click the Stop
 button. The recording session ends.
-
When the recording session ends, you can do the following:
- Review the steps you recorded, delete unnecessary steps, and add comments.
- Resume the recording session and add steps or verifications. Click the Resume button.
- Redo the recording, discard the current session and begin a new recording. Click the Start new recording button.
-
Click the Generate code and copy to clipboard
 button.
 The default language in Eclipse, Spring Tool Suite, JBoss Developer Studio, IntelliJ IDEA, and Android Studio is Java. In Visual Studio, the default language is C#. However, you can change the setting to any language supported on your IDE.
To change language, click the Settings
 button and select a language. The selection is saved and used for all subsequent code generations.
 -
Use the Export steps to CSV file
 button to export the recorded steps' descriptions. This provides a manual-test version of the recorded steps.
 -
Paste the script into your test. You can then make any necessary changes, such as synchronizing your test with the application by adding WaitUntil calls.
Use the various WaitUntil methods from the UFT Developer SDKs to wait for an object in the application to meet a specific condition before performing the next test step. You can wait for the object to exist, become enabled or visible, or any other relevant condition.
For details on these methods, see the .NET, Java, and JavaScript SDK references.
Add verification steps during a recording session
During a recording session, you can add verification steps, which are included in the code that you generate from the session.
To add a verification step:
-
In the Recorder toolbar, click the Add verification
button. -
Click an object whose values you want to verify. The verification designer opens, displaying the object's properties and current values, as well as the object hierarchy.

The most commonly verified properties are located at the top of the dialog box, for your convenience.
-
To change the name of the verification step, modify the Verification Name placeholder at the top. When the test runs, this name is used in the report.
-
Select the properties to verify and the conditions they must meet.
Note: You can select a different object from the hierarchy. The verification step checks the properties of the selected object only.
To edit the property value in a condition, click the value.
To edit the operator in a condition, click the operator and select one of the following operators:
= Equal. To pass the verification, the value in the application must be equal to the specified value.

Not Equal. To pass the verification, the value in the application must not be equal to the specified value.
abc* Starts with. To pass the verification, the string's value in the application must start with the specified string.
*abc Ends with. To pass the verification, the string's value in the application must end with the specified string.
*abc* Contains. To pass the verification, the string's value in the application must contain the specified string. .* Match. To pass the verification, the string's value in the application must match the specified regular expression. -
Click ADD to add the verification step to the steps you recorded.

Code generation
The Test Recorder is available on all IDEs supported by UFT Developer. You can choose to generate the code in either Java, JavaScript, or C#.
The script created is self-contained and includes all the object identifications required using descriptive programming. It also includes any comments added to document the operations performed during your recording session.
The code is based on the UFT Developer SDK and, typically, has the following format:
Test step:
var testObject = browser.describe(<ObjectIdentification>);
testObject.<Operation>(<Parameters>)
Verification:
WebElement testObject = browser.describe(<ObjectIdentification>);
com.hp.lft.report.Reporter.startReportingContext(<VerificationSectionName>, com.hp.lft.report.ReportContextInfo.verificationMode());
    Verify.areEqual(<Value>, testObject.<Property>(), "Verification", "Verify property: <propertyName>");
    Verify.contains(<Value>, testObject.get<Property>(), "Verification", "Verify property: <propertyName>");
com.hp.lft.report.Reporter.endReportingContext();
The object identification code is based on the definitions configured in the UFT Developer engine object identification settings. You can configure the default settings. Any change that you make affects how objects are identified in both the Object Identification Center and in the Test Recorder generated code. For more details, see Customize how to identify objects.
Note: For native mobile objects in hybrid application, the code generated includes the fully qualified namespace of the mobile SDK test objects (for Java and C#). This helps differentiate between mobile and Web objects.
 See also: