Share this page


Manual Testing
You can open a mobile device from the lab for manual testing. These sessions can be recorded, and you can use the steps performed to submit a defect directly to ALM Octane.
Start a testing session
To start a testing session on a device:
- Open the Digital Lab console by navigating to:
http/s://<Digital Lab server IP address>:<server port>and logging in with your credentials.
Digital Lab console (SaaS): To access the Digital Lab console, navigate to the Digital Lab SaaS URL provided to you, and log in with your credentials. - In the Devices tab, open a device by hovering over it in Card view and clicking the Open device remotely button
 , or by selecting the device and clicking Open device remotely in List view.
 -
In the device access window, click the Exploratory Testing
 icon at the top of the panel. (By default, this icon is located in the right-hand panel.)

Interact with the device
You can interact with a device during a manual testing session and perform the following actions:
- Simulations, including Fingerprint and Face ID simulation, Photo and video simulation, and QR code and barcode simulation.
- App interactions, such as installing and launching apps. For details, see Device actions & simulations.
- Other actions, such as changing your orientation, zoom in and out of your device, or send text to your device. You can also view information about the device. For details, see Device access window.
Record steps
To record an exploratory test, click the record button  in the toolbar to start recording the session.
Note: Digital Lab captures all steps that you perform, and saves snapshots automatically. As a result, device responsiveness is slower than when actions are performed on a device without recording.
Actions performed on the device are added as steps, together with a screenshot.
The exploratory test toolbar includes the following options:

|
Pause recording. To resume recording after pausing, click the record button .
|

|
Stop recording. |

|
Download a zip file of the steps. The zip file includes screenshots and the following text files: device_details, recorded_steps, and device_logs. You can use this to create a test case. |

|
Submit a defect to ALM Octane. For details, see Submit defect. |
The date and time that a step was performed is added after the step in the zip file, and in the defect.
Edit steps
During a recorded session, your test steps are listed in the exploratory testing panel. Use the options in the panel to edit steps as follows:
To delete steps:
Select the step/s to delete, or click Select All. Click the Delete button. When steps are deleted, the numbering of the steps and screenshots is adjusted accordingly.
To add a step:
- Click Add Notes
 to add a note or step. A screenshot is taken automatically when the button is clicked. A placeholder for the note is added as the last step, accompanied by the screenshot.
 - Start typing. Click the checkmark to confirm the text and add the note.
The note is added with a /// prefix which cannot be deleted, to indicate that it was added manually.
To select screenshots:
By default, screenshots are included in the zip file for most steps. Certain steps, such as installing or uninstalling an app, do not include screenshots.
| Exclude all screenshots | Click the exclude screenshots  option in the toolbar above the steps to exclude screenshots for all steps. option in the toolbar above the steps to exclude screenshots for all steps. |
| Exclude a specific screenshot |
You can remove screenshots for specific steps. Click |
 to toggle between including or excluding a screenshot for a specific step.
 Submit defect
If your administrator has enabled the integration with ALM Octane in the administration settings, you can submit defects during a recorded manual testing session. For details, see Defect Tracking System integration.
To submit a defect:
- Click the Submit Defect button.
- Digital Lab checks the connection to ALM Octane. A new tab opens to log into ALM Octane. After successfully logging in, or if you are already logged in to ALM Octane, you can close the tab.
If your Digital Lab username is different from your ALM Octane username, you are prompted to provide your ALM Octane username. - In the Submit Defect dialog box, give your defect a name, and select the ALM Octane workspace to which to submit the defect. Only workspaces to which you have access are listed.
Digital Lab populates the description field of the defect with the device details (manufacturer, model, ID, version) and the numbered list of steps.Note: The workspace is saved and set as the default for the next defect that you submit.
If you selected to include a screenshot with a step, the screenshot is included in a zip file that is automatically attached to the defect. Screenshot files are named according to the step number. The zip file also contains the device log file.
- Click Save to submit your defect.
Live log
Use the live log to examine the device log in real time and to investigate issues encountered during testing.
To use the live log:
- In the panel on the side of the device access window panel, click the Live log button
 .
. - Select either an application log, or the device log. For application logs, select one or more apps from the list of Digital Lab apps installed on the device.
- Click the Start button
 to start the live log. Use the drop-down in the panel to select the logging level - debug, trace, info, warn, error, or fatal. Use the toolbar for auto-scroll, text wrap, download, and copy options.
 - Click the Stop button
 to stop the live log.
Note: Only the last 1000 lines of the log are displayed in the panel. If you need to download the full log, use the Download device logs option.
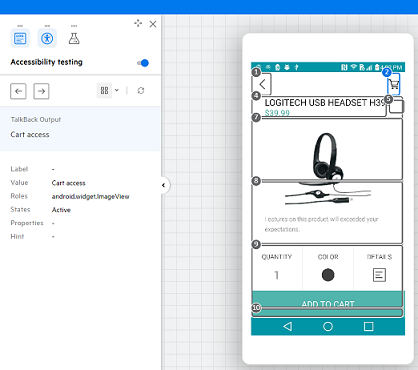
Accessibility testing
Test that VoiceOver/TalkBack users can navigate your app conveniently. You can test accessibility using VoiceOver/ TalkBack audio, or use the Accessibility Inspector to verify the VoiceOver/TalkBack output (text), attributes, and the navigation order of accessibility elements.
When you activate the Accessibility Testing mode ![]() (next to the + icon) in the Devices tab of the lab, only devices that support accessibility testing with VoiceOver/TalkBack audio are displayed. When this mode is active and you open a device remotely, the Accessibility VoiceOver/TalkBack tab is selected. Digital Lab enables VoiceOver/TalkBack automatically on the device.
(next to the + icon) in the Devices tab of the lab, only devices that support accessibility testing with VoiceOver/TalkBack audio are displayed. When this mode is active and you open a device remotely, the Accessibility VoiceOver/TalkBack tab is selected. Digital Lab enables VoiceOver/TalkBack automatically on the device.
Considerations when testing accessibility
The following issues should be taken into account when testing accessibility:
| Accessibility testing with VoiceOver audio |
|
| Accessibility testing with TalkBack audio |
|
| Accessibility Inspector | On iOS devices, supported only on iOS version 13 and later. |
| Exploratory testing | Not supported for accessibility testing. |
To test accessibility with TalkBack/Voiceover audio:
- When the Accessibility Testing mode is active
 and you open a device remotely, the Accessibility VoiceOver/TalkBack tab opens. Digital Lab automatically toggles VoiceOver/TalkBack Accessibility to On.
If the Accessibility Testing mode is not active, click Accessibility testing in the side panel of the device access window. Then, select the VoiceOver/TalkBack tab and toggle VoiceOver/TalkBack Accessibility to On.
 - The device is automatically prepared for TalkBack/VoiceOver audio accessibility testing. The preparation includes:
- Automatically enabling Bluetooth and pairing the device with an Android device (iOS)
- Enabling TalkBack/VoiceOver
- Enabling audio streaming
This may take a few minutes. Wait until the device is ready for testing.
Important note for iOS: Occasionally the Bluetooth pairing is unsuccessful or after pairing, Bluetooth disconnects. If this happens, toggle off VoiceOver Accessibility, and then toggle the option back on. If the issue persists, open the paired Android device and check if there are alerts that need to be clicked.
- When the setup finishes on the device, perform the following actions:
Android Decrease the volume on the device but do not silence it. Screen readers We recommend enabling sleep mode on your screen reader. On NonVisual Desktop Access (NVDA) screen reader, for example, the default shortcut for sleep mode is Insert + Shift + Z keys.
When you finish testing on the device, you can turn sleep mode off. - Use Next and Previous to move between elements, or click Active to make an element active.
Alternatively, you can control VoiceOver/TalkBack with the following keyboard shortcuts:Screen Reader - Sleep mode on Screen Reader - Sleep mode off Next item Right arrow Alt + Right arrow Previous item Left arrow Alt + Left arrow Activate item Ctrl + Alt Ctrl + Alt Note: If you activate an item in the device display with the Ctrl + Alt keys and then want to navigate to elements in the web page using the Tab key and a screen reader, you may need to double-press the Esc key to change the focus back to the web page.
To test accessibility with the Inspector:
- If the Accessibility testing mode is active, toggle VoiceOver/TalkBack accessibility to Off.
If the accessibility testing tab is not open, click the Accessibility testing button in the side panel of the device access window. - Select the Inspector tab, and toggle Accessibility Inspector to On.
- To shift the focus to an element, use the Next and Previous buttons in the Accessibility Testing toolbar to move between elements, or hold the Ctrl key and use your mouse to click the element.
Tip: Navigating between elements enables you to verify that the order of the elements makes sense, and that there are no navigation traps — elements that cannot be reached using the VoiceOver/TalkBack swipe right/left gesture.
The element in focus is highlighted with a blue border. When elements overlap, the top element highlighted by VoiceOver/TalkBack when you tap this specific location on the screen is highlighted. The VoiceOver/TalkBack descriptions for each accessibility element are displayed as text, together with the available attributes for the element. You can also use mouse-over to view the details of an element.
- To display all the accessibility elements on the screen, click the Show all elements button
 . Elements are marked with their accessibility frame. To view the navigation order of the elements, click the dropdown next to the button and select Show order.
- After a change such as performing a gesture, changing the device orientation, entering text in a text box, or opening a new page, click the Refresh button in the accessibility testing panel to refresh the accessibility data. If the last highlighted element is still on the screen, it is highlighted. If not, the top element of the accessibility tree is highlighted.
Known issues with recorded sessions
- A screenshot of the last action is not recorded and not saved to the report log.
- When recording on iOS devices, hybrid/web is supported only for iOS version 11 and higher.
Manual testing with Sprinter
Sprinter is a software solution for interactive testing, including testing mobile applications. Sprinter provides advanced functionality and tools to make interactive testing more efficient and effective.
When you start up Sprinter, you select whether to log in with your ALM credentials or connect to Digital Lab.
Installation prerequisites
- Enable browser cookies.
- Clean devices of any apps installed using earlier versions of Digital Lab.
Install Sprinter
| Install | Visit the Sprinter page in the AppDelivery Marketplace. |
| Help |
Open the Sprinter Help Center. |