Share this page


iOS devices
The topic covers IOS device best practices and offers solutions for iOS device issues.
Use an iOS device without a SIM card
If you have no SIM card installed, when running XCUITEST, you may experience a crash from your device’s plug & play because of the No-SIM popup. To avoid this crash, you can use a dummy SIM card (recommended) or follow these guidelines:
- In device's System Settings, configure the auto-lock of the device to 30 seconds.
- On the iOS Agent, tap two times on the Digital Lab icon.
-
Select the VNC tab.
-
Set the Avoid device lock option to 1 minute, to avoid device locking (which may occur even with the device's system auto-lock settings).
Note: To apply this setting to all connected iOS devices, configure the setting in Administration settings > iOS options. This eliminates the need to configure the setting manually on each connected device. - It is strongly advised to also enable Application Launch Alert Dismiss . If the setting is disabled and a system alert occurs, it may block the functionality of the Avoid Device Lock feature, causing the device to lock.
Note: To apply this setting to all connected iOS devices, configure the setting in Administration settings > iOS options. This eliminates the need to configure the setting manually on each connected device.

What should I know about app certificates?
When installing an app that is already installed on the device, be sure to use the same Developer certificate as the installed app. If the certificates do not match, the installation fails. For example, if the app on the device is signed with Certificate A you cannot install the same app signed with Certificate B.
The same applies if an app on the device is signed with an Enterprise certificate and you want to install the same app signed with a Developer certificate.
Workaround: If the certificates do not match, first remove the app that is already installed on the device, and then reinstall the app with the other certificate onto your device.
Note: Non-packaged hybrid apps signed with an Enterprise certificate are not supported.
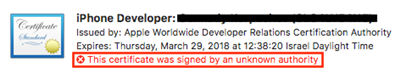
"Certificate was signed by an unknown authority" issue when trying to code sign an app
When code-signing an app on a Macintosh, an Apple trusted authority certificate must be installed so that Apple can be recognized as a trusted authority by the Keychain Access app. If an Apple trusted authority certificate is not installed, any certificate issued by Apple is shown as invalid. For more details on software signing certificates, see the Apple Developer documentation.
If a certificate is shown as invalid (red) in the Keychain Access app, followed by an error “This certificate was signed by an unknown authority”, you need to download and install a new certificate from the Apple Worldwide Developer Relations Certificate Authority.
Install the certificate as follows:
1. Download the certificate from the Apple Developer support site.
2. Double-click the certificate.
3. Verify that it is valid (green) and does not display the following error: “This certificate was signed by an unknown authority”.

Prevent your iOS device from locking during replay
If the device was set up to lock its screen, or sleep, after a certain interval, this can affect your replay.
To prevent all connected iOS device from locking, configure the Prevent auto lock setting in Administration settings > iOS options. This eliminates the need to configure the setting manually on each connected device.
Alternatively, to manually prevent a device's screen from locking up, make sure that your Display Settings for Sleep are set to "Never".
If your device continues to sleep and lock its screen, you can apply a workaround to send a pseudo-action to the device to prevent it from sleeping, and to keep the device unlocked. The pseudo-action used by this workaround, is the Volume up and Volume down controls. It does not affect the steps in your test, but you can see the control briefly at certain intervals, on the device screen.
To set up this action:
- On your device, open the Agent application.
-
On the Digital Lab icon, tap the screen two times. The advanced developer bar becomes visible at the bottom of the screen.
- Click the bottom right button, VNC, to display the VNC server details settings.
- Click in the right value column for the Avoid Device Lock feature.
- Select an interval in which to send the pseudo-action to the device, from 1 to 5 minutes.
Log files for iOS devices
You can get crash logs for a device in a number of ways:
| Method | File Location |
|---|---|
| Locate file on Linux |
|
| Locate file on Windows |
|
| Locate file on Mac connector machine |
|
| Sync with iTunes |
MacOS Mojave (10.14) only:
|
| Share from your device |
Locate the crash information in the following location on your device: Settings > Privacy. Scroll down and tap Analytics. |
|
Open the Xcode Organizer (requires macOS and Xcode) |
|
Issues with orientation steps
When you record the packaged version of an app on iOS, the recorder generates two orientation steps after the Home navigation step.
Empty device log downloaded from the device control panel
The time zone on your iOS device must match the time zone on the connector machine. If the time zones are not aligned, an empty text file is downloaded.
Unable to click Login button or other elements of an app on remote device screen viewer
Certain elements, such as the soft keyboard, are visible on the physical device but not on the remote device display. This is due to Apple security enhancements. There may be cases where these "invisible" elements are placed on top of other elements and prevent users from interacting with them. For example, the soft keyboard may be placed over the Login button, thereby preventing users from clicking it.
Virtual keyboard and secured passwords do not display
When typing secured passwords on a device running on iOS 13 and above, the virtual keyboard and secured passwords do not display in the remote device screen viewer.
Due to apple security enhancements, when typing a password on a device using the remote screen viewer, the virtual keyboard is not displayed and the text is not visible on secured password fields. On the physical device, both the keyboard and the visual indicators (dots) for the password show. Even though the text/keyboard is not displayed, the text is sent as expected.
The same behavior is observed when using the option Send text to device. The text is sent even though it is not displayed.
AccessibilityId is not used for identification
Record and replay of packaged iOS apps uses the accessibilityLabel property and value for object recognition, and not accessibilityId. If your test logic uses the accessibilityId property and value to distinguish a specific object and you plan on testing packaged apps, set up the device as follows:
- On your device, open the Agent application.
-
On the agent logo, tap the screen two times. The advanced developer bar becomes visible at the bottom of the screen.
- Click the VNC button on the bottom right of the screen, to display the settings.
- Switch on use accessibilityId for packaged apps.
Unable to connect a device running on iOS 12 and higher - "No SIM" alert
Insert a SIM card or dummy SIM card in the device.
Alternatively, manually configure the device and Agent app on the device as follows:
- On the device, select Settings > Display & Brightness> Auto-lock and set the timing to 30 seconds.
- Open the Agent app on the device.
- Tap the Digital Lab icon 2 times. The developer options tab bar is displayed at the bottom.
- Tap the VNC icon and set Avoid Device Lock to 1 minute.
Note: To apply this setting to all connected iOS devices, configure the setting in Administration settings > iOS options. This eliminates the need to configure the setting manually on each connected device.
iOS app crashes
If an app consistently crashes after a launch or Start Record, or if you cannot launch it with the Install application option (the actual option name may differ depending on the tool you are using) is selected, perform one of the following :
-
Run the tests with the uninstall or delete option.
Tool Option name UFT One Select the Uninstall checkbox in the Record and Run Settings dialog box, in the Mobile tab. TruClient Delete App After Execution in the TruClient General Settings dialog box, in the Digital Lab settings tab. Sprinter UNINSTALL button in the APPLICATION tab of Digital Lab. -
Install the repackaged AUT on the device, and only use the Restart option.
Tool Option name UFT One Restart in the Record and Run Settings dialog box, in the Mobile tab. TruClient Restart App in the TruClient General Settings dialog box, in the Digital Lab settings tab. Sprinter RESTART button in the APPLICATION tab of Digital Lab.
The Agent does not start up on the device
If the Agent does not start up on the device, verify that the devices are recognized by the
Linux
- Navigate to:
Devices connected to server machine/<path toserver installationfolder>/server/libimobiledevice/linux/
or
Devices connected to standalone connector/<pathto connector installation folder>/connector/libimobiledevice/linux/ - Run
idevice_id –l
The result of this command should be a list of devices IDs (UDID). If the command returns an empty result or ERROR message, try the following:
- Log in as root on the
- Locate the process ID of “usbmuxd”
ps aux | grep 'usbmuxd' - Kill the process:
kill –9 <processID> - Start usbmuxd again:
usbmuxd - Run
idevice_id –lagain to see if the device is recognized.
Windows
- Open a command prompt window and navigate to the following folder:
<Path to your Windows server folder>server\libimobiledevice\winor
Devices connected to standalone connector:<Path to your Windows Connector folder>\libimobiledevice\win - Run the following command:
idevice_id –l
The result of this command should be a list of devices IDs (UDID). If there are no devices listed when a device is connected to USB port, this may mean that:
- The USB port is not working (hardware problem)
- iTunes is not installed, or you are not using the most up-to-date version of iTunes on the Connector computer. Download the latest version of iTunes.
Enterprise certified apps do not launch
When trying to launch an enterprise certified app through your test (for example UFT One), the launching may fail the first time you start the app, because Apple requires the user to manually approve the app on the device. The error message asking for approval is not visible in the testing tool's interface (e.g. UFT One). However, if you launch the app manually, it is visible.
Solution: Manually launch the app and approve its certificate. Then, launch it through your test.
URL navigation steps do not record on XCUITest devices
When recording on XCUITest devices, URL navigation was not recorded.
Solution: If the navigation to the URL is the first step in your test, wait at least 5 seconds to make sure the JavaScript injection is complete. Click once in the address bar to open the keyboard—do not perform a double-click or press the Clear button. Type in the complete URL using the PC keyboard (not the device's) and press Enter.
Date picker actions fail
When using the date picker to select a date, make sure that you make your selection within 30 seconds. If the duration of the time selection exceeds 30 seconds, the agent times out. This issue only applies to non-packaged apps on iOS devices.
Unresponsive device
If a device doesn't work as expected, try to reset all settings. For example, if remote access doesn't work, taps don’t respond, apps don’t install, and so forth, revert to the original default settings:
Agent stops working
If the Agent stops working on the device, do the following:
- Disconnect the device by unplugging the USB cable.
- Wait 5 seconds, and reconnect the device by USB cable.
If you're still having problems:
- Remove the Agent apps and all applications under test (AUTs) from the device.
- Close all open apps on the device.
- Wait 5 seconds and reconnect the device to the USB port.
As a last resort:
- Restart the device. The Agent is reinstalled.
- Accept any system pop-ups on the device.
- Unplug the device by disconnecting the USB cable. Wait 5 seconds and reconnect the device.
 See also: