
Share this page


This section describes how to manage your Vuser scripts by integrating with Application Life Cycle Management.
Manage scripts using ALM
VuGen works together with Application Lifecycle Management (ALM). ALM provides efficient functionality for storing and retrieving Vuser scripts, scenarios, and analysis results. You can store scripts in an ALM project and organize the scripts into unique groups.
In order for VuGen to access an ALM project, you must connect VuGen to the web server on which the ALM project is located. You can connect to either a local or remote web server.
For details on working with ALM, see the ALM Help Center.

Connect to ALM
To store and retrieve scripts from ALM, you need to connect to an ALM project. You can connect or disconnect from an ALM project at any time during the testing process.
You can connect to one version of ALM from VuGen and a different version from your browser. For more information, see the Important Information section in ALM Connection dialog box [VuGen].
To connect to a project in ALM:
-
Determine the type of authentication required for the ALM server: User name/password or CAC (Common Access Card). For CAC mode, enable CAC authentication in VuGen's General options. For details, see General Options tab.
-
Select Integrations > ALM > ALM Connection. The ALM Connection dialog box opens.
-
In the Step 1: Connect to server section, enter a user name and password (not relevant for CAC authentication) and click Connect. VuGen connects to the ALM server.
To disconnect from ALM, click Disconnect.
-
In the Step 2: Login to project section, enter the domain and project details, and then click Login. VuGen logs in to the specified project.
To log out of the project, click Logout.
- Click Close to close the ALM Connection dialog box.
Note: If you authenticated through CAC mode and disconnected from the ALM server, you need to restart VuGen before reconnecting in CAC mode.
ALM version control
VuGen supports version control features in Vuser scripts saved in ALM projects that use version control.
The version control features change the process of opening and saving a script. Scripts with version control are either in a state of checked-in or checked-out. When you are working with a script in a checked-out state, any changes you make will not be saved on the ALM server until you check in the script. If you save the script from within VuGen, a temporary file is saved on your machine that protects your changes in case your computer crashes.
If you are working with a script in a checked-in state, the script is read-only and you cannot make any changes until you check out the script.
If a particular script is being saved to ALM for the first time, and the project uses version control, the script automatically starts in a checked-out state.
Work with scripts in ALM projects
The following steps describe the workflow of how to work with Vuser scripts that are saved in an ALM project.
Note: When downloading a VuGen script from ALM, the file name displayed in the Save As dialog box might be truncated. Due to a Microsoft IE limitation, this problem occurs if the original script name contains more than 160 letters, or if script name contains non-English letters.
To avoid this, download the script via the connection to ALM, as described below.
-
Connect to ALM:
Open a connection to the ALM server and project that contains the script. For details, see Connect to ALM.
-
Open the script:
Select File > Open > Script/Solution. In the Open VuGen Script or Solution dialog box, select the script to open and then click Open.
-
Save the script:
Select File > Save Script. If the script is in a project that uses version control and is not checked out, the script is saved as a temporary file on your local machine.
Work with version-controlled scripts in ALM projects
The following steps describe how to work with scripts saved in ALM projects for which version control is enabled.
-
Connect to ALM.
Open a connection to the ALM server and project that contains the script. For details, see Connect to ALM.
-
Open the script.
Select File > Open > Script/Solution. In the Open VuGen Script or Solution dialog box, select the script to open and then click Open.
-
Check in/out the script.
If the ALM project has version control, each script is always defined as being either checked-in or checked-out. For more details, see ALM version control . To check in and check out scripts, select Integrations > ALM > Check In/Check Out.
Note: If the ALM project has version control, the file is locked when it is checked out.
If the ALM project is not version controlled, the file is not locked when checked out of the project.
-
Cancel a check out. (Optional)
If you checked out a script and do not want to save the changes, you can return the status of the script to checked-in without saving by selecting Integrations > ALM > Undo Check Out.
-
Save the script.
Select File > Save Script. If the script is in a project that uses version control and is not checked out, the script is saved as a temporary file on your local machine.
Save VuGen Vuser scripts to ALM projects
The following steps describe how to save a Vuser script to an ALM project.
-
Open or create the Vuser script
Create or open the desired script in VuGen.
-
Connect to ALM
Open a connection to the ALM server and project in which you want to store the script. For details, see Connect to ALM.
-
Save the script to ALM
- Select File > Save Script as. The Save Script As dialog box opens.
- Click ALM Test Plan, and then specify the name and location for the script.
-
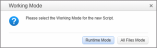
Click Save. After a short time, the Working Mode dialog box opens.
-
Select one of the following options:
Runtime Mode. Copies only the files needed to replay the script. This option does not copy recording snapshot files and other unnecessary files. This results in a shorter transfer time.
All Files Mode. Copies all of the files associated with this script. This results in a longer transfer time.

Compare previous versions of a script
If your Vuser script is saved in an ALM project that uses version control, you can compare previous versions of the script. The following steps describe how to do this.
-
Connect to ALM
Open a connection to the ALM server and project that contains the script that you want to view or modify. For details, see Connect to ALM.
-
Open the script
Select File > Open > Script/Solution. In the Open VuGen Script or Solution dialog box, select the script to open and then click Open.
-
Compare previous versions of the script
- Select Integrations > ALM > Version History. The Version History dialog box opens.
- Select two previous versions of the script and then click Compare Versions. WDiff opens and displays the two versions of the script.
ALM Connection dialog box [VuGen]
This dialog box enables you to connect to an ALM project from within VuGen.
| To access |
Integrations > ALM > ALM Connection
|
| Important information |
|
User interface elements are described below:
|
UI Element
|
Description
|
|---|---|
| Step 1: Connect to Server |
|
| Step 2: Login to Project |
|
| Restore connection on startup |
Automatically reconnect to the ALM server, using the same credentials, when restarting VuGen. |
 . Connects to the server specified in the Server URL box.
  . Disconnects from the current ALM server.
 . Logs into the ALM project.
 . Logs out of the current ALM project.


