Share this page


This topic describes different options to debug your TruClient script.
View replay errors
If any steps failed during replay, they are marked with an error  icon in the Development window. Hover the mouse over these icons to view descriptions of the errors.

Run the script step by step
You can run your script step by step, to view the replay more slowly and in a controlled manner. Select the arrow next to the Replay button in the browser and select Replay step by step. Repeat this for each step to continue the step-by-step replay.
View the replay logs
The log files record various operations performed when you replay a script in interactive mode, and when you replay the script from VuGen. These log files can be useful when debugging the script.
You can view details of your script's replay in the VuGen Output Pane. Select Output Pane > <Browser name> - Interactive Replay.
The log files are stored in the script folder:
|
interactive_replay_TruClient2Web_<Browser type>.txt |
Log file that records various operations performed when running a script in interactive mode. Example:interactive_replay_TruClient2Web_Chrome.txt |
| mdrv.log |
Log file that records various operations performed when running a script from VuGen. |
Breakpoints
Breakpoints instruct the script to stop running during a replay in interactive mode. They can be used to help debug your script. During replay, you can use the Inspector panel to inspect the values of variables at the breakpoint.
A breakpoint is indicated by a red circle icon  to the left of the step number.
To use breakpoints:
-
Use one of these methods to insert a breakpoint in your script:
-
Right-click the relevant step and select Toggle breakpoint. Select the option again to remove the breakpoint.
-
Click to the left of the step number to display the icon. Click on the breakpoint icon to remove it.
-
-
Replay the script or the step. you replay the script, the Inspector panel is displayed. The Inspector panel displays all parameters and user-defined variables.
-
To display the value for a variable at the breakpoint, enter the variable expression in the box at the top of the Inspector panel, and then click Add an expression
 .
.The expression is added to the Inspector panel.
Debug scripts using snapshots
Snapshots are generated according to the snapshot generation settings. You can use the snapshots generated during replay to debug scripts by viewing the snapshots of the failed step(s).
To view snapshots for failed steps:
-
In the General settings dialog box, open the Interactive options tab.
-
Set the Replay snapshots generation to On error.
-
Replay the script from the Development window.
-
Open the Snapshots viewer. You now have a group of snapshots that displays the errors that occurred during replay.
For UI details, see Snapshots for scripts.
Step levels
You can filter the steps by their level when replaying a script.
Assigning step levels
Before recording, on the General settings > Interactive options tab, enable Create level 2 or level 3 steps during recording.
During recording, each step is assigned a level number between 1-3 (the level is displayed in the step  ). Lower numbers represent higher levels:
- Level 1 steps are necessary to the business process. Failing to run them may cause subsequent steps to fail.
- Level 2 steps affect the application in a way that is probably not important to the business process.
- Level 3 steps have no apparent effect on the application.
For example, a step is assigned level 2 if it occurs in an area of the application that has no effect.
Filtering steps at the script level
You control the steps that are displayed in the Development window from the Script level dropdown in the menu bar:
-
Select to display level 1 steps only (highest level, default setting).
-
 Select to display level 1 and 2 steps.
 -
 Select to display all steps.
The hidden steps are ignored during interactive replay.
Steps are displayed in the user interface only if they run at the current script level, but the numbering of steps always reflects all of the recorded steps.
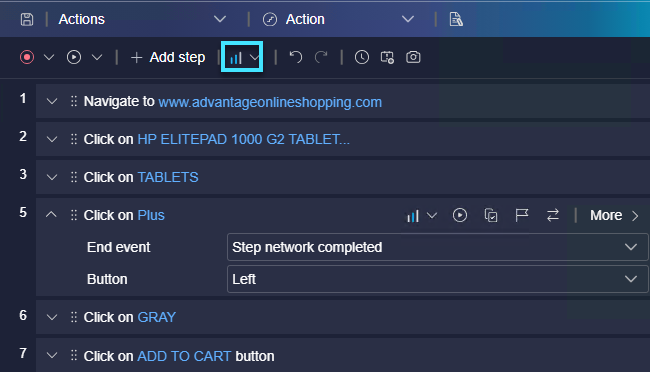
The following screen shot displays a small script. Note that the step numbers skip from 3 to 5; step 4 is hidden in a different level.
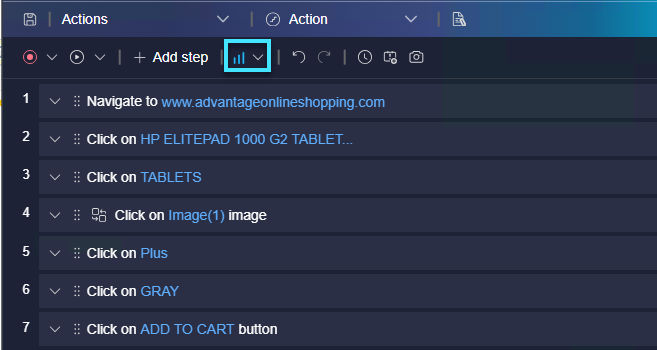
After changing the display settings to level 3, all steps are now displayed, and will run if replayed in interactive mode.
Modifying the step level
You can override the automatic step level assignment, so that the step is included or excluded at the level at which you replay.
Example:
Mouseover steps are generally assigned level 3, since many mouseover steps are recorded simply by the user moving the mouse and do not affect the application state.
However, if a mouseover opens a list to click an option, the action fails if the mouseover is not replayed first.
To fix this, lower the script level to 3 to display all steps. Open the relevant step and change the step level to level 1. (If the step is part of a group step, both the group step and the individual step must be modified.)
The step is now included when the script level is returned to level 1.
Tip: If the necessary mouseover was not recorded at all, add a Generic object action from the Steps box, and perform a click or mouseover action on the list.
Automatic leveling during replay
The level of a step is normally set during recording. If the level is set too low, the replay may fail, for example, generating an object not found error. During replay, the step level is checked. If there are steps at a level lower than the current script replay level, and they can affect the outcome of the current step, then the meaningful steps are moved to a higher level.
Handling short events
Sometimes event replay is too short. For example, there might be a mouseover that opens a dropdown menu or list box. The object must be open before an option is selected.
During replay, the list closes when the mouseover event ends, and the next action to click on an option fails, because the list is not open.
There are two ways to handle this situation:
- Change the Mouse over step end event to Action completed.
- Remove both the Mouse over and the Click steps, and replace them with an Evaluate JavaScript step which performs both actions in the same step.
Insert Wait steps
Sometimes a script fails to replay because an object required by a step is not available immediately after the End event of the previous step. In this case, it is recommended to "slow down" the script, so there is enough time for the object to load.
You can do this by inserting Wait-type steps from the Steps box Functions tab. Use the steps to ensure that the next step does not start until the wait condition is true.
There are two types of Wait steps:
| Type | Description | After insertion: |
|---|---|---|
| Wait | Delays the next step for the specified time. |
Configure the interval in the argument section of the step |
| Wait for object |
Delays the next step until:
|
|
You can run a script without the wait steps, by selecting the Ignore wait steps option on the General settings > Interactive options tab.
Another option to resolve pacing issues is to change the Object timeout of the failing step in the Step section of the step's properties.
Note: Wait steps differ from Think time steps in other VuGen protocols. Think time is the time the script waits between actions to emulate user reaction time. Wait steps pause a script replay until a condition is met.
In a Wait step, set the Think time argument to true to include the wait time in the think time calculation.
Resolve step timeouts
Steps may time out for several reasons:
-
The application is responding slowly, possibly under load. This is actually an important test result and indicates a performance issue.
-
Step timeout is incorrect and should be modified in the Step section of the step properties.
-
The end event of the step is incorrect and the step is waiting for an event that does not occur. The end event should be changed in the Step section of the step properties.
Resolve object identification issues
If an error is discovered during replay, you can highlight the object that failed, and the selected step is automatically recognized. For details, see Object identification.
You can also use the Descriptor editor to improve or control object identification in your scripts, by adding or editing conditions. For details, see Descriptors for scripts.
Selecting items in dynamic lists
If the names of the items in a list are dynamic, then the selection of an item on the list may fail during replay.
For example, the list may include cities based on the text entered so far (auto-complete). Based on the text typed in, the list constantly changes.
There are two ways to solve this issue:
-
Use an alternative step that selects an item from the list using the ordinal identifier, instead of the text of the actual item.
-
If the text is only partially dynamic, you can use a regular expression to locate the required item, based on partial text matching.
 See also: