Share this page


Release process flow
A release process is made up of a number of stages. Each stage contains actions, manual and automated, and quality gates. Optionally, you can organize actions and quality gates into groups.
The following sections provide details about the release process items and their time frames.
Release process items
The following table summarizes the items that can be included in a release process:
| Item type | Details |
|---|---|
| Stage |
The main component of a release process. Example: Prepare test environments |
| Action |
A task that should be performed as part of a stage. There are two types of actions:
|
| Quality Gate |
A task that ensures that a set of criteria is met before moving on to the next stage or action. For details, see Define quality gates. Example: Check if environments are deployed correctly. |
| Group |
An optional container for actions and quality gates. A group can contain lower level groups. |

Date and time fields
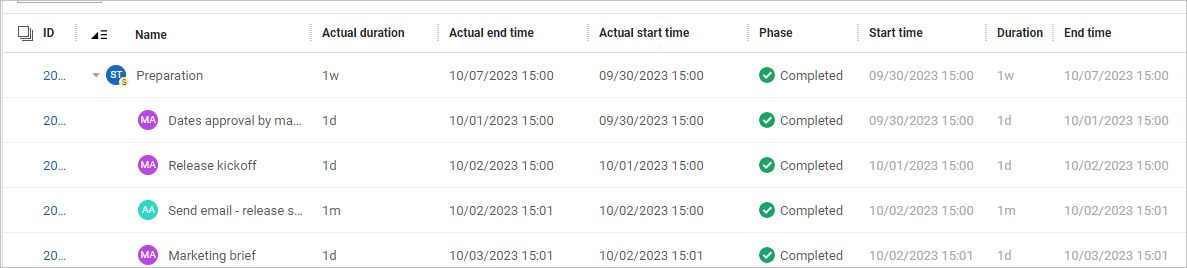
Each item in a release process, including the release process itself, includes three time-related fields: Start time, End time, and Duration. These time-related fields are also available for Planned and Actual times, which are not shown by default. For example, you can show the Actual start time, Actual end time, and Actual duration fields in the release process grid.
The system displays the Start time, End time, and Duration in the following manner:
| Phase | |||
|---|---|---|---|
| Time field | Planned, Scheduled | In Progress, Pending | Completed, Skipped, Aborted |
| Start time | Planned start time | Actual start time | Actual start time |
| End time | Planned end time | Planned end time | Actual end time |
| Duration | Planned duration | Planned duration | Actual duration |
Date field actions
The following table describes actions you can perform on date and time fields that are not yet in the Completed phase:
| Action | Details |
|---|---|
| Auto-adjust times |
For the Start time, End time, and Duration fields, after you set two of the fields, the system automatically sets the third field. For example, if you set an action's end time and duration, the action's start time is calculated automatically based on the two other values. For details about modifying the actual start time, see Actual start and end times. ALM Octane also sets the start time of an item to coincide with end time of the preceding item. For example, if the last action of a stage is set to end at 3/4/2021 10:00, the next stage is scheduled to start at that time. After modifying any of the time values, ALM Octane automatically adjusts all the time fields that are impacted by the change. |
| Pin time fields |
You can pin any of the time fields in a release process item. Pinning the field instructs ALM Octane to keep the value fixed, and not adjust the value automatically when other time fields are changed. For example, if you have a firm date on which a testing action must begin, you can pin the Start time field. Now, even if you edit the end time of the preceding item, or the testing action's end time and duration, the start time stays fixed. To pin a time field:
To unpin a time field:
|
| Set the format of time fields |
By default, the Start time and End time fields display the date and time, and the Duration field displays the duration in days, hours and minutes. Use the HIDE_HOURS_AND_MINUTES_IN_RELEASE_CONTROL parameter to display the date only. For details, see Configuration parameters. |
Actual start and end times
When a release process or release process item starts and ends, the actual start time, actual end time, and actual duration is stored for each item. By default, the start time is set for when the release process item is started and the end time when it is set to Completed. These values are visible in the Actual start time and Actual end time columns.
If, however, the automatically generated start and end times do not reflect the true times, you can manually update the actual values for items with the Completed status.
Available in versions: 24.1 and later
To manually change the actual start and actual end times:
-
Make sure that you have the Adjust actual dates permission. For details, see Roles and permissions.
-
In the actions grid, make sure that the Actual start time, Actual end time, and Actual duration columns are visible. To show and hide columns, click the Choose columns button
 .
. -
Click on the value in the Actual start time, Actual end time, or Actual duration columns and adjust them as required. If you adjust the times in the Actual start time or Actual end time columns, the duration is updated automatically. If you adjust the Actual duration value , the system adjusts the Actual end time value.
 Next steps: