
Share this page


What’s New in AccuRev 7.5
Highlights of new developments in AccuRev 7.5 are captured here. The following sections describe enhancements to the AccuRev Git Server and to the Replica Server, use of Windows symlinks for AccuRev link elements, new functionality in the GUI, and the new online AccuRev Help system.
Expanded Git Server Functionality
This section describes the numerous new features in the Git Server that are included in release 7.5.
Note: The AccuRev Git Server supersedes the AccuRev Git Client, which has been discontinued in release 7.5. See the Release Notes for information on how to transition from the Git Client to the Git Server.
For additional instructions on how to configure and use the Git Server, see What’s New in AccuRev 7.4, AccuRev Git Server section.
Create Repo Page (Administrators only)
The AccuRev 7.5 Git Server offers two new ways to create Git repos: (1) clone a sub-namespace of an AccuRev stream and (2) create multiple repos from the same stream.
To create a repo from a sub-namespace of a stream, use the "Sub-Namespace Path" field on the Create Repo page to navigate the directory structure of the stream and select the desired folder to create the repo from. (If you click in the empty "Sub-Namespace Path" field, the Git Server displays a list of the top-level directories. If you select one of those directories and type ’/’ at the end of the path, the Git Server displays a list of its subdirectories.) Only files under the directory you choose will be kept in sync between the AccuRev stream and the Git repo.
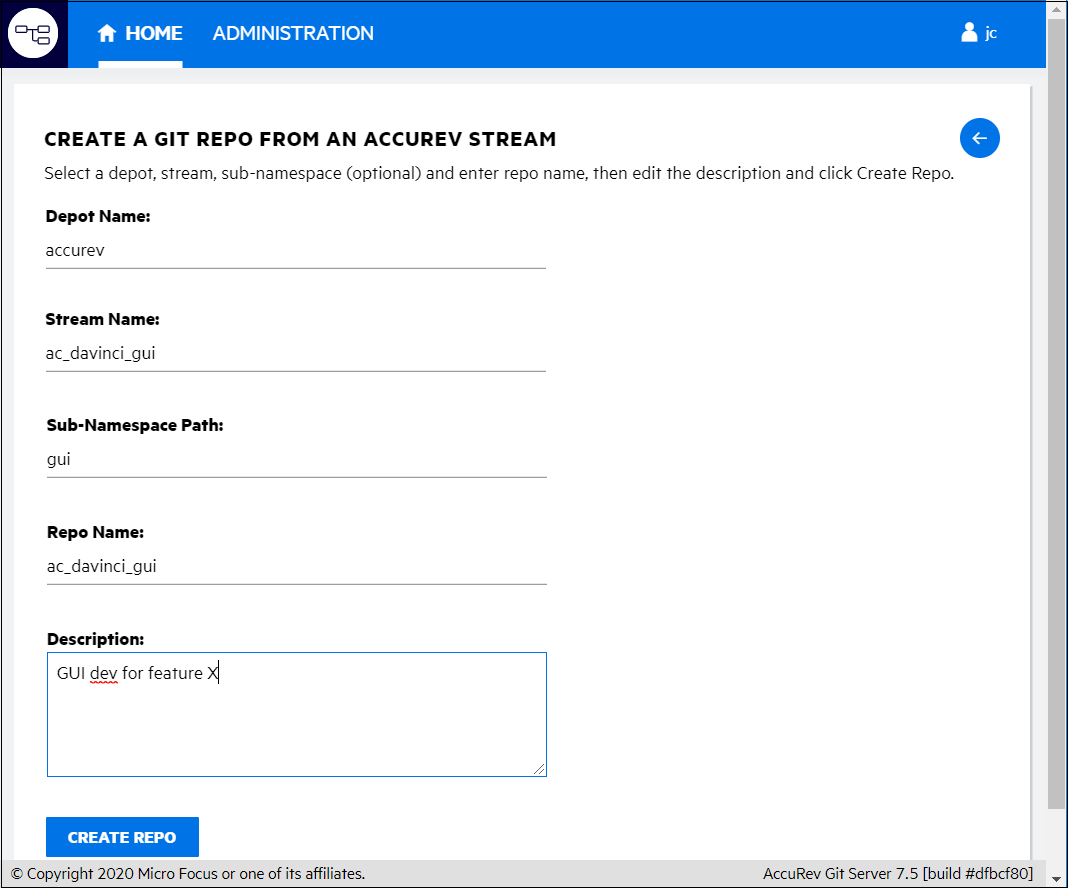
You can create multiple repos from the same AccuRev stream by assigning each repo a unique name (and an optional description). The "Repo Name" field on the Create Repo page defaults to the stream name. You can use the default name as long as all its characters are valid in a URL and no existing repo has the same name. Change the repo name as necessary to make it valid and unique. Any Description that you enter on the Create Repo page is associated with the new repo, not with the AccuRev stream.
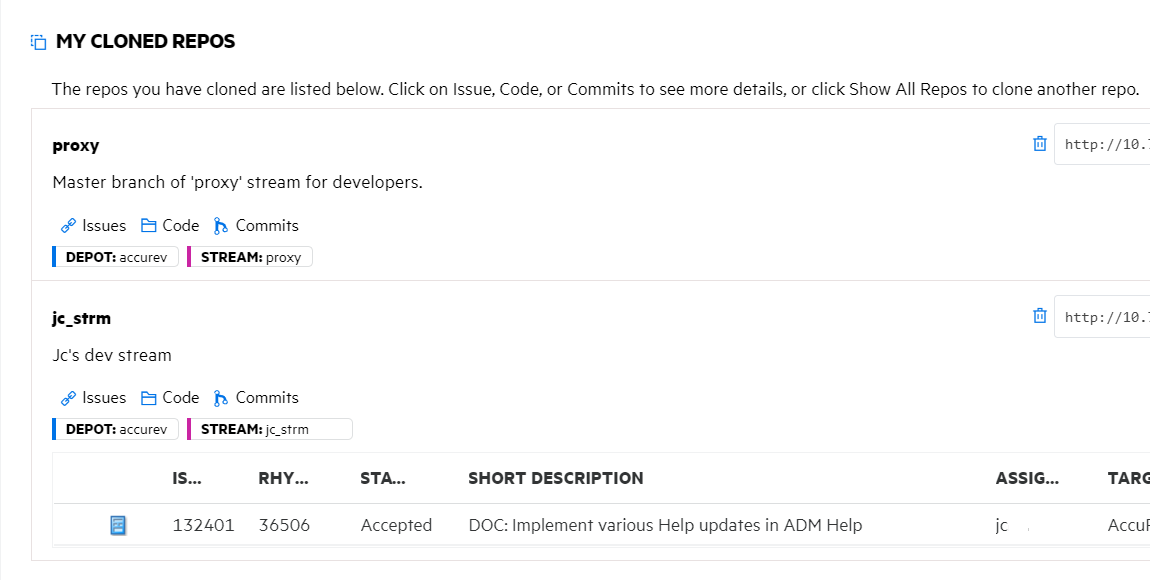
Home Page - Non-administrators
The Home page displays the description, stream or sub-namespace, and issues selected for each of your cloned repos, along with links to access additional information. The Issues, Code, and Commits links take you to the Issues/Change Package Page, Directory Browser and Commit Graph pages, respectively. (These links are also displayed on the All Repos page.)
Home Page and All Repos Page - Administrators
Administrators will see two additional links under each repo on the Home page and All Repos page.
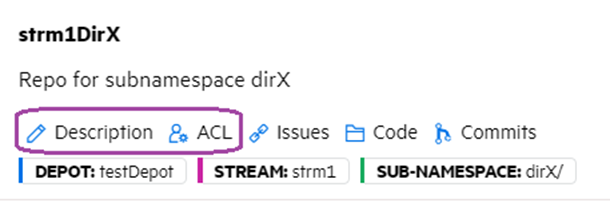
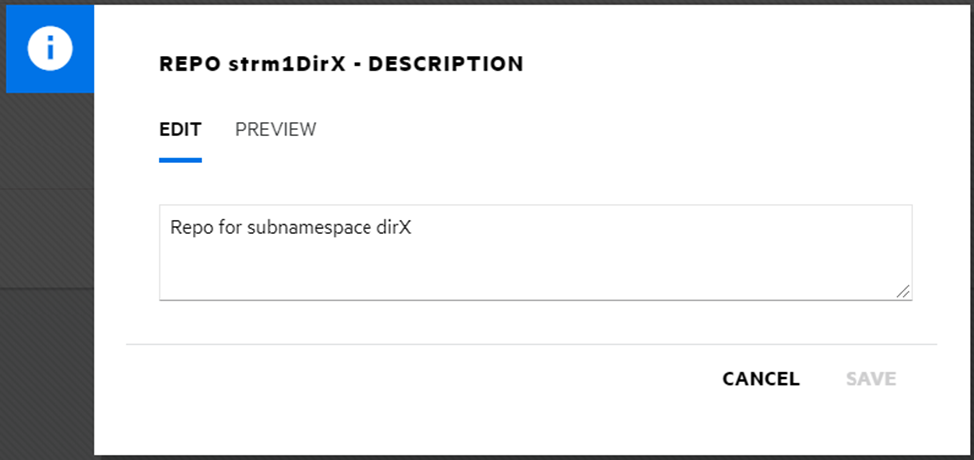
The Description link opens a window for editing the repo’s description:
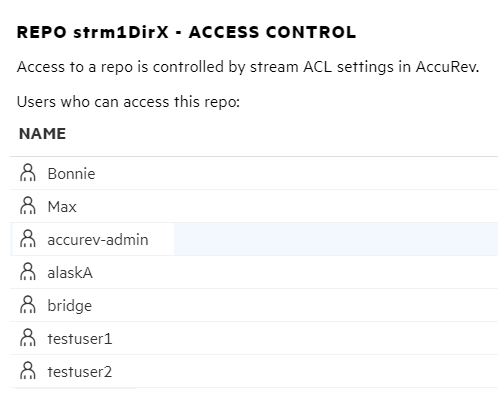
The ACL link takes you to the Access Control page, which lists all the users who can access the repo.
Issues/Change Package Page
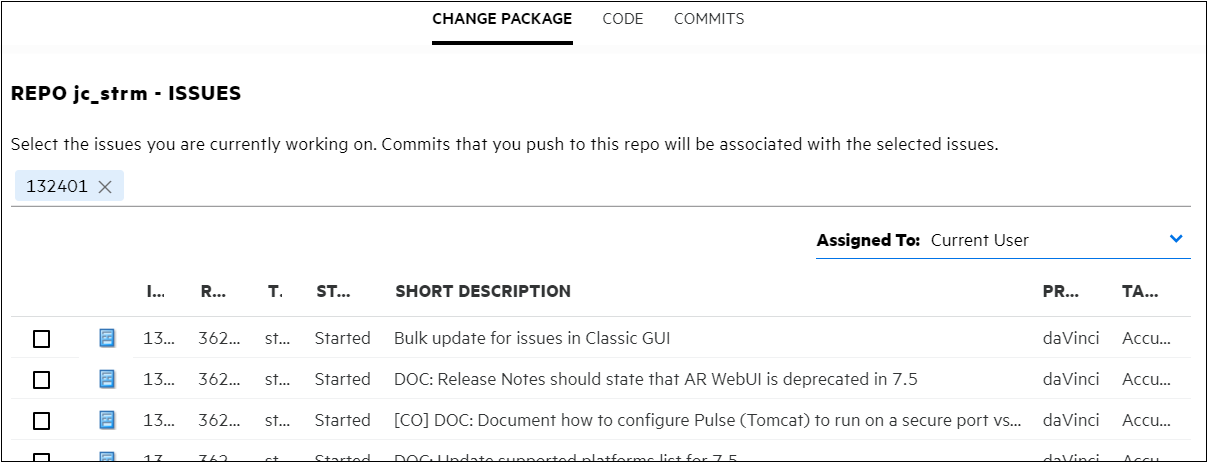
Clicking on a repo’s Issues link on the Home Page - Non-administrators opens the Issues (or Change Package) page, where you can view or update the list of issues associated with the repo:
Clicking on an Issue icon on either the Home page or the Issues/CPK page opens the Git Server’s Issue Form:
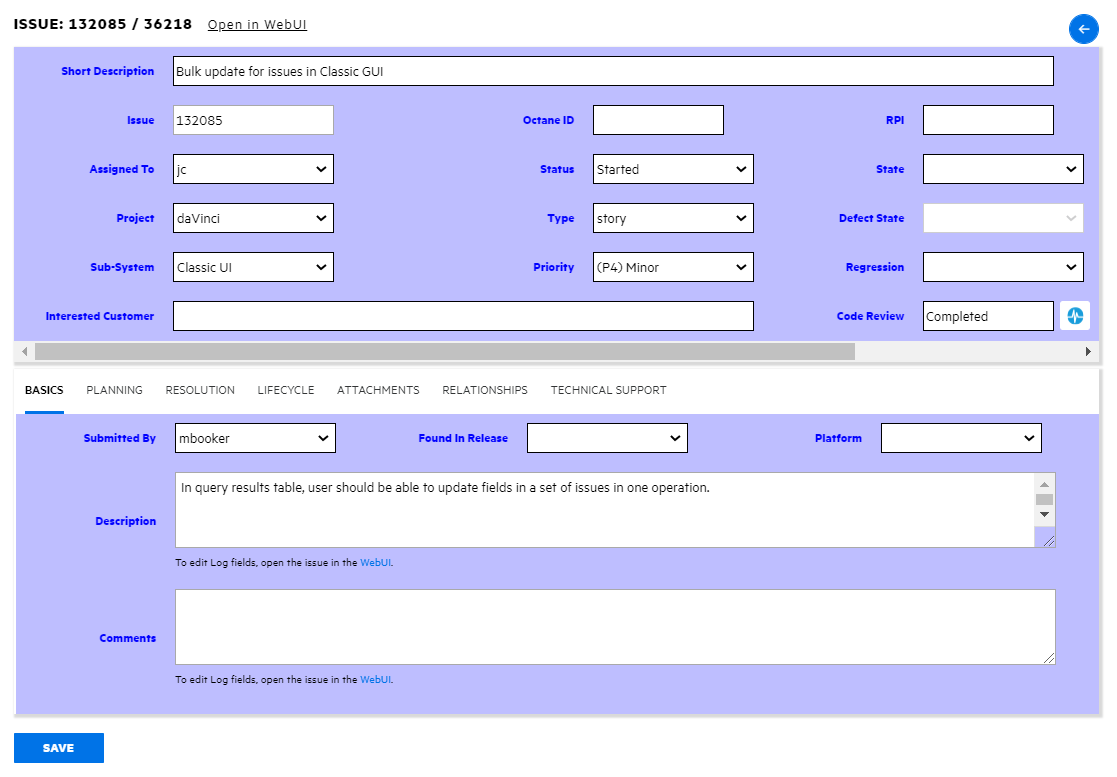
The Issue Form allows you to view and edit AccuWork issues, with a few limitations:
-
The Changes and Issue History tabs are not displayed.
-
The values of Relationship fields are not displayed.
- Log and Attachments fields are read-only; their values cannot be edited.
The Issue Form provides links to access the issue in the AccuRev WebUI, where you can view or edit field values not available in the Git Server’s issue form. The Git Server’s issue form will be enhanced in a future release to provide read and write access to all types of schema fields.
Directory Browser
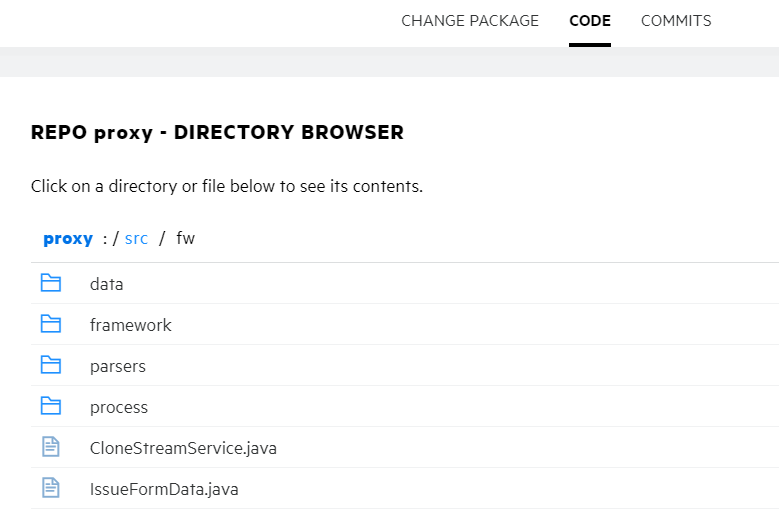
Clicking on a repo's Code link on the Home page opens the Directory Browser, where you can navigate through the repo’s directory structure. Click on a directory to drill down a level and see its contents. Click on a file to see its contents in the Code Browser.
The Directory Browser displays a clickable breadcrumb trail above the directory contents. Use it to quickly navigate around the repo’s directory structure.
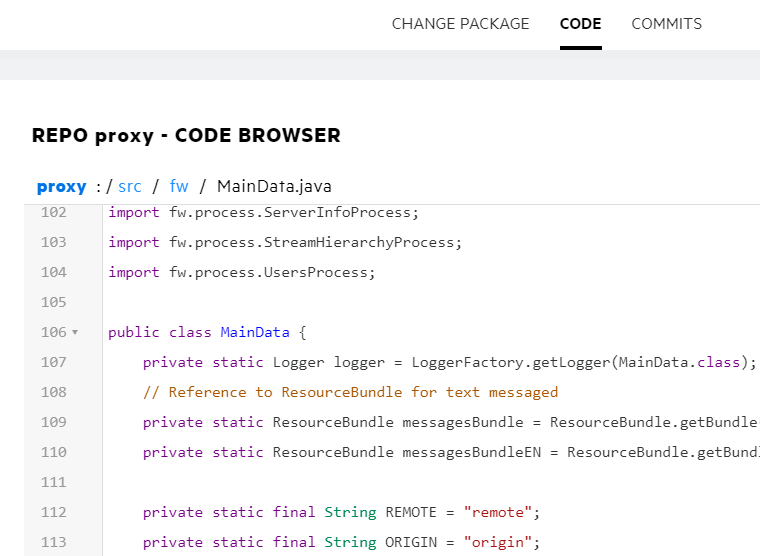
Code Browser
Clicking on a file name in the Directory Browser opens the Code Browser, where you can view the file’s contents. The Code Browser displays line numbers, syntax highlighting, and a breadcrumb trail, which enables you to quickly move back up the directory hierarchy.
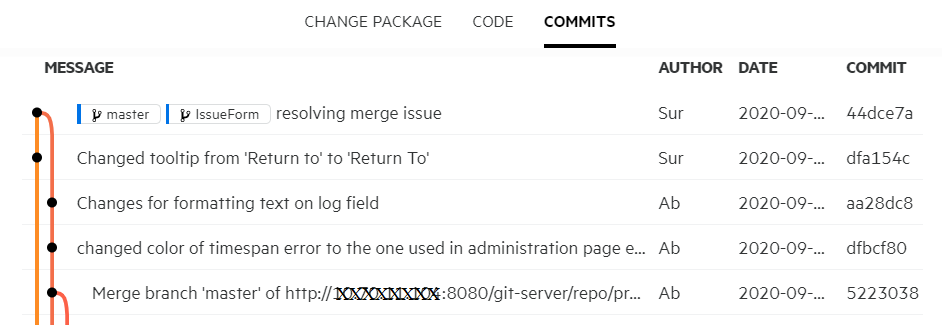
Commit Graph
Clicking on a repo’s Commits link on the Home Page - Non-administrators opens the Commit Graph, where you can view the commit history of the repo. The Commit Graph displays the commit message, author, timestamp, and commit ID for each operation.
If you are an administrator for the Git Server, you can click the commit range of a log entry on the Repo Access Logs (Administrators only) page to open the Commit Graph and see the commits and file details associated with that particular activity.
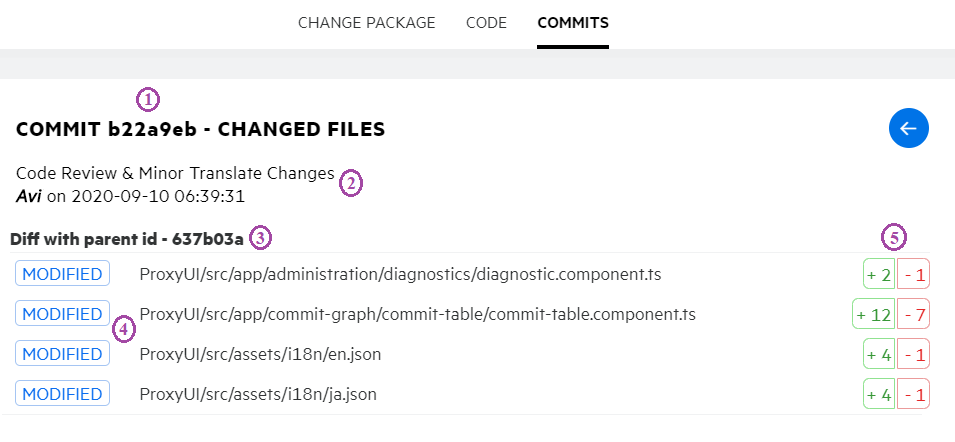
Commit Details
Clicking on a line in the Commit Graph brings you to the Commit Details page, which lists the following types of information about the commit:
1. the commit ID
2. the commit message, the user, and the timestamp of the operation
3. the ID of the parent commit
4. a list of the changed files and whether each was MODIFIED, ADDED, or DELETED
5. counts of added lines and deleted lines for each file. (An edited line counts as one added line and one deleted line.)
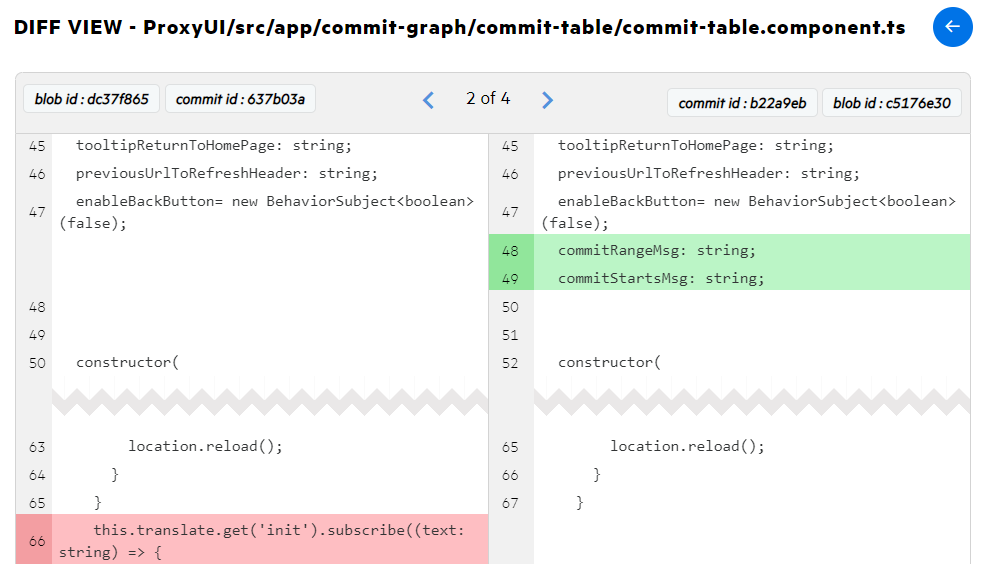
Diff Browser
Clicking on a file on the Commit Details page opens a color-coded Diff View for that file. The page header identifies the commit ID and blob ID for each side of the Diff. You can click the left- or right-arrow in the header to see Diff’s for the previous or next changed files in the commit.
Repo Access Logs (Administrators only)
In the repo access logs, you can now click on the commit ID range for each successful access to the repo. For push and pull operations, the log entry includes the repo name followed by a commit range in the form of FROM_SHA..TO_SHA. Clicking on the commit ID range opens the Commit Graph page and shows you all the commits in that range. For a clone operation, the log entry contains only one SHA. Clicking on that commit SHA opens the Commit Graph page and displays all commits in the repo up to that particular commit.
A log entry for a failed push, pull, or clone operations does not contain a commit ID. Instead, it contains a message explaining the failure.

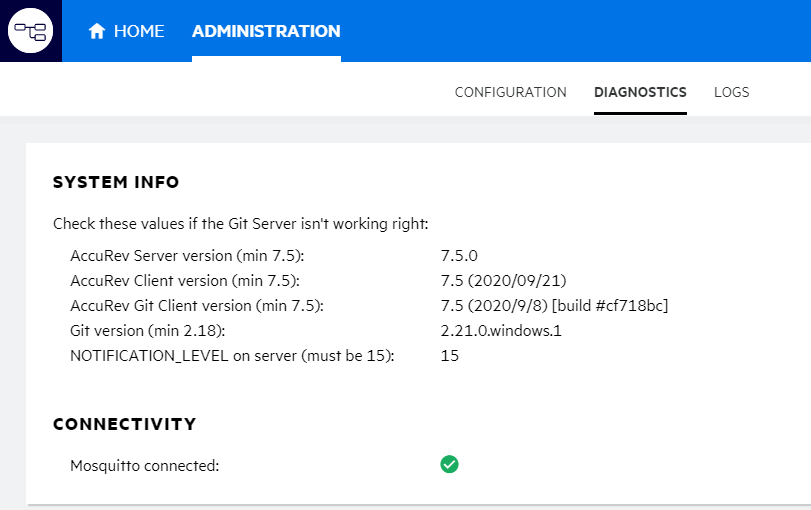
Diagnostics Page (Administrators only)
The Diagnostics page displays installed system software versions, along with the minimum versions required. Note that the minimum required version is now 7.5 for the AccuRev Server, AccuRev Client, and Git Client.

Replica Service Enhancements
Schema Definition XML
The XML files that compose the definition of a depot’s issue schema used to be stored on the AccuRev server in <ac-install>/storage/depots/<depot-name>/dispatch/config/. In release 7.5, all this XML is now stored in the database instead. This enables all dispatch and XML commands that require only database read access to run on the replica server instead of on the master server.
The XML commands that can now run directly on the replica server are:
| serverInfo | stat | cpkdepend |
| tasklist | issuediff | cpkhist |
| queryIssue | issuelist | cpkDescribeDependency |
| historyIssue | cpkdescribe | annotate |
| listRelatedIssues | cpkelems |
Note: The definition of the default AccuWork schema is still stored in XML files in the directory
<acinstall>/storage/site_slice/dispatch/config/.
Full Replica
In 7.5, the replica server can run a background thread that automatically keeps it synchronized with the master server. This feature is enabled by setting FULL_REPLICA = TRUE in the acserver.cnf file and restarting the replica server. The replica server then checks for the existence of container files from the beginning of time, downloads any missing containers, and updates its high watermark for each depot to keep track of how far it has gotten in the process. Once the replica has caught up to the master, it only needs to check for the existence of newer versions created since the last time the thread ran.
Running this background thread enables the replica server to copy all of the version file content and metadata that exists on the master, making it a full replica of the master server. One ramification of having a full replica is that commands that need access to the container file (e.g., update, pop, annotate) no longer need to download those files on demand. The files are already available, leading to better performance from an end user perspective. Additionally, in the event of a disaster, the full replica being a complete backup of the master server expedites the process of getting back up and running as quickly as possible.
Replica Server’s Login to the Master Server
A replica server needs to be logged in to its master server in order to perform replication. Sometimes the replica server gets logged out, or its session token becomes invalid. AccuRev 7.5 introduces two new configuration settings that enable a replica server to re-login to the master server whenever its session ends. Administrators must take the following steps on each replica server to set those new values.
- Login to the replica server machine as the OS user running AccuRev.
- Stop the AccuRev server, e.g. by running acserverctl stop or net stop accurev.
- Execute: maintain setcnf MASTER_USER <user_name>
- Execute: maintain setcnf MASTER_PASS <password>
- Start the AccuRev server, e.g. by running acserverctl start or net start accurev.
The specified credentials are stored in the acserver.cnf file on the replica server; the password is encrypted. The replica server uses the configured user name and password to re-login to the master server whenever it gets logged out for any reason or its session token becomes invalid.
Use Symbolic Links (symlinks) for Link Elements
Using Symlinks for elink and slink Elements
The following table shows the mechanisms that AccuRev used for implementing elink and slink elements prior to release 7.5:
| 7.4 AND EARLIER | elink to file | elink to directory | slink to file | slink to directory |
|---|---|---|---|---|
| Linux/Mac/Solaris | hardlink | symlink | symlink | symlink |
| Windows | hard link | junction point | NOT SUPPORTED | junction point |
Because symlinks are now supported on all the Windows versions that AccuRev runs on, we have updated the implementation of elinks and slinks in AccuRev 7.5 to use operating system symlinks as much as possible.
The following table shows how AccuRev 7.5 implements elink and slink elements to files and directories. Values in italics indicate changes from release 7.4.
Note: Windows distinguishes between symlink to a file and symlinkd to a directory.
| 7.5 | elink to file | elink to directory | slink to file | slink to directory |
|---|---|---|---|---|
| Linux/Mac/Solaris | symlink | symlink | symlink | symlink |
| Windows - non-Developer, non-elevated | hard link | junction point | NOT SUPPORTED | junction point |
| Windows - Developer mode or run as administrator | symlink | symlinkd | symlink | symlinkd |
How to Create slink and elink Elements in AccuRev 7.5
AccuRev 7.5 provides three ways to create slink elements:
- accurev ln s <target> <linkName>
- accurev add -s <OS symlink> (or symlinkd or directory junction on Windows)
- accurev add <OS symlink> (or symlinkd or directory junction on Windows), where the target is a file or directory that is not managed by AccuRev
7.5 provides two ways to create elink elements:
- accurev ln <target> <linkName> (the target must be a file that is managed by AccuRev).
- accurev add <OS symlink> (or symlinkd or directory junction on Windows), where the target is a file or directory managed by AccuRev.
Notes on Windows and Symlinks
-
Windows imposes restrictions on the creation of symlinks -- symlinks can only be created by:
-
elevated applications (run as administrator) OR
-
non-elevated applications in Developer mode.
-
-
The benefits of using symlinks instead of hard links and junction points on Windows are as follows:
-
Junction points can only point to an absolute path on the same file system. Symlink and symlinkd can use relative paths and can point to locations on mounted drives.
-
Hard links can only point to an existing inode (file index). Symlink and symlinkd can point to nonexistent locations.
-
-
Windows distinguishes between symlink to a file and symlinkd to a directory. When populating a workspace on Windows with a link to a target that does not currently exist on the file system, AccuRev assumes that the target is a directory and creates a symlinkd if in administrator/Developer mode, or a directory junction point otherwise. If the target appears later (e.g., by mapping a drive) and turns out to be a file, the link will be unusable. In this scenario you need to execute accurev pop -O <link> to make AccuRev overwrite the existing link with a link of the correct type.
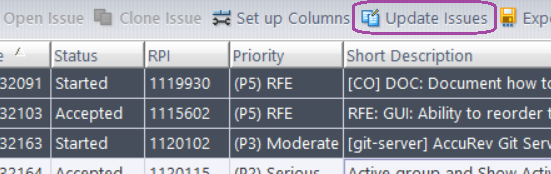
GUI: Bulk Update of Issues
The ability to update fields in several issues at once has been added to the 7.5 GUI. Update Issues in the GUI is equivalent to Bulk Update in the AccuRev WebUI. In the query results panel of the GUI, you can select one or more issues and then click the Update Issues button or select Update Issues in the context menu:
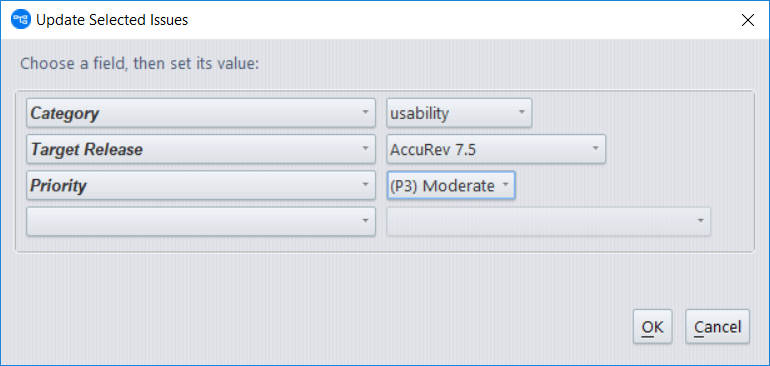
The command displays a dialog box in which you can specify one or more fields and their new values. Choose a field and set its value, repeat as necessary for other fields, and then click OK to update the issues:
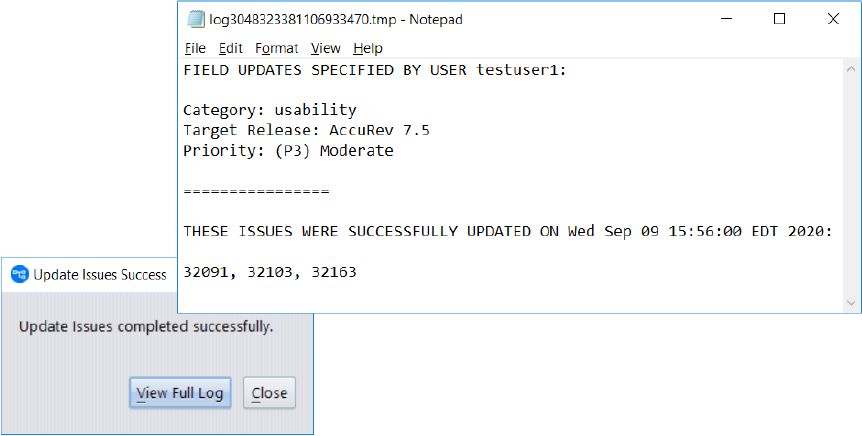
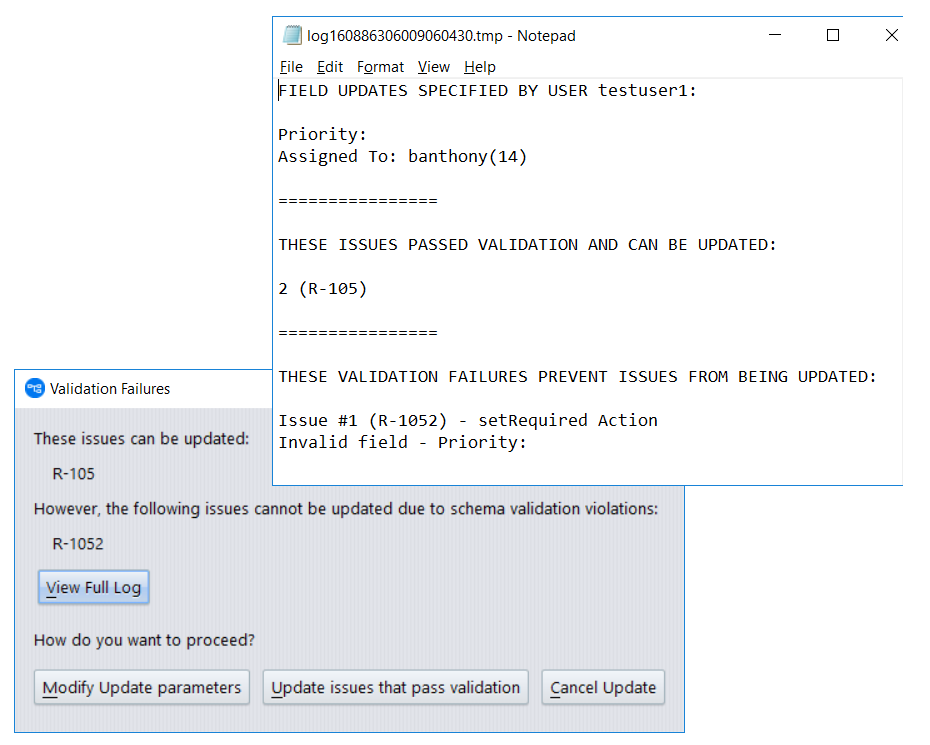
When the update completes, a Success dialog is displayed and the query results panel is updated. You can click View Full Log in the Success dialog to see a log that describes how the selected issues were updated:
AccuRev applies validation rules during the update operation. If any of the rules are violated due to the field values you selected, you will get the option to modify the field values, update only those issues that pass validation, or cancel the entire Update Issues operation:
GUI: Draggable Tabs in the Main View
In the 7.5 GUI, you can drag the top-level tabs to different positions in the main view. This enables you to group related tabs together so that you can find your desired view more quickly.

AccuRev Help Center
AccuRev’s web-based help is now hosted on the ADM Help Center. The URL for the new AccuRev Help Center is http://admhelp.microfocus.com/accurev; it is accessible using any browser. Help links in the AccuRev GUI now direct the user to appropriate pages in the AccuRev Help Center.
To aid you in transitioning to the new documentation system, the following table shows how the old-style, locally installed AccuRev help documentation maps to the new, online AccuRev Help Center:
| Locally Installed Help Doc | Online AccuRev Help Center |
|---|---|
|
Installation and Release Notes - What’s New in AccuRev Release 7.5 - AccuRev Installation Notes - AccuRev 7.5 Release Notes |
- Get Started | What’s New in AccuRev 7.5 - Admin Help | Installation Notes - Get Started | AccuRev 7.5 Release Notes On-Line |
| On-Line Help | User Help | AccuRev Desktop Help |
| CLI User’s Guide | User Help | AccuRev CLI Help |
| Administrator’s Guide | Admin Help | AccuRev Desktop Admin Help |
| Web Interface Administrator’s Guide | Admin Help | AccuRev WebUI Admin Help |
| Web Interface User’s Guide | User Help | AccuRev Web UI Help |
| Concepts Manual | User Help | AccuRev Concepts |
The AccuRev Help Center provides you with comprehensive user assistance. We recommend using the online version of the Help Center for the most recent updates available. If, however, your organization has restrictions that prevent you from using the online Help Center, you can download a copy of the Help to use locally. To do so, click Download Help Center at the bottom of any Help page:

Note: The 7.5 AccuRev client installers install the 7.4 web-based and PDF documentation. Documentation updates for 7.5 have been made only in the online AccuRev Help Center. Installers for future releases may delete any locally installed PDF and web-based documentation for AccuRev.
Pulse 19.2
Pulse has been upgraded to version 19.2 in AccuRev release 7.5. A few enhancements in Pulse are described here.
Choosing Reviewers
When you choose to add reviewers to a code review, Pulse now displays a list of suggested reviewers for you to choose from. This list includes users who have been assigned to a code review before and users who have logged into Pulse at some time.
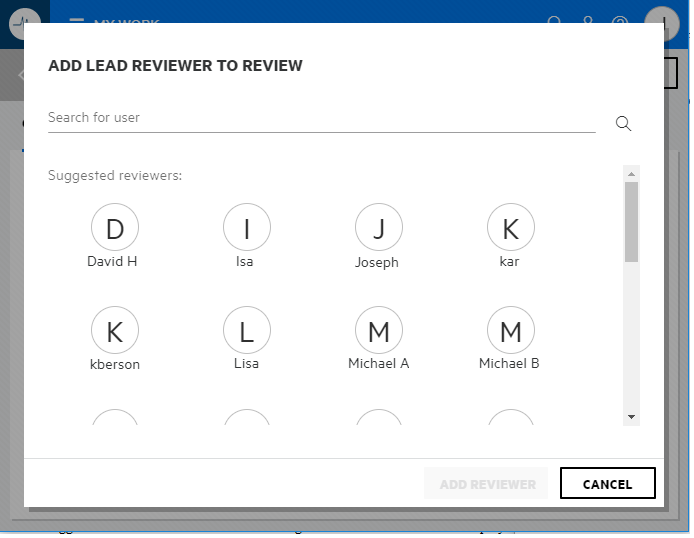
You can still type in a username (or part of it) to search for an AccuRev user that is not in the initial list of suggested reviewers. Users who have never logged into Pulse can be looked up by their usernames; users who have logged into Pulse can be looked up by their usernames or display names.
Another improvement in Pulse is that you can edit the list of reviewers after the code review has been published, i.e., when its state is "In Review".
Navigation Among Files to Be Reviewed
Pulse now offers easier navigation among the files in a code review. The files are displayed in a tree hierarchy, and you can click any file to see its differences. Also you can collapse or expand individual files on the page.
Migration Off the AccuRev WebUI
The AccuRev WebUI is deprecated in release 7.5 and will be discontinued in a future release after we finish migrating important WebUI functionality to other AccuRev components. Release 7.5 includes these migrated functions:
- Git Server: Issue Form
- GUI: Bulk Update of Issues
 See also:

