
Share this page


Get Started
This section describes how to begin working wth GitCentric. It presumes that you have completed the basic installation steps described in GitCentric installation.
Before you set your preferences and start working with GitCentric, log in and register as described in Start working with GitCentric.
Set preferences
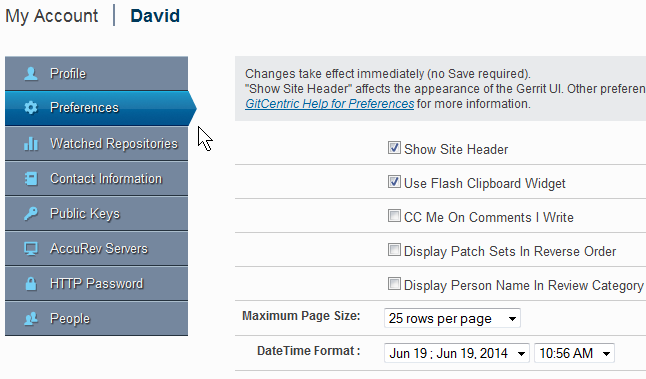
GitCentric provides a page for controlling various aspects of your display.
-
In the upper right corner of the GitCentric window, click My Account from the username list.
-
Under My Account, click Preferences. For details, see Preferences menu item.
-
Configure your settings:
Show Site Header
Enables/disables the optional header and footer images in your web UI display. For more information, see Define and Display a Site Header or Footer for Gerrit Code Review.
Use Flash Clipboard Widget
Displays a widget on various text fields throughout the web UI that allows you to copy the contents of the field to the clipboard. Note: Requires a Flash-enabled browser.
CC Me on Comments I Write
When enabled, you will receive an email containing comments that you submit in response to a review request. The default is to have this setting disabled, to reduce the amount of code review email you receive. But if you want e-mailed confirmation of comments published by your account, you have the option of enabling this setting.
Display Patch Sets in Reverse Order
Reverses the display order of the patch sets in the Change Screen so that the latest patch set is always shown on top. This is useful when there are several patch sets for a change, and the latest patch set and the links to the diffs in the patch set end up below the fold of the Change Screen.
Display Person Name in Review Category
Displays the name of the last reviewer in the “R” column of the Gerrit Code Review Dashboard.
Maximum Page Size
The maximum number of rows that will be visible in Gerrit Code Review displays.
DateTime Format
Allows you to specify one of four Date formats (Three American, with month then day, using commas, hyphens, or slashes. One European, with day then month, separated by periods), and one of two Time formats (12 hour AM/PM, or 24 hour).

Define a header or footer for Gerrit Code Review
Gerrit Code Review provides the option of displaying a header or footer in its web UI.
To create a header or footer:
- Create an image file or files that you want displayed for the header and/or footer. Place the file or files in
gc_home /site/etc
-
Create an XML-compliant file named GerritSiteHeader.html in gc_home /site/etc. Include a pointer to the image file or files in <gc_home>/site/static that you want to use for the header. Note that this file must be valid XHTML. It is not sufficient for it to be valid HTML.
-
The following example would not work if you left out the superfluous
</img>closing tags. This code below creates a site header from two image files displayed horizontally as a table row, with a link to the AccuRev web site from the splash image:Example:
<div id="gerrit_header"> <table border="0" cellpadding="0" cellspacing="0" id="masthead" width="100%"> <tbody> <tr>
<td valign="center"> <a href="http://www.accurev.com/"><img height="150" src="static/splash.jpg"></img></a> </td> <td width="100%"> </td> <td align="right" valign="bottom"> <img height="150" src="static/titletop.png"></img> </td> </tr> </tbody> </table> </div> - If you also want a site footer, repeat the previous step for a file named GerritSiteFooter.html.
- To enable the display of the header and footer, in the Web UI click Settings > Preferences > Show Site Header.
Generate an HTTP password
You can execute Git commands using SSH or HTTP. If you choose to use HTTP, you will need to provide a generated password.
To generate an HTTP password:
-
In the upper right corner of the GitCentric window, click My Account from the username list.
- On the My Account page, click HTTP Password.
- On the
HTTP Password page, click the
Generate Password button.
Tip: You can use the clipboard icon to copy the password.
The generated password appears in the Password field.
See HTTP Password menu item to learn about ways to manage and secure the password when executing Git commands using HTTP.


