
Share this page


Step 6: Validate IdP
Prerequisite: you already complete Step 5: Map IdP Users with ALM Users.
This step is to validate the IdP, verifying the IdP configuration is correct and the communication between ALM as SP and the IdP can succeed. The first IdP to validate before you enable SSO should be "alm".
Before performing this step, make sure the following:
- At least one ALM user with the Site Administrator role is already mapped to an IdP user or set as a local user. Otherwise, no user can configure ALM as Site Administrator.
-
Add the ALM and IdP URLs into the IE trusted URLs.
To validate an IdP, choose the validation method that applies to you.
| Validate IdP in SSO Configuration Tool |
You use this method for non-SaaS environments only. For SaaS environments, you can only Send validation URL to IdP users for validation. |
| Send validation URL to IdP users for validation | You can use this method for both SaaS and non-SaaS environments. |
| Enable SSO without validating IdP | If you enabled local authentication, you can enable SSO without validating the IdP "alm". |
Validate IdP in SSO Configuration Tool
- In the SSO Configuration Tool, click the IdP name, and click Validate in the bottom to start validation.
- Your IdP login page opens. Enter your IdP username and password.
-
The login page closes if you pass the validation. And a pass indicator is displayed in the front of the IdP name.
If you fail the validation, a failure indicator is displayed.
-
After you pass the validation, click Enable SSO.
Once SSO authentication is enabled, it cannot be disabled.
Send validation URL to IdP users for validation
In addition to validating an IdP in the SSO configuration Tool, you can also copy the validation URL and send it to IdP users to let them validate the IdP.
Note: In SaaS environment, you can only send the validation URL to IdP users for SSO validation.
- Click the IdP name, and click Copy Validation URL in the bottom.
- In the Copy Validation URL window, click the copy link icon (
 ).
). -
Send the link to IdP users for validation.
When the IdP users open the link, they will be redirected to the IdP login page. After entering the IdP username and password, they will be redirected to a page that tells whether or not the validation succeed, and if not, what the reasons are.
If email notification is enabled, the specified site admin users will receive emails about who accessed the SSO validation URL. For details, see Step 6: Validate IdP.
Enable SSO without validating IdP
If you enabled local authentication, you do not have to validate the IdP. You can directly enable SSO.
Before you directly enable SSO, we recommend you:
- set your IdP ID to "local" if you are not mapped to an IdP user yet, or
- set your IdP ID to a real IdP name if you are already mapped to an IdP user.
Otherwise, after you enable SSO, no one is able to access ALM if SSO fails to work and if none of the other site administrator users have set their IdP IDs to "local" or real IdP names.
FAQ
A: To troubleshoot this error, do the following:
-
In the {IdP name}.properties file, retrieve the osp.api.url parameter.
The file is located in the {ALM repository folder}\sa\DomsInfo\osp\ dirctory.
For example, for the default alm IdP, open the {ALM repository folder}\sa\DomsInfo\osp\alm.properties file to retrieve the osp.api.url parameter.
-
Run the following command to ping the osp.api.url on every ALM node:
ping {osp.api.url} -
Verify the ping output:
-
If the ping command fails to obtain the URL and returns an network issue, request assistance from the network team for further diagnosis.
-
If the network team fails to provide workable solutions, try the following workaround:
-
In the {IdP name}.properties file, change the osp.api.url parameter to the local address of the ALM server. For example, osp.api.url= http\://localhost\:{http port number}/osp/a/{IdP name}
To obtain the http port number, in the {ALM deployment folder}\server\conf\jetty.xml file, check the <Set name="port"<property name="jetty.port" default=....></set> line.
Note: Make sure the HTTP communication is enabled in the jetty.xml file and ALM is actively listening on this port.
-
Restart the ALM service on every ALM node.
-
-
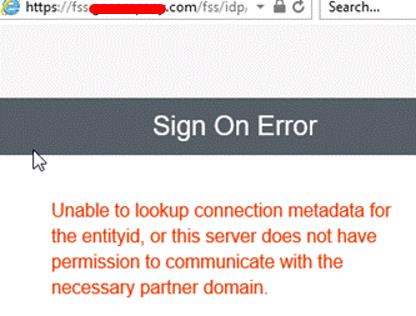
A: Root cause: Wrong SP metadata URL was registered in the IdP, so the IdP cannot recognize the SAML request sent from ALM.
Solution: Make sure the correct SP metadata can be loaded from ALM. And ALM should be registered as SP in the IdP correctly before you validate the IdP. After the SP metadata is registered in the IdP, when validating the IdP, you will be redirected to the IdP login page correctly.
A: Root cause: the SAML response assertions did not contain the required assertion of "IdentityKey".
Solution: If the IdP returned SAML response, it means the trust between the IdP and ALM has been established successfully. The only problem is that the IdP user cannot be validated by ALM. ALM users and IdP user are mapped using the IdentiyKey values. If the IdP does not provide the IdentityKey value the SAML response, ALM cannot map the IdP user to any ALM user, and thus validation fails.
To solve the issue, in IdP, map IdentityKey as the SAML attribute with an IdP attribute that can uniquely identify the IdP user.
A: In the web browser, type the ALM SP URL like this: {ALM host:port}/osp/a/alm/auth/app/. If it redirects you to the IdP login page, and if after authentication it redirects you back to the SP page without error, it means SP has received SAML response from the IdP: the trust between IdP and ALM is established successfully.
 Next steps:


