
Share this page


Each ALM project is divided into project entities, such as requirements, defects, tests, and analysis graphs. Entities contain data entered by users for a specific application management process. This section describes how to customize project entities to meet your unique needs.
Overview
Each entity contains system fields and user-defined fields.
| System Fields |
These are ALM default fields. You cannot add or delete system fields. You can only modify them. You can modify the behavior of these fields by restricting users to selecting values only from associated lists, by making certain fields mandatory, and by preserving a history of values entered in the field. |
| User-defined Fields |
These are fields that you can define and include in an ALM project to customize for your specific project needs. You can add, modify, and delete user-defined fields. For example, if you are running tests on several builds of an application, you can add a Detected in Build field to the Add Defect dialog box. You can then create a selection list containing the values Build1, Build2, and Build3, and associate the list with the Detected in Build field. |

Add user-defined fields
You can customize an ALM project by adding up to 99 user-defined fields to each ALM entity.
Cross Project Customization: The template project and linked projects can each contain up to 99 user-defined fields for each ALM entity.
To add a user-defined field:
-
In the Project Customization window, in the left pane, click Project Entities.
-
Under Project Entities, expand an entity.
Note: If you add a user-defined field in the Requirements entity, you must assign the entity to a specific requirement type. For details, see Customize requirement types.
-
Click the User Fields folder.
-
To add a user-defined field, you can:
-
To add a number, string, date, or list type field, click New Field.
-
To add a memo filed, click the arrow next to New Field and select New Memo Field. You can add up to 5 memo fields to each ALM entity.
Note: You can extend the number of memo fields you can add by editing the EXTENDED_MEMO_FIELDS parameter. For details, see Set configuration parameters.
-
-
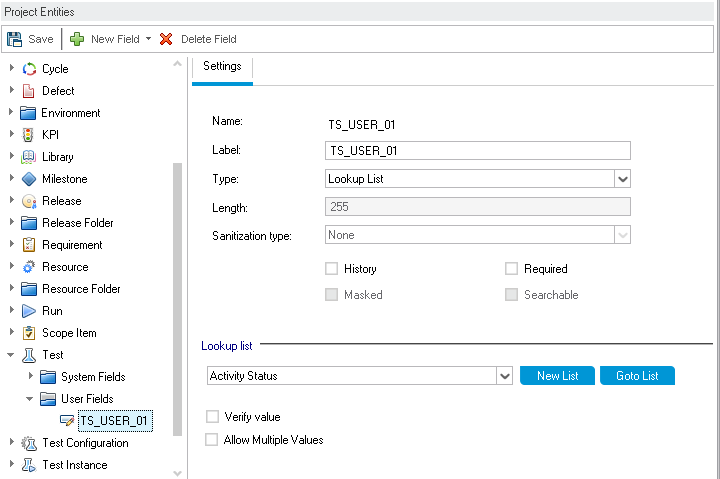
In the Settings tab, set properties for the new field.

Property
Description
Name
Indicates the field name used in the ALM database table. Read-only.
Label
Indicates the field name as it is displayed in ALM. You can enter a new name or use the default name.
The label cannot be blank or include the following characters:
( ) @ \ / : * ? " ` < > | + = ; , %
Type
Specifies the type of data that users can enter in the field. It includes the following types:
-
Number. Enables integer entry only.
-
String. Enables the entry of any character string.
-
Date. Enables the selection of a date.
-
Lookup List. Displays the Lookup List area and enables the selection from a drop-down list.
-
User List. Enables the selection of a username from your ALM users list.
-
Memo. Enables the entry of blocks of data.
Length
Indicates the field size. (Available only when the String type is selected.)
The maximum field length is 2000 characters.
Sanitization type Specifies the sanitization type of the field. (Available only when the String type is selected.)
It includes the following types:
-
None. Returns the value as it is stored in the database.
- HTML. The value is sanitized according to a predefined list for allowed HTML content.
-
Text. The value is HTML encoded.
History
Preserves a log of values entered in the selected field.
Required
Indicates that users must enter a value for the field.
If you set a field as required in a project that already contains data, users do not need to enter a value for the field when they modify an existing record if the field is already empty.
Masked
Indicates the input data mask for the field. (Available only when the String type is selected.) For details, see Define input masks.
Versioned Version Control: Indicates whether to save field values for each version of entities/fields under version control.
This checkbox is selected, by default, for most fields. You can turn off versioning for user-defined fields and some system fields.
In some cases, the checkbox is disabled, for example, if the field's parent entity is not version-controlled.
Turning off versioning for relevant fields enables workflow scripts and OTA scripts to run without requiring entities to be checked in.
For details about version control, see Version control.
Searchable
Indicates if this field is searchable. (Available only when the Text Search option is enabled for the database.)
For details about Text Search, see Configure Text Search.
Lookup List
Includes a list of predefined lists. (Available only when the Lookup List type is selected.)
To associate a field with a predefined list, select a list from the Lookup List box. To view or modify the selected list, click the Go to List button.
New List
Creates a new list. (Available only when the Lookup List type is selected.)
To associate a field with a new list, click the New List button.
For details on customizing a list, see Customize field lists.
Goto List
Displays a predefined list. (Available only when the Lookup List type is selected.)
To open a predefined list, select a list from the Lookup List box. Click the Goto List button.
Verify Value
Limits the user to select a value only from the items that are listed in the list box. (Available when Lookup List or User List is selected.)
For user-defined fields, this option allows the user to select more than one value in any field that is associated with a predefined lookup list.
For example, if you create a Language user field in the Defect entity and enable the Allow Multiple Values option, a user can select
English,French, andGermanlanguage values at the same time when entering this field's value.Note:
-
This option is available only when the Lookup List type is selected and the ALLOW_MULTIPLE_VALUES parameter does not exist or is set to Y.
-
This option is not available in the TEST STEP entity.
-
If you group a data grid or summary graph by a field containing multiple values, each set of values is used as a category for grouping. For example, a value with English and French is grouped once as English;French, and not as part of separate English and French categories.
For details on customizing a list, see Customize field lists.
-
-
Click Save to save your changes to the Project Entities page.
Modify system and user-defined fields
You can modify the properties of system and user-defined fields in your ALM project.
Before you modify
Consider the following before you modify entity fields.
| Certain fields cannot be modified | For example, you cannot modify the Type or Length properties for system fields. In addition, for system fields of the Lookup List type, you cannot modify which list is associated with the field, or allow multiple values to be selected. |
| Cross Project Customization |
If you are working with a project that is linked to a template project, you cannot modify system or user-defined fields that are defined by the template project, nor can you delete user-defined fields defined by the template project. Fields defined by a template project are displayed with a template icon
|
To modify a system or user-defined field:
-
In the Project Customization window, in the left pane, click Project Entities.
-
Under Project Entities, expand an entity.
-
Expand the System Fields folder or the User Fields folder.
-
Click the field that you want to customize. The settings for that field appear in the Settings tab.
-
Modify the properties for the selected field. For details, see the Settings tab.
-
Click Save to save your changes to the Project Entities page.
To delete a user-defined field:
-
In the Project Customization window, in the left pane, click Project Entities.
-
Under Project Entities, expand an entity.
-
Expand the User Fields folder.
-
Click the field that you want to delete and click Delete Field.
-
Click OK to confirm.
-
Click Save to save your changes to the Project Entities page.
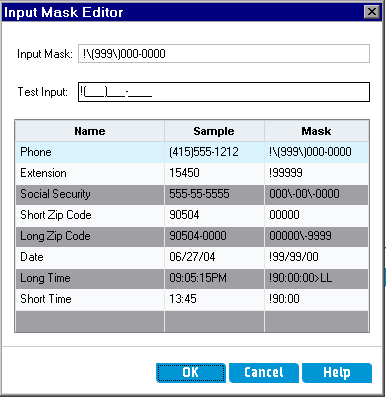
Define input masks
The input mask option is used to prompt users to enter data using a mask pattern. If a user attempts to enter a character that conflicts with the input mask, an error occurs. You can define input masks for string type fields only.
For example, to prompt the user to enter a phone number, you can define the following input mask:
!\(000\)000-0000
This input mask limits the user to numeric characters only. It is displayed in an edit box as follows:
(___) ___ - ____
To define an input mask for an entity field:
-
In the Settings tab of the entity field, select Masked.
-
Under Masked Edit Attributes, click Define.
-
In the Input Mask box, type an input mask or select a predefined mask.
You can use the following characters when defining input masks:
Mask Character
Description
!
A space for a leading or trailing blank.
#
A digit.
.
A decimal.
:
A time separator.
/
A date separator.
\
Treats the next character in the mask string as a literal. For example, you can include the (, ), #, &, A, and ? characters in the mask.
>
Converts all the characters that follow to uppercase.
<
Converts all the characters that follow to lowercase.
A
An alphanumeric character (entry required). For example: a – z, A – Z, or 0 – 9.
a
An alphanumeric character (entry optional). For example: a – z, A – Z, or 0 – 9.
C
A character (entry required). Valid values are ANSI characters in the following ranges: 32-126 and 128-255.
c
A character (entry optional). Valid values are ANSI characters in the following ranges: 32-126 and 128-255.
L
An alphabetic character or space (entry required). For example: a – z or A – Z.
l
An alphabetic character or space (entry optional). For example: a – z or A – Z.
0
A digit (entry required). For example: 0 – 9.
9
A digit (entry optional). For example: 0 – 9.
_
Inserts spaces. When the user types characters in the field box, the cursor skips the _ character.
-
In the Test Input box, test the input mask.
-
Click OK to close the Input Mask Editor dialog box.
-
Click Save to save your changes to the Project Entities page.
 See also:


