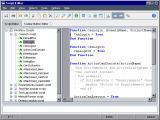
This section describes how to use the Script Editor to create a workflow script for any modules and to view or edit existing workflow scripts.
Considerations for cross project customization
If you are working in a template or linked project, the Scripts Tree displays two sections under Workflow Scripts:
-
Template Scripts (Shared). Workflow scripts listed in this section are the scripts applied from the template to the linked project. For details on applying template customization, For details, see Cross project customization.
If you are working with a linked project, this section is displayed only when there are template scripts defined in the template. The template scripts cannot be edited in the linked project. If you remove a project from a template, the template scripts remain in the project and are editable.
-
Project Scripts. Workflow scripts listed in this section apply only to the template or linked project in which you are working. Scripts in this section of a template are not applied to linked projects.
When running workflow scripts for a linked project, ALM combines template scripts and project scripts into one script. Duplicate variables or functions in the template scripts and projects scripts can cause conflicts.
Additional considerations when working in a template project:
-
Scripts generated by one of the script generators are created under Template Scripts (Shared).
-
ALM adds the prefix Template_ to events in template scripts. By default, ALM triggers template event procedures. The project event procedure is triggered if the template event procedure does not exist, or if you instruct the template event procedure to call the project event procedure.
Each template event includes a commented call to the parallel project event. For example, the Template_Bug_New event in the template script is displayed as follows:
Sub Template_Bug_New
    On Error Resume Next
    `call Bug_New
    On Error Go To 0
End Sub
To instruct the template script to call the project event, remove the comment marker to activate the call to the project event, as follows:
Sub Template_Bug_New
    On Error Resume Next
    call Bug_New
    On Error Go To 0
End Sub
Create workflow scripts with Script Editor
Use the Script Editor to enter VBScript code into the ALM event procedures, or to create user-defined procedures that can be called from ALM event procedures.
Before creating workflow scripts
ALM provides some sample scripts for your reference to write your own scripts. See Workflow Examples and Best Practices.
You can also use the scripts generated by the Script Generator as a basis for your scripts. See Generate workflow scripts using Script Generators.
For an index to knowledge base articles that provide examples of workflow scripts, see this KB article.
To create a workflow script using the Script Editor:
-
In the Workflow window, click the Script Editor link. The Script Editor opens.
-
In the Scripts Tree, select the node of the module for which you need to customize the workflow.
If you want to do the following, select the Common script node instead of a specific module:
-
Create user-defined procedures that can be used by multiple modules.
-
Declare a global variable that can be used across all modules.
-
-
Expand the node and select the event procedure to which you need to add code, depending on when you want your code to be triggered. The existing script for this event procedure is displayed in the Scripts pane.
For a description of ALM event procedures, see Workflow Event Reference.
-
Add your VBScript code to the script.
Note: A red indicator
 next to a module name in the Scripts Tree indicates that there are unsaved script changes in that module.
 -
Decide which ALM objects your script must access. Your script performs customizations based on information obtained from the relevant objects. You customize the workflow by using the methods and properties of the objects.
To use the code complete feature instead of typing in the names of ALM objects, properties, methods, and fields, place the insertion point at the location where you want to insert an object name and click the Code Complete
 button.
 For information about ALM objects, see Workflow Object and Property Reference.
-
To use the code template feature instead of typing in commonly used VBScript statements, place the insertion point where you want to insert the code and click the Code Template
 button. Choose one of the following items from the code template list:
Template
Code Added to Script
FVal: Fields value access
Fields.Field("").ValueList: QualityCenter list access
Lists.List()IfAct: Action "switch" If Block
If ActionName = "" ThenEnd IFAct: Actions access
Actions.Action("")Func: Function template
Function
   On Error Resume Next
On Error GoTo 0
End FunctionSub: Sub Template
Sub
   On Error Resume Next
On Error GoTo 0
End SubErr: Error Handler
On Error Resume Next -
To insert an item from a field list defined in the project, place the insertion point at the location where you want to add the item. Click the List Value
 button. In the Lists box of the Select Value From List dialog box, choose the name of the list. In the List Items box, select the list value.
 -
To insert an ALM field name, place the insertion point at the location where you want to add the field name. Click the Field Names
 button. Select a name from the list of system and user-defined fields in the ALM project.
 -
To validate the syntax of the script, click Syntax Check
 . Any messages are displayed in the Messages pane.
 -
Click the Save button
 to save the script.
 -
Close the Script Editor.
You can customize the behavior of the Script Editor.
To set the properties of the Script Editor:
-
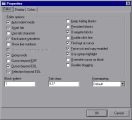
In the Script Editor, click the Properties button
 or choose Options > Editor Properties. The Properties dialog box opens.
 -
In the Editor tab, you can set the following options:
Option
Description
Auto indent mode
Places the cursor under the first non-blank character of the preceding non-blank line when you press Enter.
Smart tab
Tabs to the first non-blank character in the preceding non-blank line. If Use tab character is selected, this option is cleared.
Use tab character
Inserts a tab character. If cleared, inserts space characters. If Smart tab is selected, this option is cleared.
Backspace unindents
Aligns the insertion point to the previous indentation level when you press Backspace, if the cursor is on the first non-blank character of a line.
Show line numbers
Displays line numbers. If this option is selected, Show line numbers on gutter is enabled.
Show line numbers on gutter
Displays line numbers in the gutter instead of in the left margin. If Show line numbers is selected, this option is enabled.
Group undo
Reverses your last editing command and any subsequent editing commands of the same type, if you press Alt+Backspace or choose Edit > Undo.
Cursor beyond EOF
Enables you to place the insertion point after the last line of code.
Cursor beyond EOL
Enables you to position the cursor after the end of the line.
Selection beyond EOL
Enables you to select characters beyond the end of the line.
Keep trailing blanks
Keeps any blank spaces you have at the end of a line.
Persistent blocks
Keeps marked blocks selected, even when the cursor is moved using the arrow keys, until a new block is selected.
Overwrite blocks
Replaces a marked block of text with new text. If Persistent Blocks is also selected, text you enter is appended following the currently selected block.
Double click line
Highlights the line when you double-click any character in the line. If disabled, only the selected word is highlighted.
Find text at cursor
Places the text at the cursor into the Text To Find list box in the Find Text dialog box when you choose Search > Find.
Force cut and copy enabled
Enables the Cut and Copy commands, even when there is no text selected.
Use syntax highlight
Displays script elements according to colors and attributes defined in the Display tab and Colors tab.
Overwrite cursor as block
Controls the appearance of the caret when using the Overwrite mode.
Disable dragging
Disables dragging and dropping text.
Block indent
Specifies the number of spaces to indent a marked block.
Tab stops
Specifies the locations to which the cursor moves when you press Tab.
Keymapping
Sets the keyboard mappings in the Script Editor. Supports the following keyboard mappings: Default, Classic, Brief, Epsilon, and Visual Studio.
-
In the Display tab, you can set the following options:
Option
Description
Editor gutter
Enables you to set the visibility, width, color, and style of the gutter.
Editor margin
Enables you to set the visibility, width, color, style, and position of the right margin.
Use mono font
Displays only monospaced screen fonts, such as Courier, in the Editor font box.
Editor font
Lists the available text fonts.
Editor color
Lists the available background colors.
Size
Lists font sizes.
Use Read-Only Color
Enables you to select a color for displaying read-only text from the Read-Only Color box.
Draw Special Symbols
Sets special characters for displaying end-of-file, end-of-line, space, and tab characters.
-
In the Colors tab, you can set the following options:
Option
Description
Color SpeedSetting
Enables you to configure the Script Editor display using predefined color combinations.
Element
Specifies syntax highlighting for a particular code element.
Foreground color
Sets the foreground color for the selected code element.
Background color
Sets the background color for the selected code element.
Use defaults for
Displays the code element using default system colors for the foreground, background, or both.
Text attributes
Specifies format attributes for the code element.
Open
Loads a color scheme from your computer.
Save
Saves a color scheme to your computer.
 See also:


