Share this page


Filter and query data
This topic describes how to use filters or queries to limit the scope of the returned data.
Filtering overview
You can limit the scope of items retrieved from the data source for synchronization by defining filters or setting criteria for the data source.
You can apply filters on a server-side or client-side level.
Client-side filters
Client-side filtering limits the data based on criteria set within the user interface. With this type of filtering, all of the data source's data is transferred during the synchronization. In the Sync Criteria area, you apply conditions to the returned data. For details, see Filter and query data.
Server-side filters
Server-side filtering is the most efficient way to filter data. It limits the data from its source, reducing the amount of data that is transferred and the network traffic.
-
For an overview of server-side filtering, see Filter and query data.
-
For information about setting up server-side filters, see Server-side filters per product.

Client-side filtering using sync criteria
This section describes client-side filtering. You filter the data by setting synchronization criteria in the form of a query with logical operators, after all the data has been synchronized.
Client-side filtering is useful when working with large data sets, where you need to choose which subsets to synchronize. You can set criteria for both the master and target.
To apply sync criteria:
- Open a connection for editing. Click the connection's gear symbol, and choose Edit from the context menu.
- Navigate to the Projects and Rules section of the wizard using the Next button.
-
To add criteria to a new rule, click + Type Rule. To apply criteria to an existing rule, go to the type rule and click the Edit button
 to open the Edit dialog box.
 - Click the Sync Criteria tab for the target or master.
- If here are multiple projects, select a project for the target or master.
- Select the level upon which you want to add a criteria, and click the Add Child button
 . The interface adds a line with the default operator, And. To change it, double-click the operator in the left column and select And, Or , or Not from the dropdown.
 -
Click the Add Child Criteria
 button. The Add Term dialog box opens.

- Select an operator from the Operator list. For a list of operators, see Criteria operators.
-
In the Field Value column, select or enter the value that you want the field to have in order to be synchronized. Certain operators do not require a value, such as Is New or Is Modified, or Is Empty. Click OK.
-
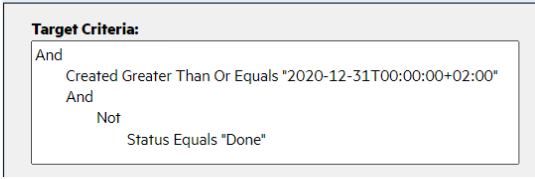
In the Connection Rules pane, view the criteria.
In the following example, all defects created after 12/31/2020, whose status is either In Progress or To Do, are included in the synchronization:
- Repeat the above steps for each type rule for which you want to apply conditions.
-
Use one of these buttons to further manage your query.
Option Description 
Opens the edit mode to update criteria. 
Deletes the selected criteria. -
Click the Filter tab for the Master or Target. Select the Use Named Filter option.
-
Expand the Selected Filter dropdown and choose one of the project's filters. The Filter Details section displays the conditions.
-
At the bottom right, select a field to show in the test results. Click Test Filter in the bottom right, to preview the data that the filter includes. The preview lists up to ten items, and indicates the total number of items in the filter.
Criteria operators
The following table lists the operators for building a query for the synchronization criteria:
| Operator | Description | |||||||||||||||||||||
|---|---|---|---|---|---|---|---|---|---|---|---|---|---|---|---|---|---|---|---|---|---|---|
| Equals | The property equals the value. | |||||||||||||||||||||
| Contained in Set |
The property is contained within a set. Contained in Set is an OR operation. For example:
|
|||||||||||||||||||||
| Contained in String |
The property contains a part of the value. For example, assume you have a field which can be 'SAM', 'BOB', or 'GREG'. If you specify Contained in String: 'SAMBOB', the result for 'SAM' is TRUE. The result for 'GREG' is false. If you leave this field empty, it returns TRUE. |
|||||||||||||||||||||
| Field Contains Value |
The field value contains the specified string value. For example:
|
|||||||||||||||||||||
| Starts With | The property name starts with the specified letter or number. | |||||||||||||||||||||
| Ends With | The property name ends with the specified letter or number. | |||||||||||||||||||||
| Includes |
The property includes the value. Includes is an AND operation, and is useful for determining if a field contains a particular value. It is often used when the field is a multiple value property, such as the Tags field. For example, assume you have a field which can be 'SAM', 'BOB', or 'GREG'. To determine if the Tags property contains 'GREG', use the Includes operator, specify the Tags property as the field, with the value 'GREG'. A value of true indicates that 'GREG' appears. |
|||||||||||||||||||||
| Greater Than | The property is larger in number than the value. | |||||||||||||||||||||
| Less Than | The property is smaller than the value. | |||||||||||||||||||||
| Greater Than Or Equals | The property is larger or equal to the value. | |||||||||||||||||||||
| Less Than Or Equals | The property is smaller than or equal to the value. | |||||||||||||||||||||
| Is Descendant Of |
Use for items contained in an hierarchical tree, such as stories and requirements. For example:
Notes:
|
|||||||||||||||||||||
| Instance Of | Use with Property or Type Name. For example:
WorkProduct->Instance Of Story.
|
|||||||||||||||||||||
| Is Empty | The property value is empty. | |||||||||||||||||||||
| Is New | The asset is being created for the first time. This operator is not available when setting up a Synchronization Criteria query. | |||||||||||||||||||||
| Is Modified | The asset has been modified. This operator is not available when setting up a Synchronization Criteria query. |
Sync criteria structure
The following section describes the correct structure for sync criteria and the order of operators.
When defining sync criteria values, the structure of the criteria is important. Logical operators apply directly to child conditions and child operators.
Consider the following use case where you want to synchronize the following:
-
All Requirements of type Functional with Reviewed set to “Reviewed”
-
All Requirements of type Folder
Correct structure
The correct structure for this use case is as follows:
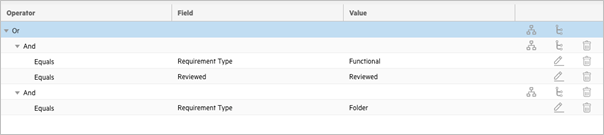
The sync criteria above evaluates as:
((RequirementType == Functional && Reviewed == Reviewed) || (requirementType == Folder))
There is a parent OR operator with two AND operators as its children.
-
The first AND operator ensures that both the Requirement Type and Reviewed criteria must be met for that operator to evaluate it as true.
-
The parent OR operator also ensures that Requirements of the type Folder meet the criteria, regardless of their Reviewed value.
Incorrect structure
The following is an incorrect approach for the above use case:

This example is structured incorrectly. This incorrect example evaluates as:
((RequirementType == Functional && (Reviewed == Reviewed || RequirementType == Folder))
The OR operator is a child of the AND operator, indicating that all three conditions must be met for the criteria to evaluate as true. Therefore, the criteria would always evaluate as false.
Server-side filtering overview
Server-side filtering is the most efficient way of limiting the data as it filters the incoming data. Server-side filters use a REST API to apply filters to the data at its source and filter the incoming data per connection.
There are two types of server-side filters: Named and Free Form.
-
Named filters are the native queries that you save within your product, such as Favorites in Jira. Integration with other products allows Micro Focus Connect to access the filters during synchronization. Since these filters/queries are accessed dynamically, changes made to them over time are detected. For details, see Named filters.
-
Free Form filters are custom filters that you write in the product's proprietary syntax. Free Form filters require expert knowledge of the product's filter syntax. For details, see Filter and query data.
Named filters
Named filters are native queries saved within the product, such as Favorites in Jira. When you add a named filter, you are adding a link to the entity that contains the REST API query within the product. These links are dynamic, so that if you modify the query on the server side, the changes are also reflected within Micro Focus Connect.
Named filters are currently supported for ALM/QC, ALM Octane, Jira, Azure DevOps, and ServiceNow.
To add a named filter:
-
In your tool, define a data filter. For example, in Jira, save the filter as a Favorite. For details about creating a filter in ServiceNow, see Create a ServiceNow filter.
- Open a connection for editing. Click the connection's gear symbol, and choose Edit from the menu.
- Navigate to the Projects and Rules section of the wizard using the Next button.
-
To add criteria to a new rule, click + Type Rule. To apply criteria to an existing rule, go to the type rule and click the Edit button
to open the Edit dialog box. - If here are multiple projects, select a project for the target or master.
- Click the Filter tab for the target or master.
- Make sure that the default Use Named Filter option is selected.
-
Expand the Selected Filter dropdown and choose one of the project's filters. The Filter Details section displays the conditions.
-
At the bottom right, select a field to show in the test results. Click Test Filter in the bottom right, to preview the data that the filter includes. The preview lists up to ten items, and indicates the total number of items retrieved by the filter.
Free form filters
In addition to selecting a named filter, you can manually enter filter conditions in free form text. This is useful if your tool does not support named filters. For certain tools, you may be able to copy the named filter conditions, paste them into the free form filter details area, and modify them as required.
To add a free form filter in the classic user interface:
- Open a connection for editing. Click the connection's gear symbol, and choose Edit from the menu.
- Navigate to the Projects and Rules section of the wizard using the Next button.
-
To add criteria to a new rule, click + Type Rule. To apply criteria to an existing rule, go to the type rule and click the Edit button
to open the Edit dialog box. - If here are multiple projects, select a project for the target or master.
- Click the Filter tab for the target or master.
- Select the Use Free Form Filter option.
-
Enter a query in the Filter Details area.
-
At the bottom right, select a field to show in the test results. Click Test Filter in the bottom right to preview the data that the filter includes. The preview lists up to ten items, and indicates the total number of items retrieved by the filter.
 Next steps: