SBM Connector setup
This topic describes the general guidelines for setting up a connector when working with SBM (Solutions Business Manager).
Prerequisites
Before working with the SBM connector, make sure to download and install the connectors:
- The SBM connector package from the AppDelivery Marketplace.
- For SBM 11.7.1 and earlier, download and install SBM Connector ERH, from the Knowledgebase solutions. Detailed instructions are included within the package.
For details about SBM, see SBM Overview.
Set up an SBM connector data source
In the main data source's Properties page, fill in the general data source information.

Tip: We recommend that you work on a step-by-step basis when configuring the SBM connector. If you configure too many things at once, when encountering an issue, it is more difficult to determine its cause.
To set up the SBM connector data source:
- In the data source's Properties page, fill in the mandatory fields, marked in red: URL, User Name (loginid) and Password. The SBM URL is the shortened URL. HTTPS is also supported.
- The SBM connector has no pre-configured data source types. In the Data Source Types field, enter a colon-separated list of labels/names of the data source types available for this data source. The individual data source types contain the actual values.
- Ignore the following fields: SBM Table, SBM Submit Transition, and SBM Update Transition. These properties were moved to the individual data source type configuration.
- Leave the Alternate URL for SBM Token field blank unless you have configured your system to receive the SBM SSO token from a different server.
Data source types
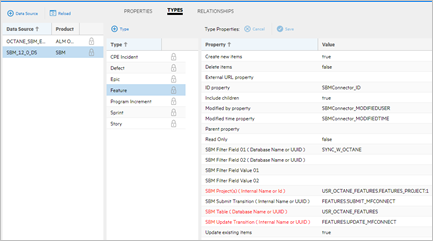
The Types page shows the types that you listed in the main Data Source Types field. The type's fields are not pre-configured. Admins should fill in all of the required fields.

To define the individual data source types:
-
In the Types page, select the type you want to configure.
-
Enter the SBM Table name, as defined within the SBM Composer. Use the following syntax: <prefix>_<database table name>, for example USR_OCTANE_FEATURES.
-
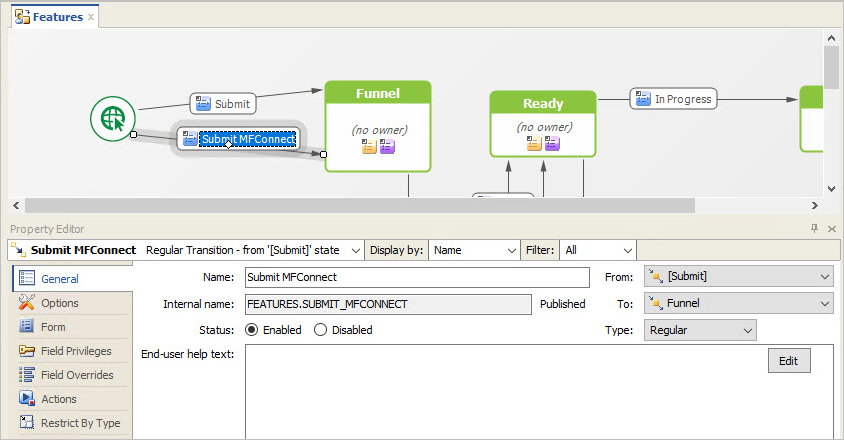
Enter the value of the internal transition name as defined in the SBM Composer, into the SBM Submit/Update Transitions fields. Use the same value for the update and submit transition. This allows the designer to take advantage of all the possible transition level overrides and actions specific to the SBM Connector configuration. This only applies to transitions associated within the SBM Table/SBM Workflow definition.

-
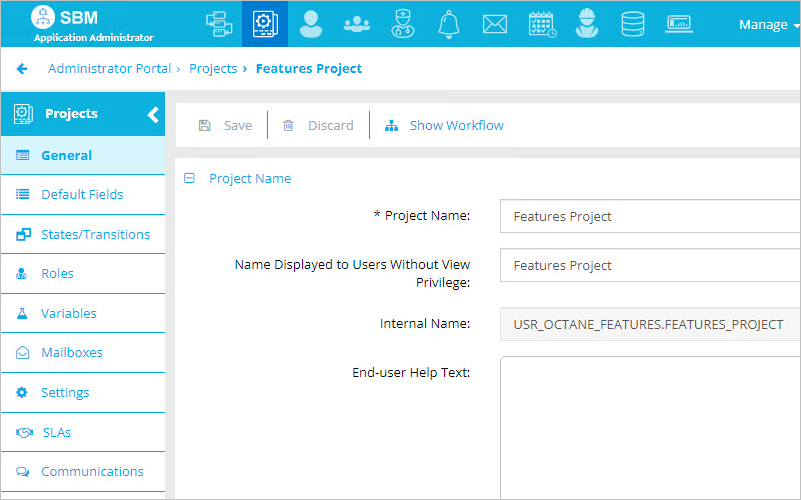
Enter the SBM Project(s) name, as defined within the Application Administrator as the project's Internal Name. Separate multiple project names with a semicolon. Add the suffix :1 to include all defined sub-projects. This only applies to projects associated within the SBM Table/SBM Workflow definition.
When configured against an auxiliary table, make sure to enter a value, such as the SBM Table identifier. Although this field is usually ignored, a value must be present.

-
Enter filter terms.
- For simple filtering, use the SBM Filter fields SBM. These filters are simplistic and allow you to apply a filter based on the SBM Binary/Trinary or SBM Single Selection field types.
- For advanced filtering, use connection rules. For details, see Add projects and rules to a connection.
-
We recommend not modifying the following field values: ID property, Modified by property, Modified time property, These fields use the default values: SBMConnector_ID, SBMConnector_MODIFIEDUSER, and SBMConnector_MODIFIEDTIME, defined within the SBM connector. These fields can be mapped through a user map. For details, see Automatic user mapping.
Data source relationships
Since each data source type requires its own configuration, you must also manually define all relationships. Defining these relationships only applies:
- To the SBM Relational and multi-relational field types.
- When the related item is also defined within the data source and synced within the connection definition.
The exposed property name is the SBM Relational/Multi-Relational field’s internal field name. These field types can still be mapped without a relationship configuration, but there must be an exact match of the System Title field in order to be resolved.
SBM connector connection
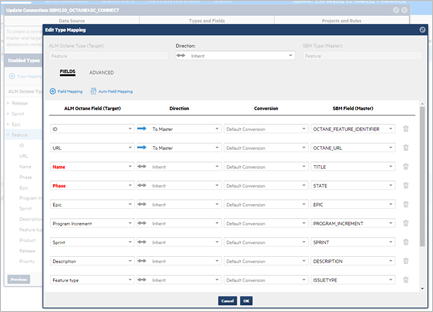
To join your data sources together, use a Connect connection to define the configuration such as field mappings. The samples below show an SBM / ALM Octane configuration.
Connection types and fields
The example below shows how two data sources are mapped at the field level. All SBM fields are represented by the SBM Field Internal Name, together with some customer read-only internal values, represented as SBMConnector_.

Foreign Identifier field
We recommend creating a read-only SBM fixed text field of at least 80 characters to hold the foreign Identifier value. The Submit / Update transition, can override the read-only attribute. You can also create a read-only URL field and map it to the foreign URL, which will also overrides the read-only attribute at these transition points.

The selection type values that are marked in red need to be mapped manually.

Note: Connection Projects and Rules are not SBM projects. They may be high level workspaces. Since SBM does not utilize high-level workspaces, the connection uses the data source name.
SBM connector logging
When you run a connection, SBM-specific information is logged. The logs are stored at the following location:
<SBM_installdir>\SBM\Application Engine\Log\SBMConnector.log.


