Share this page


Create type mapping
This topic describes type mapping and how to define mappings between a connection's data sources.
About types
A type is a system asset such as an epic, issue, requirement, task, or user story. When creating a connection, you must add at least one type to synchronize between your master and target data sources. For example, you may want to map a Broadcom Rally Central hierarchical requirement to a story.
The types that are available to add to a connection are limited to the types that you added to your data source. If the type that you want is not listed, return to the Data Sources tab and add the type to the data source. For details, see Create a data source.
Note: If you save the connection before adding any types, you can then edit it and select which types you want. If you do not save the connection before pressing Next (to navigate to the Types and Fields page), Micro Focus Connect automatically maps a preselected list of types and fields.
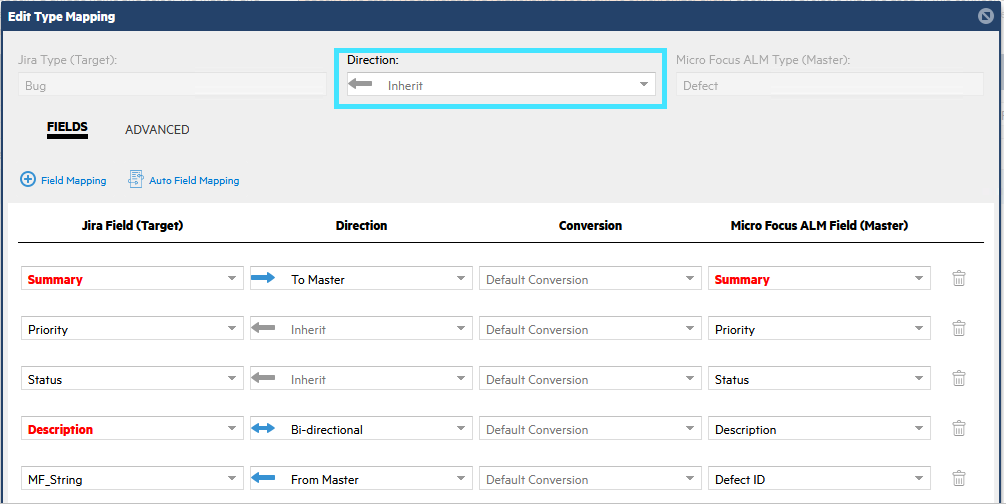
Default direction
In the connection wizard, you specify a default direction for synchronization. This setting is inherited by all child levels (type, field) unless explicitly overridden. When a child level inherits this setting from its parent, the Direction shown is Inherit with gray text or a gray arrow.
The direction specified at the type-mapping level is used when creating a new field mapping. The direction specified for field mappings is used when you update a mapping.
The following example demonstrates a combination of direction settings, both inherited and explicit:

Define type mapping in a connection
You define type mapping in the Connection Wizard, as a step in creating a connection, or later when editing a connection.
To define type mapping in a connection:
- In the connection wizard, click Next to open the Types and Field tab.
-
In the Default Sync Direction list, select a direction for data synchronization. Synchronization between all types and fields will be performed in this direction. You can override this setting for specific types. Possible values for synchronization direction are:
From Master Data is only synchronized from the master to the target. To Master Data is only synchronized to master from the target.Bi-Directional Data is synchronized both to and from the master and target. (This is the default.) Note: When mapping to or from a read-only field, select the direction prior to selecting the non read-only field name on the other endpoint.
-
You can allow Micro Focus Connect to automatically map the data sources' types and fields. Click Auto Type Mapping. Micro Focus Connect attempts to auto-replace and map all types exposed by the selected data sources, and their fields. If you choose Type one, Micro Focus Connect resets the types that you see in the mapping to the types that are available in the auto-map.
Caution: Mapping that you may have already manually input can be overwritten.
To set the type and field mapping manually, click + Type Mapping. The Add Type Mapping window opens. For more details, see Map types manually.
Map types manually
If Micro Focus Connect cannot map the connection's types automatically, you can map them manually.
To add a manual type mapping:
- In the Types and Fields tab of the connection wizard, click + Type Mapping. The Add Type Mapping dialog box opens.
- The Target Type and Master Type fields list all the types that you exposed in the target and master data sources. Select the types to map from the target and master data sources.
- In the Direction field, select a direction for data synchronization. Select the "Inherit" option to use the default direction that was set in the main Types and Fields tab. For details, see Define type mapping in a connection.
-
After selecting the types to map, you can now map the types' fields. Click Fields.
- You can allow Micro Focus Connect to automatically map the types' fields. Click Auto Type Mapping. Micro Focus Connect attempts to map all fields between both types.
- To define a manual field mapping, click Add Field Mapping.
-
Select fields in the target and master data sources to map with each other.
For details on the field types that can be mapped, see Define type mapping in a connection.
For details on mapping relationship fields, see Relationship mapping.
- Select the synchronization direction in the Direction list for each field. By default, the direction is inherited from the type mapping.
-
In the Conversion field, in most circumstances leave the default "No Conversion" value.
Apply one of the following values only after careful consideration:
Master is HTML If the master side of a field mapping contains HTML-formatted content and you want, or are allowed only, plain-text content in the target. This setting converts the HTML content in master to plain-text content in target. Target is HTML If the target side of a field mapping contains HTML-formatted content and you want, or are allowed only, plain-text content in the master. This setting converts the HTML content in target to plain-text content in master. Apply user map If neither side of the mapping is a user property, you can apply the user map by selecting this option. No Conversion The field data is not altered when synchronizing. - If the fields you are synchronizing use different values, create a value map. For more details, see Create value maps.
- Click the OK button to save your mappings and close the Add Type Mapping dialog box.
Relationship mapping
In addition to mapping attribute fields between types, you can also map relationship fields.
A relationship field defines the link between two types in a data source. For example, in ALM Octane, a story is linked to a feature via the story's Feature field.
Micro Focus Connect provides the ability to synchronize those relationships between data sources. For example you can map and synchronize the ALM Octane story-to-feature relationship with a similar story-to-epic relationship in Jira.
Considerations for relationship mapping
- The relationships in either data source may not be the same type. For example, ALM Octane's story-feature relationship is a parent–child relationship. Whereas most relationships in Jira are many–many relationships.
-
Where there can be an ambiguity between relationship and attribute fields, Micro Focus Connect represents the relationship as a field with the prefix “link”.
For example, in the list of Jira story fields, there is a fixVersions field. This is a regular attribute field that is populated in Jira by a plain string. Micro Focus Connect adds a link.fixVersions field that represents the story's relationship to a virtual fixVersion entity. This allows you to treat Jira's fixVersions like an ALM Octane release.
Mapping children links
Micro Focus Connect supports mapping links (relationships) between items from one endpoint type to another provided that the item types are mapped. For example, to synchronize ALM/QC defect Release and Release Cycle links with Jira Release and Sprint links, you must map the Release to Release and the Release Cycle to Sprint types in that connection.
In most cases , the default behavior of this mapping updates or creates the desired fields. Make sure to consider the architectural differences of the endpoint types. For example, unlike ALM/QC, Jira sprints are not linked to Jira releases. In addition, unlike ALM/QC, in Jira, start and end dates are not mandatory fields.
If you do not want to synchronize the parent types, such as sprint, release, release cycles, and iterations, but you want to synchronize the links for child types, such as defects, bugs, or requirements, use one of the following methods:
Map by name
Map by name incorporates Micro Focus Connect's custom utilities. Micro Focus Connect provide utilities to map ALM/QC to Jira, ALM to Azure DevOps, ALM Octane to Jira, ALM Octane to Azure DevOps, and ALM/QC to ALM/QC by name.
For this method, you must create the fields, such as sprints, releases, release cycles on the endpoint systems, in the relevant projects. You must also make sure that the field names are identical as they are case-sensitive.
These utilities run directly on the endpoint systems and perform the following steps:
-
Query the Micro Focus Connect database and find the supported types in all projects in all of the running connections.
-
Match the entities of these types by name.
-
Retrieve the IDs and write them into the Micro Focus Connect database as cross references.
These utilities can be integrated into a nightly purge script, so that they run when the Micro Focus Connect service is down. This serves as a scheduled catch-up for changes made to the matching artifacts. For information about the utilities, contact support.
Manually map
Manual mapping is an alternative method that the Micro Focus Connect configuration engineer can deploy. With this strategy, names are not used.
The Micro Focus Connect administrator should:
-
Determine the matching values, for example the Jira Release that corresponds to the ALM/QC Release, and that the Jira sprint that matches the ALM/Octane release cycle.
-
Import or insert the cross references as <adds> pairs directly into the Micro Focus Connect database. For details, see Manage cross references.
Additional guidelines
To ensure the success of the above methods, Micro Focus Connect must be prevented from synchronizing while mapping the types. For example, your admin should only map the ALM/QC Release type to the Jira Release type and the Release Cycle type to the Jira Sprint type, but explicitly exclude all of these types' properties.
This approach, mapping types without properties, allows Micro Focus Connect to load the cross references into memory from its database without creating or updating the artifacts on either side. This approach also allows control at the connection level.
An alternative approach is to set the type to ReadOnly at the data source level. This approach however, affects all connections associated with the data source.
Note: When mapping links using calculated values, you must use the FindFirst function. For details, see Functions.
For example, you cannot set a calculated value using this syntax:
set Release = 123456
Instead, use the following syntax:
set Release = FindFirst(Release) where ID equals 123456
Create value maps
If you have mapped two select-list fields, you need to make sure that the fields' values are also mapped.
A value map defines how a field value in Product A maps to a field value in Product B.
To define value maps:
- In the connection wizard's Types and Fields tab, expand a type mapping. The types' fields are listed.
- Click the Edit value map button
 . The Value Maps dialog box opens.
 - Click Auto Value Mapping to allow Micro Focus Connect to map the field values automatically, or + Value Map to map the values manually.
- On each row, select a value in the master's field to map to the corresponding value in the target's field.
It is possible that the field in Product A has more values than the equivalent field in Product B. In this case, you need to map more than one value in Product A to the same value in Product B.
Example:
| Product A | Product B |
|---|---|
| New | Open |
| In Progress | Open |
| Done | Closed |
The last value in Product A that is mapped to the same value in Product B appears in bold (see above). This indicates that, when changes are synchronized from Product B to Product A, the "Open" in Product B will translate to "In Progress" in Product A, and not to "New".
Supported field type mappings
The following table lists the supported field type mappings:
| Field type | Maps to types |
|---|---|
| datetime | datetime, richtext, string, date |
| boolean | boolean, richtext, string, enum |
| item | item, string |
| long | long, richtext, float, int, double, string, long |
| richtext | richtext, datetime, float, boolean, int, double, enum, date, string, user, long |
| float | float, richtext, int, double, string, long |
| int | int, richtext, float, double, string, long |
| double | double, richtext, float, int, double, string, long |
| attachment | attachment |
| comment | comment |
| enum | enum, richtext, enum, string, boolean |
| date | date, richtext, datetime, date, string |
| string | string, richtext, datetime, float, boolean, int, double, enum, date, string, user, long |
| user | user, string, richtext |
string - date/time conversion
A string containing a datetime value should follow the syntax below:
"yyyy-MM-dd" + optional("'T'HH:mm:ss" + optional(".nnnnnnnnn")) + optional("+2:00" + optional('[Region/Zone]'))
Using this format, the string is converted to an ISO date/time format.
Mapping multiple types to a single type
When mapping two or more types from one endpoint to a single type endpoint, the receiving endpoint must be able to distinguish between the types in the syncsets.
For example, consider a case where a Jira Story and a custom type called "Jira Support" are both mapped to an ALM Octane story type. The Jira Support type is mapped uni-directionally to the ALM Octane story, while the Jira Story is mapped bi-directionally to the ALM Octane story.
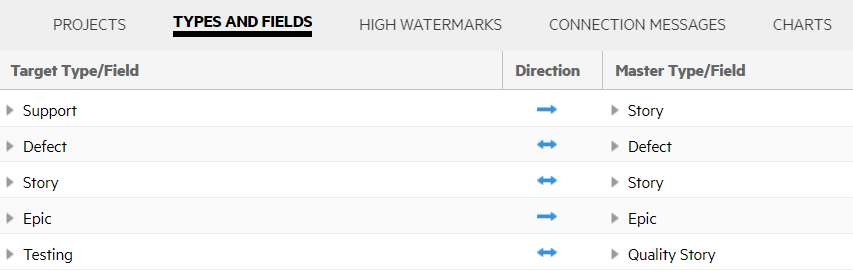
In this case, the receiving endpoint, ALM Octane, must be able to distinguish between stories syncing from the Jira Support type and stories syncing to/from the Jira Story type.
To enable the receiving endpoint to make this distinction:
- Add a custom field to the target endpoint type, the ALM Octane story. The field can be a Boolean type, for up to two cases, or a string/list for three or more type cases.
-
When mapping to the ALM Octane story, make sure that the Master Calculated Value is set to the correct value:
- False: for the Jira Support type
- True: for the Jira Story type
-
When reading the ALM Octane stories, set the Master Sync Criteria to accept only stories with the value set in the following way:
- False: for the Jira Support – Jira Story syncset
- True: for the Jira Story – Jira Story syncset
These steps ensure that only relevant ALM Octane stories are considered when processing each syncset, and the ALM Octane stories do not overlap across the two syncsets: the Jira Story–ALM Octane syncset and the Jira Support–ALM Octane story syncset.
Additional type mapping guidelines
This section lists several guidelines that apply when mapping types.
- You can maintain relationships between types. Micro Focus Connect surfaces the relationships as fields in the mapping for a type in a connection. First you choose the relationship field in one product, and then choose the relationship in the other product.
- Micro Focus Connect does not reflect changes in types. Therefore it does not convert a story to a defect or vice versa. Most products do not support changes in types. Micro Focus Connect creates a parallel item in the new type, provided that the new type is configured in the connection.
- You can map any type, such as a story or defect in one product, to any type in another product.
- For any given type mapped for a connection, the required fields for that type are displayed in red. An error message indicates that the synchronization may fail if an artifact is being created on the type without the required field. You can ignore this warning if the synchronization direction is uni-directional, with data flowing out from the type whose fields are displayed in red. In this case, none of the required fields of the type should appear in the mapping, and the warning message can safely be ignored.
-
When mapping workflow statuses from one end point system to another, ensure that each system is able to transition from one status to all others. This is required for all projects being synchronized, but only for the Micro Focus Connect data source user account. The Micro Focus Connect data source user account must be able to execute any state transition that satisfies the corresponding state transition on the other endpoint. All endpoint users will continue to see only the relevant workflow state transitions. For example, consider a state transition of a defect in ALM Octane. The user moves the defect from New to Rejected, which is a permitted transition in ALM Octane. However, when Micro Focus Connect tries to synchronize the modified ALM Octane Defect to a Jira Bug, it fails since the transition from New to Rejected is not permitted in Jira. The Jira server will throw an exception stating that the transition is not supported and as a result the synchronization will fail. Micro Focus Connect only serves as an intermediary service, taking state transition data from one endpoint and applying it to another.
Mapping custom type fields
In Micro Focus Connect's current implementation, you cannot map a custom reference field to a custom list field from one endpoint to another. If you try to do so, you may receive an error message indicting: Target field is of type item and cannot be mapped to Master field of type enumeration.
If, for example, in Jira you defined a custom Release type reference field, Detected in Release, and in ALM/QC you also defined a Release type custom field, Detected in Release, but as a list field, Micro Focus Connect will not be able to map them.
Although they are both Release type fields in their respective systems, the fields are both custom fields with different meta data types.
As a workaround, use a VB script to set the field in the other endpoint.
Follow these steps (based on the example above, with Jira and ALM/QC endpoints):
-
Map the Jira Detected in Release to a custom string field in ALM/QC. The custom string field should get the name of the Release.
-
Write a custom ALM/QC VB Script plugin that is triggered when the custom field is assigned a value.
-
Use the custom field's value to set or choose the corresponding entry in the custom list.
For assistance with creating VB Script plugins for ALM/QC, contact ALM/QC support.
 Next steps: