Share this page


Prepare Jira for synchronization
This topic lists the recommended steps to perform before you use Jira as a data source for a synchronization.
Create a dedicated Jira board
For each project being synchronized, create a dedicated scrum board to use for synchronizing your data. Do not reuse an existing board by changing its filter.
This board should only be accessible to the Micro Focus Connect Jira data source user account. Ensure that no other Jira users can use, see, or modify this board.
Note: Boards which span multiple projects are not supported and may cause unpredictable behavior. An example of a board that spans multiple projects is (ProjectKey=ABC AND Component = 123) OR (ProjectKey = DEF AND Component = 456).
Use the following guidelines:
-
Give the board a distinct name. Do not use special characters or spaces. To avoid potential issues, use all uppercase characters.
Suggested format:
MFCONNECT<projectname><projectkey>Example:
MFCONNECTGLOBGL, where GLOB is the project name, and GL is the key. - Make sure to never change the board's filter.
- Use the dedicated board both as the sample project in the data source, and in the connection itself.
-
Make sure that all statuses are mapped to the board.
-
The Data Source User Account specified in the Micro Focus Connect Jira data source must have the locale/profile set to EN-US.
For Micro Focus Connect to discover the board, click the Actions button  in the top banner and choose Flush Server Cache. For details, see Flush data and reload configurations.

Define "Create" screens and "Edit" screens
Micro Focus Connect recognizes fields defined within Jira “Create” and "Edit" screens. As a result, these fields are added to the list of available fields in the user interface.
Note: For “Edit” screen fields to be recognized by Micro Focus Connect, there must be at least one ‘editable’ issue of the mapped Jira issue type present in the sample project and mapped projects.
For a Jira issue to be created by Micro Focus Connect, the relevant fields must be present on the “Create” screen.
For a Jira field to be modified by Micro Focus Connect, it must be present on the “Edit” screen.
Do the following in Jira:
- Define Create screens or Edit screens for the relevant data types.
- Include in the Create or Edit screens all the fields that you want to include in synchronization.
- Assign the Create or Edit screens to the dedicated Micro Focus Connect user.
Jira Item Workflows and Micro Focus Connect
Micro Focus Connect requires the ability to move artifacts from any status value to any status value. Certain products, such as Azure DevOps, have a bypass workflow access privilege which can be granted to the data source user. This access privilege permits an Any-to-Any status change for that user, while still ensuring that all other users honor the workflow.
Jira currently does not have a bypass workflow permission. All users, including users running via REST tools such as Micro Focus Connect, must honor the Jira workflow for the items they are editing. This may cause issues with item updates.
For example:
Consider the following status phases for defects: New, Open, In QA, Signed Off, and Closed.
In the following scenario, Micro Focus Connect would synchronize successfully with Jira using these steps:
• Developer creates a new defect: Status=New
• Micro Focus Connect runs a sync iteration
• Developer updates defect to open: Status=Open
• Micro Focus Connect runs a sync iteration
In the following scenario, however, synchronizations may fail, since an item can move between multiple workflow steps between iterations.
• Developer creates a new defect: Status=New
• Micro Focus Connect runs a sync iteration
• Developer updates defect to open: Status=Open
• After some minor code changes, Developer updates defect to In QA. Status=In QA
• Micro Focus Connect runs a sync iteration – fails to move status for bug from New to In QA
The only solution at present is to add additional transitions to the Jira workflow, from every status to every status. These transitions can be restricted by access rights to ensure that they can only be used by the service account specified in the Micro Focus Connect Jira data source: For details, see Prevent specific users from executing workflow transitions in Jira server.
Exposed fields for Jira synchronization
In a Jira project, fields and screens can be customized by modifying schemes.
The following project screens and schemes control how the fields are exposed to the Jira REST APIs that Micro Focus Connect uses to synchronize data:
-
Create Screen and associated screen
-
Edit Screen and associated screen
-
Associated Field scheme
Micro Focus Connect uses a sample project in the data source that determines the exposed fields that can be synchronized from JIRA to any other endpoint. These fields must be on either the Create or Edit screens in order for Micro Focus Connect to update Jira artifacts from another endpoint, for bi-directional synchronization.
A connection can also be created to synchronize from multiple Jira Projects. In this case, the exposed fields determined by the data source's sample project must be available in all other projects. This means that for all mapped projects, the fields that are part of the Create screen and Edit screen, and exposed by the Associated Field scheme, must be the same as in the sample project.
The following section describes how to gather information on your Jira projects to show what fields are exposed to Micro Focus Connect and how to use this data to create a successful synchronization.
Note: If the same schemes are used for all projects in Jira or the set of projects being synchronized, these steps are only required for the sample project. Otherwise this will be required for all projects that are being synchronized by Micro Focus Connect.
To determine the exposed fields:
-
Log into Jira using the Micro Focus Connect Data Source user.
-
Select Administration > Projects
-
Select your Jira project.
-
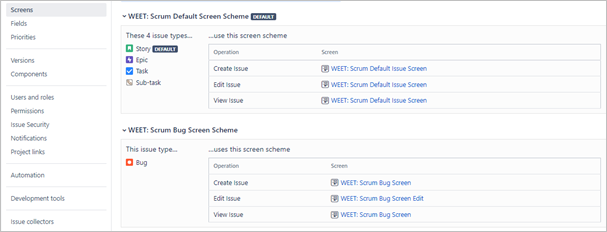
For each Jira issue type that you are synchronizing, determine the fields that are exposed by clicking on the Associated Scheme for the Create and Edit screens. The scheme for Create and Edit can be different, depending on your Jira configuration. The following example shows differences between Create and Edit screens for different schemes:
-
Make a list of all fields in your Create and Edit screens. These are the fields that are available for a successful synchronization. You use this list to create your Field mapping in your Connection.
The image below shows the differences between the Create and Edit screens for the Bug issue type. Micro Focus Connect only exposes the fields shown on the Create screen. The "Epic Status", "Parent Link", and "Due Date" fields will also be exposed by Micro Focus Connect.

Note that the Epic Link field is only shown on the Create screen, and not in the Edit screen. As a result, this field cannot be updated by Micro Focus Connect from another endpoint.
-
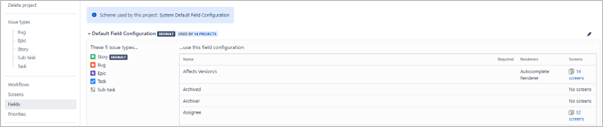
Using the Create Screen field list that you created above, check that all fields are available in the project's Associated Field scheme and Associated Screens. The top heading indicates the field scheme used by the project. The right column shows the screen for which the field is exposed.
Best practices
This section lists some best practices and tips for your Jira synchronizations.
• To ensure an accurate synchronization for the item statuses, make sure to ignore normal workflow transition rules. Check that the role assigned to the Micro Focus Connect user is not limited by workflow transition rules.
• Field contexts can determine for which projects and types your custom fields will be displayed. Check the context for any fields that you intend to use with a synchronization. For details about editing a custom field's context, see the Atlassian documentation.
 Next steps: