
Share this page


Manage agent relays
This topic provides an overview of agent relays and describes how to detect and modify them in the Deployment Automation user interface.
About agent relays
Agent relays manage communication between servers and agents.
You typically use an agent relay when agents are dispersed across geographic locations or must communicate through firewalls. Agent relays can also be used to manage network traffic in implementations with many agents.
The following diagram demonstrates simple agent relay communication.
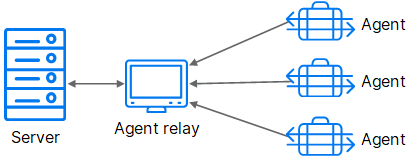
For more details, see Agent relay communication.

Agent relays page overview
To manage agent relays, navigate to Management > Resources and select the Relays tab.
On the Agent Relays page, you can:
-
Remotely restart or remove agent relays.
If many agents are connected to a single agent relay, the restart/shutdown period may be too short, and the agent relay may shut down.
The default agent relay restart/shutdown timeout is 5000 milliseconds.
Tip: To change the default timeout setting, open this file <relay_installation>\conf\worker-args.conf and modify the value of the timeout. Restart the agent relay to apply the change.
- Edit the relay's name and description, and specify whether the HTTP communication is server- or agent-initiated.
- Detect agent relays that were upgraded from agent relays or network relays in previous versions of Deployment Automation.
Detect agent relays
If you upgrade a server configuration where the agent relays communicate with the server through network relays, the server cannot automatically detect the agent relay, and you need to instruct the server where to find it.
For details about upgrading, see Upgrade agent relays.
After you upgrade an agent relay configured for server-initiated connections:
- If the agent relay is displayed with an automatically generated name that includes an ID string, and you do not see the status information, use the Detect Agent Relay option to connect the relay.
-
If the agent relay name is displayed correctly, and you can see the status information, you do not need to detect the relay.
Note: If you take the server offline and upgrade all agent relays before bringing the server back online, you may not need to detect agent relays. Use this option only if necessary.
To detect an agent relay:
-
Navigate to Management > Resources > Relays.
-
If the agent relay is displayed with an automatically generated name, and the Status field is empty, click Detect Agent Relay.
-
In the Detect Agent Relay dialog box, provide the following details:
Field Description Host Remote host name or IP address that the server uses to connect to the relay. JMS Port Remote port used to communicate over JMS protocol. Timeout How long (in seconds) the search continues before timing out. -
Click Save.
In the Relays list, the agent relay is now displayed with its given name.
Note: If in step 3 you provided the agent relay's host name, the system replaces it with the IP address after detecting the relay.
To ensure that the agent relay remains connected when its IP address changes, edit the relay's details and replace the IP with the host name.
- (Optional) If the agent relay is displayed as Offline, activate it by clicking the Activate icon next to it.
You can now view the correct name, status, and other important information for the detected agent relay.
Modify agent relays
After you install an agent relay and detect it if necessary, you can configure it for your implementation.
The full set of options are set for agent relays at the time of installation. If the agent relay is online, you can modify some of the settings remotely from the user interface.
To change the agent relay settings that cannot be configured through the user interface, edit the agentrelay.properties file located in the <relay_installation>\conf directory. For details, see Agent relay installation options.
To edit an agent relay:
-
Ensure that the agent relay is online.
-
Navigate to Management > Resources > Relays.
-
Select the agent relay.
-
View and change the agent relay information:
Option Description Name Name of the agent relay. You can edit it only if the agent relay is online. Host Remote host name or IP address the server uses to connect to the agent relay. You can edit it only for the agent relays that are online and have the Server Initiated option selected. JMS Port View only. Remote port used to communicate over JMS protocol. Server Initiated Select this option if you want to ensure that the server initiates HTTP communication for requests over a given size. See Server-initiated HTTP communication through agent relays. -
Click Save.
 See also:


