Resolve conflicting item revisions
In the desktop client, resolve conflicting item revisions if you have received an email notifying you of conflicts when merging projects. You can resolve conflicts manually or automatically.
Note: This operation is not available for streams.
Resolve options
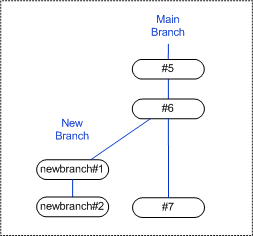
Item revisions in the same project may conflict when the same item revision has had more than one new item revision created from it, thus creating a branch in its update history.
For example:

In this diagram above, revisions newbranch#2 and #7 conflict because they both have a common ancestor, revision #6. To have only one current latest version of that item in the project, you need to merge the differences between these two revisions into one.
Dimensions CM can automatically resolve such conflicting revisions, provided there are no conflicts with file contents. A conflict occurs where a line has been added, deleted, or changed differently between the versions. Dimensions CM doesn't choose which of the conflicting lines to include in the merged revision, so you must manually select it.
The Resolve option in the desktop client searches your selected project for conflicting item revisions. You then have the following options:
-
Run the merge tool manually to resolve conflicting lines in the file content for individual items.
-
Auto resolve the differences between the files for a selected item. Dimensions CM attempts to automatically resolve the differences and, if successful, merges the changes and creates a new revision.
-
Auto resolve the differences for all the conflicting item revisions in the project. Dimensions CM attempts to automatically merge each conflicting item to create a new revision, and lists any that it is unable to resolve. You can then select and resolve each of these by manually opening the merge tool.
Manually resolve item revision conflicts
If there are items with conflicting lines, versions of a line that differ between different derivatives, you need to resolve them manually.
For manual file merging, Dimensions CM opens the merge tool. For details, see Use merge tools.
PRIVILEGES: Add Item Revisions to Project, Remove Item Revisions from Project.
To manually resolve conflicts between item revisions:
-
In the desktop client, in a project containing conflicting item revisions, select one or more item revisions.
-
Select Item > Resolve Merge Conflicts.
-
In the Resolve Project Merge Conflicts dialog box, select the item specification and click Resolve.
-
On the General tab, from the Item Revisions list select the item revisions to merge.
-
(Optional) Select a New Named Branch and enter a New Revision value to override the default values.
-
Select the Options tab and specify the following if required:
Request ID Enter the name of the related request, or click the browse button and use the Find dialog box to find it. Status Select a status from the list. Reason for Item Merge Enter a comment for the merge. -
Select the Attributes tab, and enter or select values. Attributes in bold are required. Attributes in italics cannot be modified.
-
Click OK. The merge tool opens.
-
Resolve all the conflicting lines between the files.
-
When you have completed the merge, close the merge tool. You are returned to the Resolve Project Merge Conflicts dialog box.
-
Repeat the procedure for each item in the Conflicting Revision Item Specifications list.
To automatically resolve item revision conflicts:
-
Do one of the following:
-
For a project containing conflicting item revisions, select the top-level folder and. select Project > Resolve Merge Conflicts.
-
For items related in response to a request, select the request and select Request > Resolve Merge Conflicts.
-
For a subfolder within a project, right-click the folder in a project folder tree, and select Resolve Merge Conflicts.
-
-
In the Resolve Merge Conflicts dialog box:
-
If you have selected a project subfolder, and you want to include items in its subfolders, select Include items related to sub folder.
-
If you have selected a request, and you want to include items related to its child requests, select Include items related to child requests.
-
-
To automatically resolve one of the conflicting items, select the item specification and click Auto Resolve.
To automatically resolve all the conflicting items, click Auto Resolve All.
If Dimensions CM is able to automatically resolve the conflict, the items are removed from the Conflicting Revision Item Specifications list.
-
If a conflict cannot be resolved automatically, the merge tool opens, where you can manually resolve the conflict. Resolve all the conflicting lines between the files, complete the merge, and close the merge tool.
In the Resolve Project Merge Conflicts dialog box, the item is removed from the Conflicting Revision Item Specifications list.
-
Repeat step 4 for each conflicting item.
 See also:


