
Share this page


Run a load test
After you configure a load test, you schedule its run time, preview the settings, and initiate the run.
In this topic:
Schedule a test run
Schedule a test to run on a specific date and time. The most up-to-date test settings are used when the test is launched.
Note: You can schedule a test only when the Run test button is available.
To schedule a test:
- From the Load tests tab, click Test scheduler
 in the sidebar.
 -
Click the Add a schedule button
 . You can configure up to 50 schedules for a load test.
 - From the date picker, select a date to run the test.
- From the time picker, specify a time to run the test.
-
Turn on the Active switch to apply the schedule.
The Schedule On button
 appears in the cart section indicating that a schedule is set for this load test.
Tip: In the Load tests page, a test with a set schedule has the Scheduler icon ![]() displayed in the Name column.
displayed in the Name column.
Timeline pane
The Timeline pane displays the timeline for the selected schedule and for any other schedule in the project that overlaps with the selected schedule.
If the current project uses global licenses (that is, it does not have dedicated licenses assigned to it), then schedules from other global license projects that overlap with the selected schedule are also displayed.
The timeline is colored according to its status, as follows.
| Status | Description |
|---|---|
|
|
This schedule is inactive. |
|
|
There are no conflicts and this schedule should run as planned. |
|
|
This schedule impacts another schedule causing it to breach your license count. However, this schedule should still run as planned. |
|
|
This schedule breaches your license count and might not run. |
Note: The Timeline pane is only displayed for tests whose license mode is set as VU. It is not displayed for load tests configured for the Iterations or Goal Oriented run mode.
Scheduled runs pane
The Scheduled runs pane displays a list of previously scheduled runs and their launch status.
| Status | Description |
|---|---|
| Launch status |
Displays the test launch status (Launched, Failed to launch). If the test was launched successfully, click the run ID to view results. |
| Scheduling error |
If the test was not launched successfully, provides a description of the error. Troubleshooting failed launches:
|

Run setting previews
You can preview your run settings in the Run Preview window, which shows test run details such as:
-
How load generators are allocated (both cloud and on-premises).
-
How scripts are distributed across load generators.
-
The number of Vusers allocated to each load generator per script.
-
The number of dedicated IPs for cloud-based load generators required and allocated for the test run.
If a potential error is detected, it alerts you when you open the window, even before you run the test. Knowing this information helps you better understand your test runs and allows you to run load tests more efficiently.
To view a short demo, see Load test setup demos.
To show the run preview:
-
On the Load tests page, click a test.
-
Click Run preview. The Run preview window shows the Vusers Distribution grid. If dedicated IPs are enabled for your tenant, the preview information is provided in separate Vusers Distribution and Dedicated IPs for load generators tabs.
-
You can expand the Group by list to choose the way in which to group the information.
Vusers Distribution grid
The Vusers Distribution grid lets you see if Vusers were distributed evenly over the cloud generators. An unbalanced distribution may help you understand why CPU alerts occurred on certain load generator machines.
In addition, this grid lets you verify the changes that you may have made to a test's settings. For example, if you adjusted the distribution locations or if you selected a different on-premises load generator, the run preview lets you see its impact on the load distribution.
The grid shows the load generator vendors, their locations, the scripts that are used in the load test, and the number of Vusers running on the load generator.

Dedicated IPs for load generators tab
The Dedicated IPs for load generators tab lets you see how many dedicated IP addresses for cloud-based load generators are required for your test. This tab is only displayed when you have enabled Dedicated IP addresses for cloud-based load generators in your tenant. If it is not enabled, submit a service request.
For details about dedicated IPs, see Dedicated IP addresses.
A warning symbol indicates that there is an insufficient number of allocated IPs. Hover over the warning symbols to show the number of missing IPs for each load generator.

Run the test
After you configure all of the settings, you are ready to run the load test.
Note:
-
An on-premises load generator can only be used by one running test at a time.
-
The number of Vusers defined in your test cannot exceed the maximum number of Vusers defined in your Vuser license.
-
The run engine waits for all Vusers to be provisioned before running the test. If some Vusers are not provisioned after the default waiting period, it starts running the test if at least 95% of the Vusers have been successfully provisioned. For further information, submit a service request.
To run the test:
-
Verify the following.
- You have set up the monitors and data streaming integrations that you want to run with your test. For details, see Monitors and Time series database streaming.
-
All defined server monitors are accessible so that the test can be monitored and results can be displayed in the dashboard.
-
Click Run preview to review the Vuser distribution and make sure that it is correct. For details, see Run setting previews.
-
Check the Run Configuration Summary toolbar in the banner to make sure that all other setting are correct.
-
Click Run test.
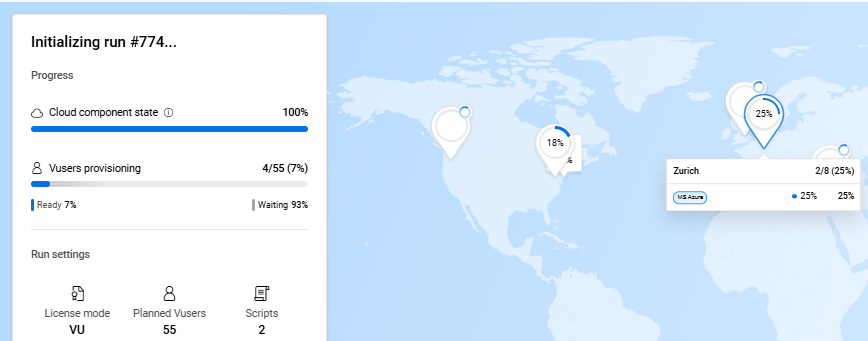
An Initializing pane and a distribution map open. The Initializing pane shows the progress of cloud component deployment and Vuser provisioning. It also shows the Run settings, such as the run mode, number of scripts in the test, and the planned duration.
The map shows the progress for each selected location. To drill down further, hover over a load generator location to view its loading status in real time.

-
You can start a test manually, as soon as all the runtime control components are ready, and the predefined threshold for successfully provisioning Vusers is reached. This saves having to wait for all the planned Vusers to be ready.
-
To start a test manually, select Enable early test start in the top banner.
-
When all the runtime control components are ready and the required Vuser threshold is met, the Start now button becomes available. Click the button to start the run immediately.
Note:
- The default tenant threshold for successfully provisioning Vusers is 95%. However, someone from your team might submit a service request to set a different tolerance level to prevent tests from failing in case a small percentage of the Vusers are not provisioned.
-
Any Vusers that are not ready when the test is started are displayed as Failed Vusers. Depending on the protocol and the scheduling settings, you might be able to restart these Vusers using the Restart Vusers capability. For details, see Restart failed Vusers.
-
Early test start is also supported when using the Delayed start option in the Test settings page. If both of these options are in use, the delayed phase is started only after 100% of the Vusers are ready.
-
-
After the test starts running, the dashboard opens and displays the default metrics for your test run in real time. For details, see Dashboard.
During the test run, the dashboard's toolbar shows summary information such as the elapsed time and number of running Vusers.
-
If pause scheduling is selected in Test settings, you can pause the scheduling during the test run by clicking the Pause scheduling button on the toolbar. To resume the scheduling, click Resume scheduling. For details, see Pause scheduling during a test run.
-
To increase or decrease the number of running Vusers during a test run, click Change Load. For details, see Change the Vuser load dynamically.
Note: This feature is only enabled when all Vusers in all scripts are in Duration mode. If Vusers in at least one script are ramping up or ramping down, or a script finishes running, the change load capability is no longer available for the remaining scripts.
-
To end a test run before its completion, click Stop test, and select:
-
Stop now to stop the load test immediately. This terminates all Vusers without letting them complete the current iteration.
-
Stop gradually to stop the load test gradually. This enables all Vusers to finish current the iteration and the tear down before exiting.
Note: The Stop gradually option is not supported if at least one of your scripts is in Advanced scheduling mode. If you click this button anyway, your test will stop immediately.
-
For information about known issues relating to running load tests, see Load test limitations.
Restart failed Vusers
If some of the Vusers that were assigned to the test failed, you can re-run them using the restart Vusers capability.
When you run a test, the summary toolbar shows the number of failed Vusers. If the restart capability is available, the Failed Vusers gauge shows the Restart Vusers button ![]() when at least one Vuser failed to run.
when at least one Vuser failed to run.
Guidelines
-
To enable this option, submit a service request.
-
The restart Vusers capability is supported for:
- Tests running in Duration mode. For details, see Run mode.
-
Tests for which the restart process is not already in progress.
-
Tests with at least one script that is eligible to be restarted, according to the following criteria:
- Scripts configured with Simple or Manual scheduling. It is not supported for Advanced scheduling. For details, see Creating a load test profile.
- VuGen type scripts with the exception of DevWeb scripts. For details, see the VuGen protocols list in the Support Matrix.
- Vusers that are not in ramp up or tear down stage.
Note: For tests running on on-premises load generators (OPLGs), the OPLG versions must be 2022.03 or later.
To restart failed Vusers:
-
In the summary toolbar's Failed Vusers gauge, click the Restart Vusers button
 .
. -
In the Restart Failed Vusers window, select a Ramp up option, and then click Apply.
Option Description According to script Perform a ramp up based on the script configuration. All at once Disregard the script configuration and run all of the failed Vusers together.
 See also:

